Section 7
Instrument Setup and Use for the
Column Adaptor Plate
Preparing the Aurum manifold:
Tubing provided is 4 ft. long and must be cut in appropriate pieces
before proceeding.
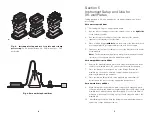
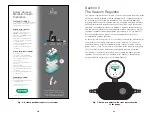
Vacuum set-up conditions (please see Figure 3, page 4).
1.
Cut tubing into 3 pieces of appropriate length.
2.
Use one piece of tubing to connect the vacuum source to the
right
side
of the vacuum regulator.
3.
Use another piece of tubing to connect the left side of the vacuum
regulator to the sidearm of the filter flask.
4.
Place a rubber stopper
with hole
into the mouth of the filter flask.
Insert a serological pipette (or comparable) into the hole of the
stopper.
5.
Finally, use the last piece of tubing to connect the filter flask to the
nozzle of the manifold.
Note:
The Aurum vacuum regulator is strongly recommended to
enable full control of the negative pressure within the manifold.
Vacuum purification conditions
6.
Insert the CAP (luer ends up) into the depression in the vacuum
manifold top. Ensure that the CAP rests evenly on the gasket.
7.
Close the unused luer fittings with the caps provided. Close caps by
rotating clockwise until light resistance is encountered. Excessive
tightening of a cap may cause the luer fitting to dislodge when the
cap is removed.
8.
Insert the luer ends of the desired Aurum columns into the available
luer fittings, ensuring a tight fit. The manifold is now ready for
column processing according to the vacuum protocol of the
appropriate column purification kit.
9.
After finishing the purification, rinse the CAP and Aurum vacuum
manifold with distilled water, and air-dry or wipe with paper towels.
Vacuum elution conditions
10. When ready to elute, proceed with the appropriate spin elution step as
recommended by the protocol.
11. After finishing the elution, rinse the Aurum vacuum manifold with water,
and air dry or wipe with paper towels.
9
8


