


08
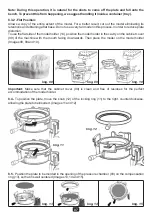
8.6
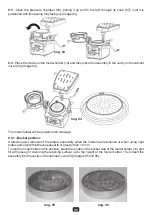
- Position the plate's locking ring (11) in the pressure chamber opening (03), observing that its knob
(12) and diametrically opposite pin match the pressure chamber slots (Images 16 and 17).
8.7
- Press the locking ring (11) against the pressure chamber (03) using its handle and pin as a guide
and turn it to the left clockwise, locking the plate. (Image 18).
Img. 16
Img. 17
Img. 18
Img. 19
Img. 20
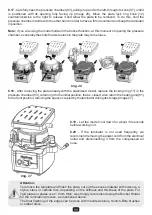
Attention:
It is important to hold with one hand, through
the knob (07), the pressure chamber (03), in
order to keep the set firm when the plate is
locked.
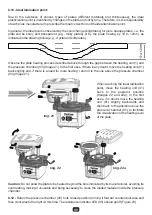
8.8
- Move the pressure chamber (03) backwards until it reaches its end of course and partially return
the heating unit (01) aligning it on the pressure chamber (03). In this position it will be possible to feel a
"click" (Images 19 and 20).
8.9
- Turn on the main switch (06), thus starting the hob heating process. The blue light of the main
switch (06) and the red light of the resistance indicator LED (05) will light up indicating that the
equipment and the resistance will be on.
Attention:
If the pressure chamber (03) is not in the correct position for heating and its lock (08)
is not in the unlocked position, the resistance indicator LED (05) will not light up and
the hob will not be heated.