Binatone Carrera C350 Скачать руководство пользователя страница 71


71         

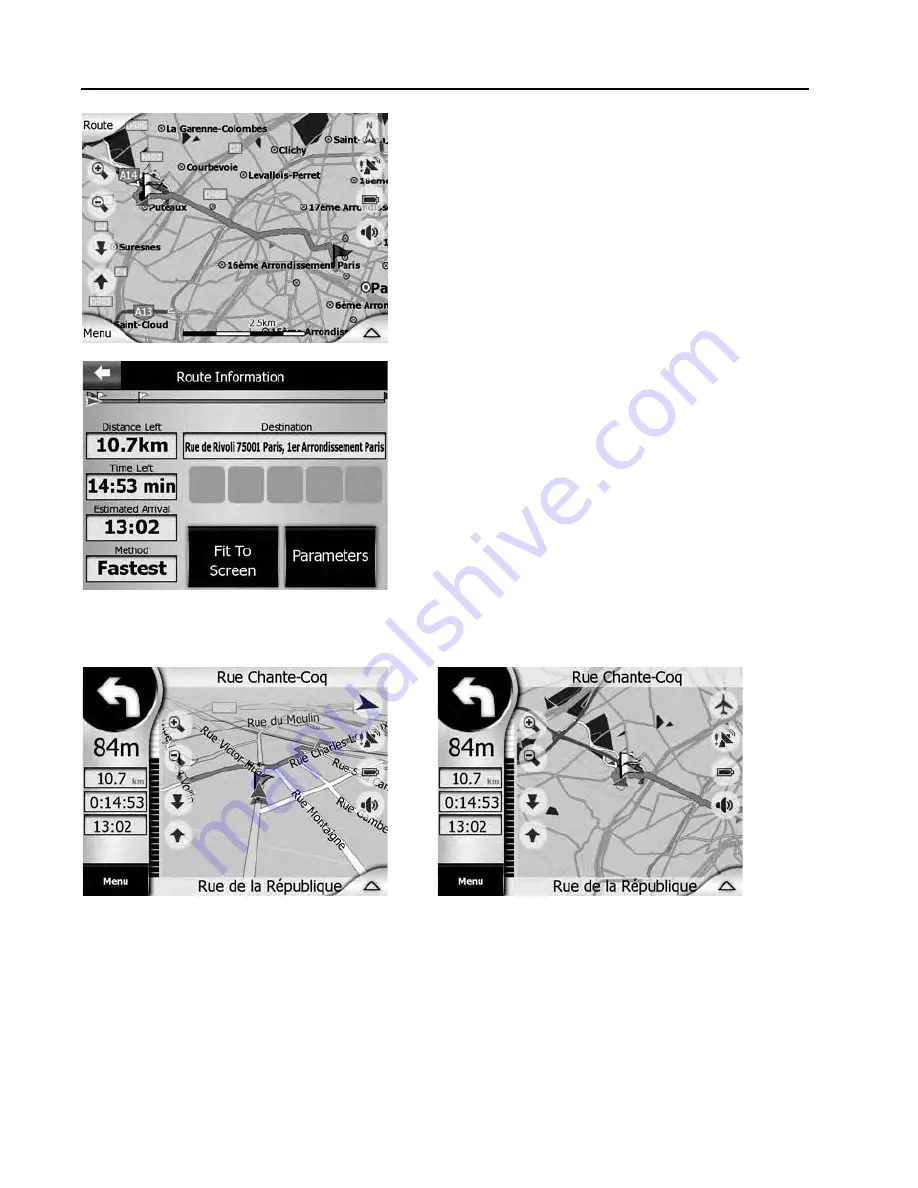
9. Total Route Map View

The map view with the entire route contains a
blue flag for your starting position, two white flags
for the two waypoints and one red flag for your
destination.

10. Route Information

Before you go, read the Route Information (Menu

=>

 Route 

=>

 Info). Here you can see a summary

of information on your route. The straight route
segment on top shows two waypoints.

Start (bottom left): detailed graphical
representation of the first manoeuvre (turn
right) with distance (84 m) to the manoeuvre.

If no critical items exist along the route
segment, the map automatically toggles to
Overview mode (see figure below).
At the same time, a voice will guide you.

MAIN ELEMENTS

Содержание Carrera C350

Страница 1: ...user guide C350 G52 56511X1...

Страница 2: ...your computer and the internet updates are payable Unpacking your Binatone Carrera C350 In the box you will find z GPS navigation device z Car mounting kit z In car charger z USB cable z Stylus pen z...

Страница 3: ...D instructions when the road regulations allow you to do so When mounting the PND in your car make sure that it does not obscure your view or impede the operation of any driving controls Prohibited Ar...

Страница 4: ...Route parameter settings 35 Language Units 37 Advanced settings 38 FREQUENTLY ASKED QUESTIONS 75 Technical Specifications 6 Binatone Carrera CONTENTS 21 GPS Function INTRODUCTION 21 7 ACTIVE MAP ELEM...

Страница 5: ...the customer helpline Position of the controls 1 Power Button 2 SD Card Slot 3 Touch Panel 4 Menu Button 5 Indicator Light When it charges the red light will be on when fully charged the green light w...

Страница 6: ...ia the car charger in order to charge the battery Plug the USB cable or the car charger into the USB socket When you use the PND in your car we recommend that you always use the car charger in order t...

Страница 7: ...ternal Antenna Optional Additional maps and upgrade Please visit on www binatonecarrera com website for more information Switching On Off NOTE For the very first time using the unit you have to switch...

Страница 8: ...8 Press the Power Button for 3 seconds to turn the unit into Sleep Mode Press Power button for 5 seconds to wake up the device then display shows the status before entering Sleep Mode GETTING STARTED...

Страница 9: ...ing face towards you and the cut off corner at the bottom as shown Insert the card in and push it in so that it clicks in place Insert a SD card into the slot and you will see the message as below If...

Страница 10: ...cable to the mini USB port of the unit and plug the other end to your computer 3 The system will try to recognize and connect the device the display will show as the figure below 4 And now you can fin...

Страница 11: ...and jpeg formats only from a SD card 1 Copy all the pictures you want to view into the SD card 2 Insert the SD card into the slot In Photo thumbnails list tap on SD Card folder to enter 3 You will se...

Страница 12: ...gain to stop slideshow y Tap on button to set the slideshow interval among 2 3 and 5 seconds y Tap on button to mute the touch tones y Tap on button to adjust the touch tones Rotate Tap on button to r...

Страница 13: ...on the button to zoom out When the photo is zoomed in you can tap and drag it to view the part you need y Tap on button to restore the photo Note when the zoom in or zoom out limitation is met the zo...

Страница 14: ...st to find out the other options Note when there is no option above below the button will become in gray color and not selectable Volume Press Volume you can modify the volume level of the voice promp...

Страница 15: ...imum brightness level is met the level down level up button will become in gray color and not selectable Backlight Timeout Select an option to set idling time to shut down the display to save battery...

Страница 16: ...Follow the on screen directions to tap on the center of the cross to calibrate When the steps are done you will see the second figure tap on screen to save and apply the new calibration GETTING START...

Страница 17: ...your need Power Status Enter this filed to know the battery status While charging the status will be in motion and noted Charging If the battery is fully charged and the USB cable is still connected...

Страница 18: ...restore the settings to default values When necessary tap on Restore item to enter Tap on button to restore all the setting values After the procedure is done the Finished message will prompt Or tap o...

Страница 19: ...vice and Storage Devices The Devices page shows information about your software versions and capacity of the embedded memory Storage The Storage page tells the total capacity and free capacity of your...

Страница 20: ...memory card during upgrading Note 4 please visit on www binatonecarrera com website for more information 1 Download the firmware file from our website Uncompress the file and copy it to a SD MMC memo...

Страница 21: ...It is also important that you look at the display only if it is absolutely safe to do so y You should always observe traffic signs and road geometry before obeying instruction from Carrera is embedde...

Страница 22: ...ttery Status indicator 3 Button to open Cockpit screen 4 Button to open Find menu 5 Button to open Settings 6 Button that displays GPS Status and opens the GPS Data screen 7 Button to shut down and ex...

Страница 23: ...to open this screen The About screen is not used in normal navigation It is there to inform you about the map licenses you have the creators of Binatone Carrera Map Screen Cockpit Screen and the legal...

Страница 24: ...rack up and Overview 11 GPS position quality Opens GPS Data screen 12 Battery status Opens settings 13 Sound on or muted Enables disables muting 14 Track Log recording or playback Opens Track Logs scr...

Страница 25: ...eturn the zoom control to Smart Zoom You can also set Binatone Carrera No 4 5 Tilt up and down These semi transparent buttons are only displayed if Zoom Tilt is enabled in the Quick menu This function...

Страница 26: ...osition is available the Follow button will appear indicating that you have disabled Lock to Position Tapping the Follow button will re enable the position lock and move the cursor back to the current...

Страница 27: ...Similarly to the icon found on the GPS Data screen Page 34 the map screens also inform you about the GPS signal The black satellite dish with the red exclamation mark shows there is no connection wit...

Страница 28: ...it is available and Lock to Position is enabled When you tap the screen to place the Cursor the Cursor menu pops up automatically to give you the list of possible functions you can use the Cursor for...

Страница 29: ...s near the cursor this button is inactive and you can change the parameters of the camera by tapping it in the list No 16 Current street This field of the Cockpit screen shows the name or number as av...

Страница 30: ...e settlement where this next street is Binatone Carrera will display the name of eet A bullet symbol will appear next to the name This field is only displayed when navigating a route No 20 Approaching...

Страница 31: ...set a new destination or change the settings When you disable Safety Mode Set Favourite Destinations You can select two of your most frequent destinations to be your favourites You can start navigatin...

Страница 32: ...to enable and fine tune user alerts A new window opens with the options Warn When Speeding Maps may contain information about the speed limits of the road segments Binatone Carrera is able ion may not...

Страница 33: ...t Warning at 40 km h 50 km h 40 km h 10 km h 60 km h 70 km h 60 km h 10 km h 90 km h 100 km h 90 km h 10 km h 100 km h 105 km h 100 km h 5 120 km h 126 km h 120 km h 5 160 km h 168 km h 160 km h 5 Map...

Страница 34: ...to mute all Binatone Voice guidance volume switch The switch on the left can turn on or mute Binatone Carrera s audible guidance When turned on the In its leftmost position the voice guidance is supp...

Страница 35: ...Setting it to Single Tone will initiate a single attention tone before the instructions while Double Tone will use a double tone Route parameter settings This is a very important page Settings here de...

Страница 36: ...program assumes that high speeds cannot be achieved and this information is taken into account when calculating the route the estimated time enroute ETE and the estimated time of arrival ETA Availabl...

Страница 37: ...l more to avoid paying a toll disabling them will make Note You have a few more ways to influence routing and route recalculation in Advanced settings Route options Language Units Here you can set the...

Страница 38: ...ters They all open new windows where you can make your desired changes Display options These settings determine how Binatone Carrera displays different content elements or how it 2D in Map mode and No...

Страница 39: ...at least a significant part of it around its centre Selecting a POI a junction or an exact address will give you a closer look with only a few streets on the display Coordinate display format Position...

Страница 40: ...st a usual automatic zoom While navigating a route when approaching a turn it will zoom in and raise the view angle to let you easily recognise your manoeuvre at the next junction If the next turn is...

Страница 41: ...ed The map will still follow your position but will not change the view parameter you have modified You can return to the full Smart Zoom mode by tapping the Follow button If you move the map all part...

Страница 42: ...ot done so When the GPS reception is poor e g driving in an urban environment with a low sensitivity GPS occasional wandering called position fluctuation of the calculated GPS position is likely Altho...

Страница 43: ...POIs and track logs of your holiday look for the backup file on the memory card rename it or save it to your PC Tip If you move to another PND or PDA and you wish to keep your data and settings make a...

Страница 44: ...you lose all your saved data and customised settings Binatone Carrera will warn you about this Reset Advanced Settings There are a multitude of Advanced settings in Startup minimised Here you can set...

Страница 45: ...rner This menu item will appear instead of Add POI and is only available in map mode if at least one POI is located near the cursor Add POI POI opens a new POI data window allowing you to add customis...

Страница 46: ...ng Hide The disabled category Transportation is greyed out the other categories are enabled and appear in blue Good to Know For a very detailed description of POIs see the menu Find POI see page 95 Cr...

Страница 47: ...ulation based on the same settings as before This option is to be used when the automatic Off route recalculation has been disabled You can use this function while driving parallel to a suggested rout...

Страница 48: ...ption Avoid As soon as you reach your destination the route will be deleted But while planning a route all roads manoeuvres and places that you had avoided in the previous route will also be avoided T...

Страница 49: ...ng the route These events will appear in the manoeuvre preview and will be announced along with audible events Route Summary Tap on Mode once again to obtain a route summary that lists only the major...

Страница 50: ...a specific road MyGuide recalculates the route without this road This function is very useful for going around traffic jams or when you have heard a traffic message broadcast announcing that the road...

Страница 51: ...e selected route Warning the program will delete it without prompting you Optimise This will optimise the waypoint order Up and Down these buttons allow you to sort the list by moving the selected ite...

Страница 52: ...when you have been using the option Avoid Once you have reached your destination the route line will disappear from the map and the navigation is cancelled At this point the route is erased however wh...

Страница 53: ...es to Cockpit view and starts navigating Direct Selection on the Map You can also set the destination by using the map Just browse to your destination and tap on it to start navigation 1 Map View Choo...

Страница 54: ...Route Tap Route To to activate the route you have just entered 5 Start Toggle to Cockpit view to start 6 Route Information Under Route Information you can view the most important details of your jour...

Страница 55: ...ct destination address History Here you can choose from a list of destinations routes and activate them Coordinates Here you can enter the geographic coordinates of your destination or any point Point...

Страница 56: ...ecent Destinations or select a different city via Other City in the top right 3 Other City If your destination is located in your country enter the name of the city via the keypad If this is not locat...

Страница 57: ...ed a few letters of your destination a city list will appear Here you can browse the search results and also view the Outskirts belonging to a selected highlighted city see the button in the lower lef...

Страница 58: ...10 Enter the Street Number Tap Keys to toggle to the numeric keypad Here you enter the street number For Via 15 Novembre the street numbers 1 to 27 are available If you don t know the street number se...

Страница 59: ...destination includes all data post code city street and street number as well as coordinates Tap the desired destination and the view will change 2 Destination View and Info to the destination view wi...

Страница 60: ...ollowing warning may appear For instance this can happen if you have selected a vehicle Car Lorry etc under Settings Route Settings but the destination lies in an area reserved for pedestrians only 1...

Страница 61: ...position to the cursor position 3 Select the Destination In this example we select the Cathedral in Cologne 4 Coordinates Window The Coordinates window shows the longitude N S and latitude E W of the...

Страница 62: ...es If you know the geographic coordinates of your destination enter the latitude in the left window and the longitude in the right window The E W switch toggles between latitude East East of Greenwich...

Страница 63: ...position if available Otherwise it is the the cursor if no accurate GPS tracking is available 3 POI Location To change the reference point tap Change ref In the upper right hand corner of the screen...

Страница 64: ...ordinates via the keypad to search for nearby POIs 6 History If you select Recent Destinations select a destination from the list to search for nearby POIs 7 New POI Reference For example the upper ri...

Страница 65: ...the selected destination 9 Search When tapping a main category like Shopping the corresponding sub categories appear The active sub category will be highlighted Tap the Search button in the lower left...

Страница 66: ...distance from your reference point the closest appears first 13 Main Category When tapping the main category 14 Sub categories a list of groups belonging to the main category appears Enable one of the...

Страница 67: ...ap OK to confirm your selection 17 Start The program starts navigating 18 Route View Under Route menu Itinerary you can view route segments In this example it is the final route segment 19 Recent Dest...

Страница 68: ...e on the screen to start navigating to a favourite destination 2 Home Work You can add an address for each of these two favourites To enter the address for Work tap Change address 3 Entering the Work...

Страница 69: ...ate the street in the database 3 Enter the Street Number Next to the House Number field you ll find a list of street numbers contained in the database 4 Start Navigating As you have defined your desti...

Страница 70: ...and the pharmacy will be saved as a waypoint Don t tap Route To otherwise you ll delete your route to the destination 7 Refreshing the Map View with Waypoint The waypoint will be marked by a white fla...

Страница 71: ...te Information Menu Route Info Here you can see a summary of information on your route The straight route segment on top shows two waypoints Start bottom left detailed graphical representation of the...

Страница 72: ...econd Waypoint The second waypoint along your route leads you to the petrol station 13 Route Information Read the Route Information for the last route segment Menu Route Info Here you can see a summar...

Страница 73: ...oundabout The graphic representation on the top left indicates that you have to take the seventh exit roundabout icon with a 7 in the centre 15 Arrival at Destination Only 160 m left to destination Th...

Страница 74: ...enable the route from the cursor position to the destination As you have no GPS reception and didn t enter you destination via Find and Go the route will not be activated automatically 3 Inserting Way...

Страница 75: ...e would like to inform our map data provider Please let us know via www binatonecarrera com I am experiencing problems getting a GPS fix If you have problems getting a satellite fix with GPS you can s...

Страница 76: ...hone Jack x 1 Integrated 0 8 W Speaker Power 1000mAH 3 7V Li polymer battery Battery Life 3 hr for GPS Input Stylus Interface USB 1 1 Digital frame Digital photo stored in SD card should be displayed...

Отзывы: