background image

BGS technic KG

Bandwirkerstr. 3

D-42929 Wermelskirchen

Tel.: 02196 720480

Fax.: 02196 7204820

[email protected]

www.bgstechnic.com

© BGS technic KG, Copying and further use not allowed

OPERATE 

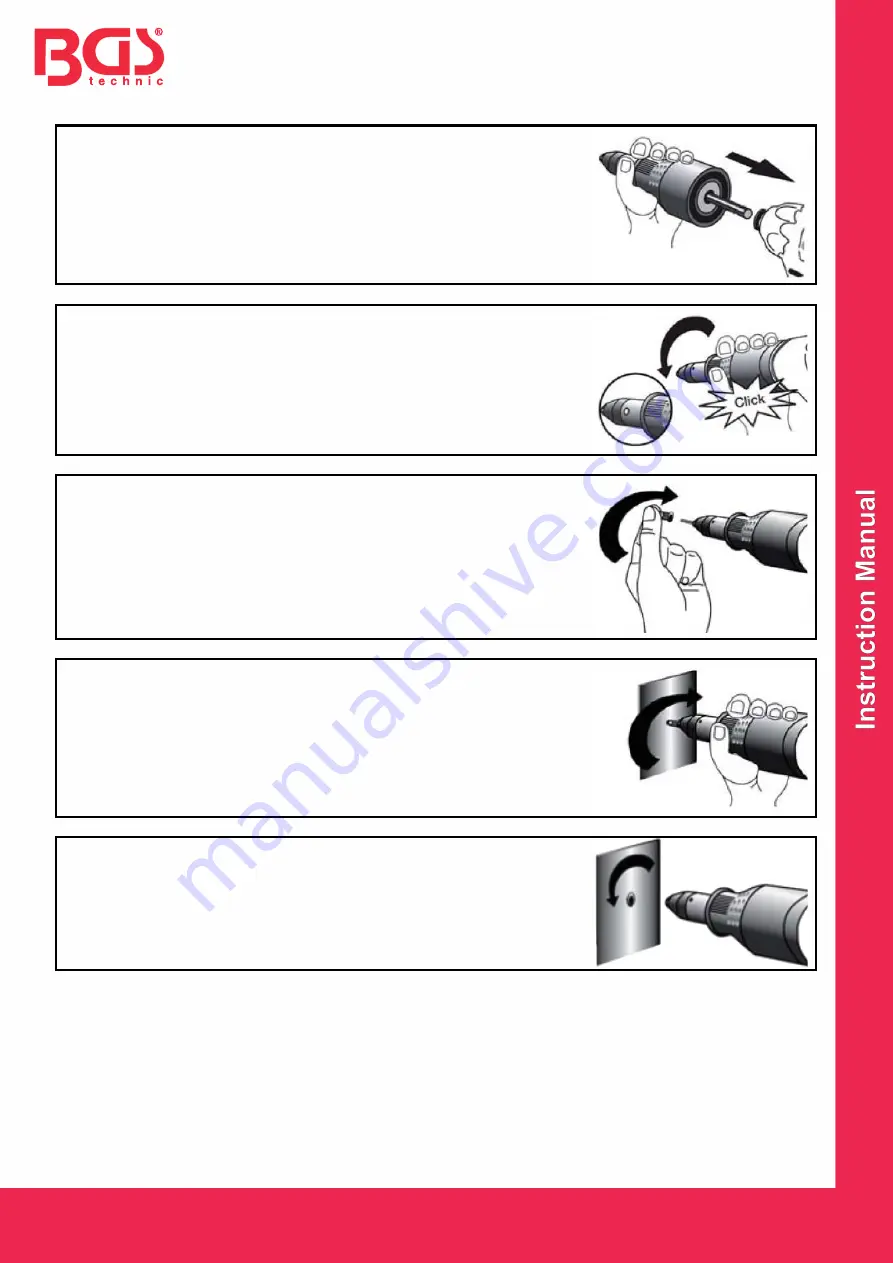
1.  Install the equipment into the spindle recess of the drill/driver as a 

bit or into the chuck of the driving tool. You may need to adjust the 
torque for different size thread nuts


2.  While holding the equipment fast, start the driver anticlockwise. 

Keep holding the equipment while the drill slowly turns until you 
hear it click as the sight window is closed


3.  Choice the required pulling bolt and nosepiece for the nut size. 
4.  Mount the threaded mandrel and the nosepiece to the rivet nut 

attachment device.  

5.  Mount the rivet nut onto the threaded mandrel


6.  Set the drilling machine to the clockwise direction, make sure the 

speed should not be too high. 

7.  For riveting, the device must be firmly pressed onto the workpiece. 

When riveting, hold the drill and the rivet nut attachment with both 
hands. Start the drilling machine to clockwise direction until the 
riveting process is completed


8.  After the riveting process is finished, set the drilling machine to 

slowly counterclockwise direction and remove the tie bolt from the 
rivet nut


Maintenance and Cleaning 

Before cleaning or maintaining, first disconnect the plug from power mains and make sure the driving tool 
cannot get started inadvertently.  
Do not clean the rivet nut riveter with sharp detergents or aggressive chemicals. 


Disposal 

Tool, accessories, and packaging should be sorted for environment-friendly recycling. 
If your tool can no longer be used, then please keep in mind that many of its components consist of 
valuable materials, which can be recycled. Please do not dispose it in the rubbish bin, but check with your 
local council for recycling facilities in your area. 

Содержание BGS 407

Страница 1: ...setzt werden Dieses Produkt ist nicht f r gewerbliche oder industrielle Anwendungen bestimmt sondern nur f r den privaten Gebrauch GER TEBESCHREIBUNG 1 Sechskant Antriebwelle 2 Geh use 3 Zugbolzen M3...

Страница 2: ...Zum Nieten muss das Ger t fest auf das Werkst ck gepresst werden Halten Sie beim Nietvorgang die Bohrmaschine sowie den Nietmutternaufsatz mit beiden H nden fest Starten Sie die Bohr maschine im Rech...

Страница 3: ...oduct is not intended for commercial or industrial applications it meant for private use only TOOL DESCRIPTION 1 Hexagon drive shaft 2 Housing 3 Threaded mandrel M3 M4 M5 M6 4 Sight window 5 Nosepiece...

Страница 4: ...the speed should not be too high 7 For riveting the device must be firmly pressed onto the workpiece When riveting hold the drill and the rivet nut attachment with both hands Start the drilling machin...

Страница 5: ...ais uniquement un usage priv DESCRIPTION DE L APPAREIL 1 arbre hexagonal 2 corps 3 boulons de traction M3 M4 M5 M6 4 orifice d observation 5 embout M3 M4 M5 M6 6 cl de montage CONSIGNES DE S CURIT 1 C...

Страница 6: ...ez la perceuse ainsi que le mandrin river des deux mains lors du processus de rivetage D marrez la perceuse avec une rotation droite afin de terminer le rivetage 8 Une fois le processus de rivetage te...

Страница 7: ...be utilizarse como se describe en estas instrucciones para colocar tuercas remachables de los tama os M3 M4 M5 M6 Este producto no est dise ado para uso profesional o industrial sino solo para uso par...

Страница 8: ...ci n 6 Coloque el taladro en giro a la derecha el n mero de revoluciones no debe ser demasiado alto 7 Para el remachado la herramienta debe presionarse firmemente sobre la pieza de trabajo Durante el...

Отзывы: