16
Instructivo de ensamble
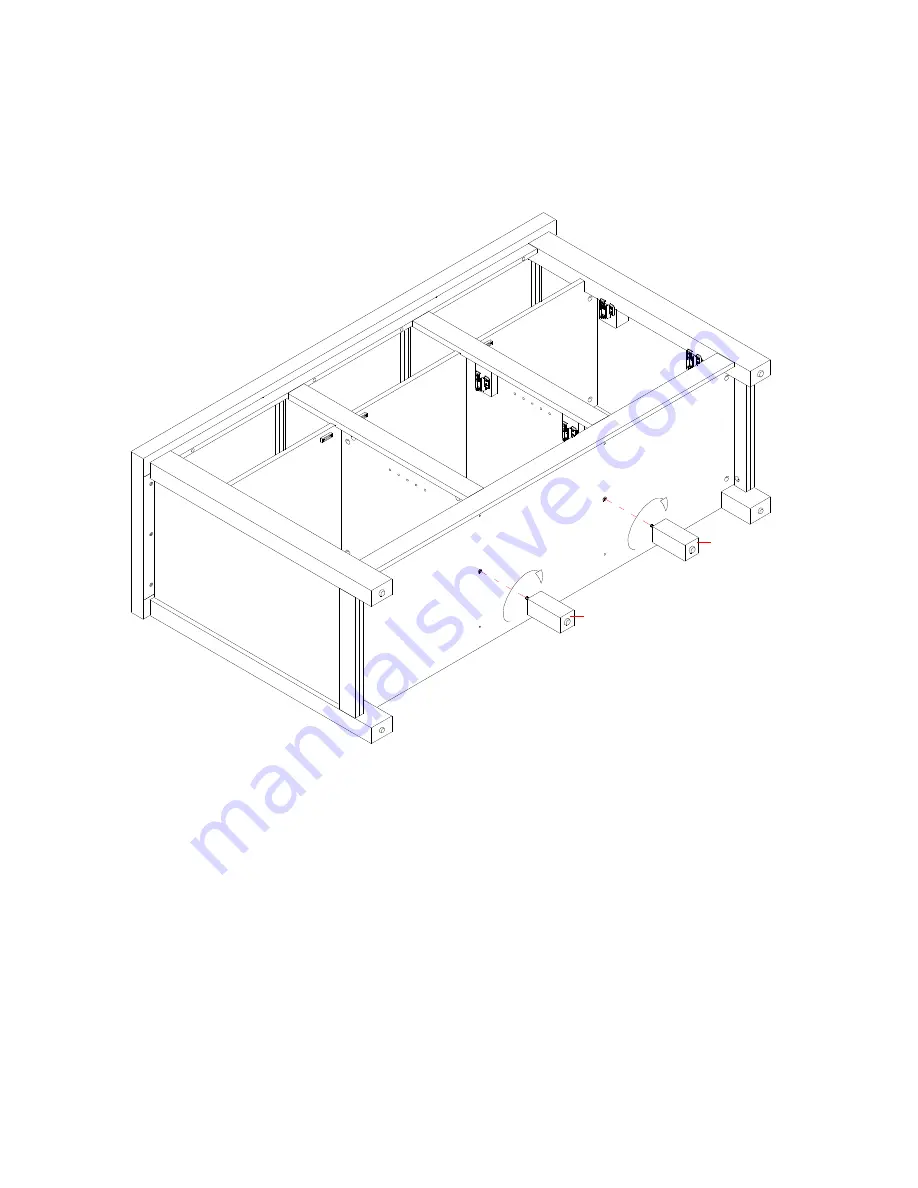
16.
Atornillar 2 soportes centrales (P) en los insertos roscados del panel inferior (E).
E
P
Страница 1: ...embly or if parts are missing DO NOT return this item to the store where it was purchased Please call our customer service number and have your instructions and parts list ready to provide the model n...
Страница 2: ...LOAD 50 lb 22 6 kg FITS UP TO MOST 70 FLAT PANEL TVs MAXIMUM LOAD 135 lb 61 2 kg PLACE TV BEHIND THE STOPPER THIS UNIT IS NOT INTENDED FOR USE WITH CRT TVS USE ONLY WITH FLAT PANEL TVS AND AUDIO VIDEO...
Страница 3: ...CAM LOCK SYSTEM OPERATION HOW THE KNOCK DOWN KD ASSEMBLY SYSTEM WORKS 1 Screw Cam Bolt into the pre drilled small holes on panel Connect both panels together making sure Cam Bolt goes into pre drilled...
Страница 4: ...Side Frame Qty 1 D Fixed Shelf Qty 1 E Bottom Panel Qty 1 F Upper Partition Panel Qty 2 G Left Lower Partition Panel H Right Lower Partition Panel I Top Front Stretcher Qty 1 Qty 1 Qty 1 J Bottom Fron...
Страница 5: ...1 extra 4 M4 x 38 mm Screw 5 M4 x 50 mm Screw 6 M3 5 x 15 mm Flat Head Screw Qty 4 1 extra Qty 8 1 extra Qty 6 1 extra 7 M3 5 x 15 mm Washer Head Screw 8 Door Stopper 9 Shelf Pin Qty 32 1 extra Qty 3...
Страница 6: ...d parts listed Assembly the unit on a carpeted floor or the empty carton to avoid any scratch 2 Securely screw the Cam Bolts 2 into the designated small holes on the Top Panel A the Side Frames B and...
Страница 7: ...ll holes on the Fixed Shelf D 4 With the pilot holes as a guide fasten three Door Stoppers 8 to the Fixed Shelf D using two 15 mm Flat Head Screws 6 per stopper 2 D 6 8 Cam Bolt 4 used in this step Do...
Страница 8: ...se a small amount of glue with both ends of all dowels 6 Align the drilled holes on the Top Front Stretcher I with the inserted Wood Dowels 3 on Top Panel A and then press them together Secure the Top...
Страница 9: ...ith the pilot holes as a guide attach two Upper Partition Panels F to the Fixed Shelf D with four 30 mm Wood Dowels 3 and four 50 mm Screws 5 5 5 5 5 D F F 3 3 Wood Dowel 4 used in this step M4 x 50 m...
Страница 10: ...sembly Instructions 8 Attach the Lower Partition Panels G and H to the Fixed Shelf D with four 30 mm Wood Dowels 3 and four Cam Locks 1 Wood Dowel 4 used in this step Cam Lock 4 used in this step 1 3...
Страница 11: ...tructions 9 Attach the Bottom Panel E to the Lower Partition Panels G and H with four 30 mm Wood Dowels 3 and four 50 mm Screws 5 G H E 5 5 5 5 3 3 Wood Dowel 4 used in this step M4 x 50 mm Screw 4 us...
Страница 12: ...bly Instructions 10 Attach the Bottom Front Stretcher J to the Bottom Panel E with two 30 mm Wood Dowels 3 and three Cam Locks 1 E J 1 3 M8 x 30 mm Wood Dowel 2 used in this step Cam Lock 3 used in th...
Страница 13: ...nstructions 11 Attach the Middle Stiles K to the Partition Panels F G and H with two 30 mm Wood Dowels 3 and six Cam Locks 1 G F D H F K K 1 3 M8 x 30 mm Wood Dowel 2 used in this step Cam Lock 6 used...
Страница 14: ...oth ends Align the large holes on the Left Side Frame B with the inserted Wood Dowels 3 then press them together and fasten it in place by engaging five Cam Locks 1 13 Repeat the previous step to atta...
Страница 15: ...holes of the Side Frames B and C and Upper Partition Panels F 15 Ask for assistance to position the Top Panel A onto the inserted Wood Dowels 3 and attach it in place by engaging eight Cam Locks 1 Wo...
Страница 16: ...16 Assembly Instructions 16 Tightly screw two Center Supports P into the threaded inserts on the Bottom Panel E E P P...
Страница 17: ...p keep the unit square 18 Unfold the Back Panel Q and lay it to the back of the assembled unit Make sure the margins along all edges of Back Panel are equal Screw the 15 mm Washer Head Screws 7 into t...
Страница 18: ...n the hinge arm under the bolt head on the back of the hinge base Make sure that both door hinges engage and function properly Tighten the bolt on the hinge base to lock the hinges in place 21 Repeat...
Страница 19: ...ure that you place the four Shelf Pins in the same level so the shelf is not tilted Tilt and rest the Adjustable Shelves L and M onto the Shelf Pins 24 Plug the Cam Lock Covers 10 onto the visible cam...
Страница 20: ...erly align the Stop Rail with the top edge of the stopper template on the front of the Top Panel A Press down on the Stop Rail to help adhesion 26 Carefully remove the stopper template from the Top Pa...
Страница 21: ...to the unit and the wall NOTE Young children can be seriously injured by tipping furniture You must install the Tipping Restraint Hardware with the unit to prevent the unit from tipping causing any ac...
Страница 22: ...keep your furniture in a climate controlled environment Extreme temperature and humidity changes can cause fading warping shrinking and splitting of wood It is advised to keep furniture away from dir...
Страница 23: ...e est faltante no retorne este producto a la tienda que lo compr Por favor llame a nuestro departamento de ayuda al cliente teniendo su instructivo y lista de partes para proveer el modelo nombre de p...
Страница 24: ...6 kg PARA TVs DE PANTALLA PLANA DE HASTA 70 CARGA M XIMA 135 lb 61 2 kg POSICIONE LA TV ATRAS DEL TOPE ESTA UNIDAD NO DEBE UTILIZARSE CON TELEVISIONES CRT O DE TUBO UTILIZARSE NICAMENTE CON TELEVISIO...
Страница 25: ...C MO FUNCIONA LA INSTALACI N DE MONTAJE KD 1 Fijar los tornillos de fijaci n en los orificios peque os Conectar ambos paneles cerciorandose que los tornillos de fijaci n entren bien y que estos queden...
Страница 26: ...Repisa fija Cant 1 E Panel inferior Cant 1 F Panel divisor superior Cant 2 G Panel divisor izquierdo inferior H Panel divisor derecho inferior I Soporte superior frontal Cant 1 Cant 1 Cant 1 J Soport...
Страница 27: ...nillo de M4 x 50 mm 6 Tornillo de cabeza plana de M3 5 x 15 mm Cant 4 1 extra Cant 8 1 extra Cant 6 1 extra 7 Tornillo cabeza de arandela de M3 5 x 15 mm 8 Tope de puerta 9 Perno de repisa Cant 32 1 e...
Страница 28: ...Ensamblar la unidad en un piso alfombrado o en el cart n vac o para evitar rasgu os 2 Colocar los tornillos de fijaci n 2 en los agujeros chicos designados en el panel superior A en los marcos lateral...
Страница 29: ...repisa fija D 4 Con los agujeros pilotos como gu a sujetar 3 topes de puerta 8 a la repisa fija D usando 2 tornillos de cabeza plana de 15 mm 6 por tope 2 D 6 8 Tornillo de fijaci n 4 usados en este...
Страница 30: ...dad de pegamento en ambos lados de los pernos 6 Alinear los agujeros perforados en el soporte superior frontal I con los pernos de madera insertados 3 en el panel superior A y presionarlos para juntar...
Страница 31: ...os pilotos como gu a Adjuntar 2 paneles divisores superiores F a la repisa fija D con 4 pernos de madera de 30 mm 3 y 4 tornillos de 50 mm 5 5 5 5 5 D F F 3 3 Perno de madera 4 usados en este paso Tor...
Страница 32: ...mble 8 Adjuntar los paneles divisores inferiores G y H a la repisa fija D con 4 pernos de madera de 30 mm 3 y 4 tuercas de fijaci n 1 Perno de madera 4 usados en este paso Tuerca de fijaci n 4 usados...
Страница 33: ...djuntar el panel inferior E al los paneles divisores inferiores G y H con 4 pernos de madera de 30 mm 3 y 4 tornillos de 50 mm 5 G H E 5 5 5 5 3 3 Perno de madera 4 usados en este paso Tornillo de M4...
Страница 34: ...e 10 Adjuntar el soporte inferior frontal J al panel inferior E con 2 pernos de madera de 30 mm 3 y 3 tuercas de fijaci n 1 E J 1 3 Perno de madera de M8 x 30 mm 2 usados en este paso Tuerca de fijaci...
Страница 35: ...juntar las molduras medias K a los paneles divisores F G y H con 2 pernos de madera de 30 mm 3 y 6 tuercas de fijaci n 1 Perno de madera de M8 x 30 mm 2 usados en este paso G F D H F K K 1 3 Tuerca de...
Страница 36: ...los agujeros grandes en el marco lateral izquierdo B con los pernos de madera insertados 3 luego presionarlos para juntarlos y sujetar en su lugar empleando 5 tuercas de fijaci n 1 13 Repetir el paso...
Страница 37: ...los marcos laterales B y C y en los paneles divisores superiores F 15 Pedir asistencia para posicionar el panel superior A sobre los pernos de madera insertados 3 y adjuntar en su lugar empleando 8 t...
Страница 38: ...16 Instructivo de ensamble 16 Atornillar 2 soportes centrales P en los insertos roscados del panel inferior E E P P...
Страница 39: ...Desdoblar el panel posterior Q y descansar en la parte posterior de la unidad ensamblada Asegurar de que los margenes en los bordes del panel posterior estan iguales Atornillar los tornillos cabeza de...
Страница 40: ...abajo de la cabeza del tornillo detr s de la base Asegurar de que las bisagras de puerta participen y funcionen correctamente Apretar los tornillos en la base para trabar las bisagras en su lugar 21...
Страница 41: ...os de repisa en el mismo nivel para que la repisa no est inclinada Voltear y descansar las repisas ajustables L y M en los pernos de repisa 24 Enchufar las tapas de las tuercas de fijaci n 10 sobre la...
Страница 42: ...el riel tope con el borde superior del templete del tope en el frente del panel superior A Empujar el riel tope para abajo para ayudar a la adhesi n 26 Retirar el templete del tope del panel superior...
Страница 43: ...adjuntar los topes de movimiento a la unidad y a la pared NOTA Ni os peque os pueden resultar lastimados por muebles inclinados Debe instalar el juego de restricci n de movimiento con la unidad en fun...
Страница 44: ...lduras que se contraigan o que la madera se raje Es recommendable mantener la unidad lejos del sol directo ya que puede da ar el acabado Cuidados adecuados y limpieza pueden extender la vida til de su...