background image

13

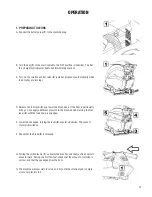
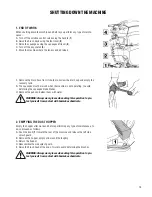
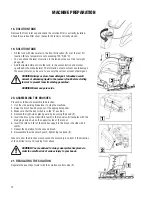
1. PREPARING TO WORK

A.  Connect the battery plug (

1

) to the machine plug

B.  Turn the key (

1

) of the main switch to the "ON" position (clockwise). The bat-

tery charge level indicator lights will immediately come on.

C.  Turn on the solution control valve (

2

) (solution dispenses automatically while 

the brushes are turning).


D. Release the foot lever (

3

) and lower the brush deck. If the floor is particularly 

dirty, you can apply additional pressure to the brush deck by raising the foot 

lever (

3

) until the lock down is engaged.

E.  Lower the squeegee, turning the lever (

4

) counter clockwise. The vacuum 

motor will switch on.

F.  Check that the brake (

5

) is released.

G. Pulling the switch levers (

1

), activates the brushes and the machine begins to 

move forward. During the first few feet, check that the amount of solution is 

correct, and that the squeegee dries the floor.

H. The machine will now start to scrub and dry until the solution tank is empty 

or recovery tank is full.

OPERATION

Содержание STEALTH ASC24BT

Страница 1: ...00 STEALTH ASC24BT 24 Cylindrical Scrubber with Traction Drive 1001 Brown Avenue Toledo Ohio 43607 0127 Customer Service 888 GO BETCO Fax 800 445 5056 Technical Service 877 856 5954 www betco com Operator and Parts Manual ...

Страница 2: ...RNING OFF THE MACHINE 15 DAILY MAINTENANCE 16 17 WEEKLY MAINTENANCE 18 TROUBLESHOOTING 19 BRUSH AND SELECTION USE 19 PARTS DIAGRAMS AND LISTINGS 20 44 BATTERY CHECK CARD HOUR METER 45 WATER PLANT INSPECTIONS 45 BRAKE ADJUSTMENT 46 VACUUM SYSTEM INSPECTION 46 SQUEEGEE ADJUSTMENT 47 CHECK LIST 48 MAINTENANCE SCHEDULE 49 WEAR ITEMS 50 WARRANTY 52 ...

Страница 3: ...ing As it advances it also collects the dirt removed and the detergent solution not absorbed by the floor The machine must be used only for this purpose Even the best machines will only work well if used correctly and kept in good working order We therefore suggest you read this instruc tion booklet carefully and re read it whenever difficulties arise while using the machine Please contact our tec...

Страница 4: ...MPH km h 1 9 3 Maximum Grade 10 Vacuum Motor V HP W 24 0 5 310 Vacuum Motor Suction Millibar 188 Solution Tank Capacity Gallons L 21 80 Recovery Tank Capacity Gallons L 24 90 Weight of Machine excluding batteries Lbs Kg 385 175 Battery Charger V A 24 25 Machine Dimensions Length Width Height in x in x in 57 x 43 x 26 Noise Level dBA 58 TECHNICAL DESCRIPTION Measurement Unit Stealth ASC24BT ...

Страница 5: ... not hit against shelving or scaffolding The operator must always be equipped with the appropriate safety device gloves shoes helmet glasses etc Do not use the machine on surfaces with an inclination greater than the one shown on the serial plate The machine is designed to wash and dry floors simultaneously Signal the presence of wet floors with suitable signs If the machine does not work properly...

Страница 6: ... The overall dimensions of the package are A 69 in 1760 mm B 40 in 1020 mm C 50 in 1270 mm 2 HOW TO UNPACK THE MACHINE A Remove the outer packaging B The machine is attached to the pallet with wedges which block the wheels C Remove these wedges D Use a ramp to get the machine down from the pallet pulling it backwards E Keep the pallet for any future transport needs MACHINE PREPARATION ...

Страница 7: ...r the machine you can use Wet batteries AGM batteries Gel batteries OTHER TYPES MUST NOT BE USED The maximum dimensions and weight are Width 6 8 in 172 mm Length 14 2 in 360 mm Height 11 2 in 285 mm Weight 97 lb 44 kg WARNING Your charger must be set according to the type of bat tery you install Call BETCO customer service to ensure correct charger setting after replacement batteries are installed...

Страница 8: ...r into the machine plug WARNING This process must be carried out by qualified person nel The incorrect or imperfect connection of the cables to the connector can seriously harm people and damage objects 8 RECHARGING THE BATTERIES Perform one complete battery charge cycle before using the machine Avoid totally discharging the batteries This can cause permanent damage Recharge as soon as the battery...

Страница 9: ...attery indicator uses LEDs and has 8 positions 7 yellow charged batter ies and 1 red run down batteries WARNING A few seconds after the red indicator light comes on the brush motor turns off automatically The vacuum motor will remain in operation so that the remaining water can be removed from the floor MACHINE PREPARATION ...

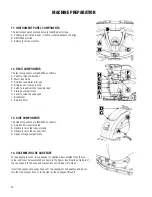
Страница 10: ...raise the squeegee I Brake lever J Solution filter 13 SIDE COMPONENTS The side components are identified as follows A Solution flow control valve B Handle to raise the recovery tank C Handle to raise the vacuum unit D Upper storage compartment 14 ASSEMBLING THE SQUEEGEE For packaging reasons the squeegee is supplied disassembled from the ma chine and must be assembled as shown in the figure insert...

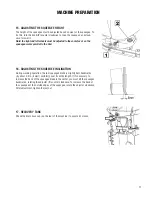
Страница 11: ...ING THE SQUEEGEE INCLINATION During working operation the rear squeegee blade is slightly bent backwards by about 0 2 in 5 mm uniformly over its entire length If it s necessary to increase the bend of the squeegee blade in the center you must tilt the squeegee backwards rotating the adjuster 1 counter clockwise To increase the bend of the squeegee at the outside edges of the squeegee rotate the ad...

Страница 12: ...NG Never use pure acids 20 ASSEMBLING THE BRUSHES Proceed as follows to assemble the brushes 1 Use the side parking brake lever to stop the machine 2 Raise the brush head by means of the appropriate pedal 3 Make sure that the key switch is in the 0 position 4 Remove the right side splash guard by loosening the knob 1 5 Insert the brush the side with 5 teeth in the tunnel until it couples with the ...

Страница 13: ...is particularly dirty you can apply additional pressure to the brush deck by raising the foot lever 3 until the lock down is engaged E Lower the squeegee turning the lever 4 counter clockwise The vacuum motor will switch on F Check that the brake 5 is released G Pulling the switch levers 1 activates the brushes and the machine begins to move forward During the first few feet check that the amount ...

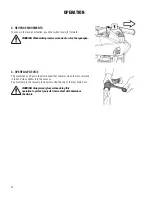
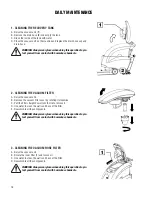
Страница 14: ...gee 3 OVERFLOW DEVICE The machine has a float in the filter basket that activates when the recovery tank is full and stops airflow into the vacuum You must empty the recovery tank by removing the cap of the rear drain hose WARNING Always wear gloves when doing this operation to protect yourself from contact with hazardous chemicals OPERATION ...

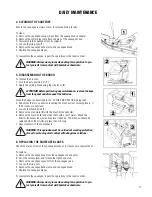
Страница 15: ...queegee blade blades H Remove the pads and clean them with water WARNING Always wear gloves when doing this operation to pro tect yourself from contact with hazardous chemicals 2 EMPTYING THE DUST HOPPER Empty the hopper after work and before performing any type of maintenance to do so proceed as follows A Push the knob 1 toward the rear of the machine and release the left side splash guard B Remo...

Страница 16: ...uum filter cover by rotating it clockwise C Pull the filter straight down from the lid to remove it D Use water to clean the walls and base of the filter E Reassemble all the components WARNING Always wear gloves when doing this operation to pro tect yourself from contact with hazardous chemicals 3 CLEANING THE VACUUM HOSE FILTER A Raise the vacuum unit B Rotate the inner filter 1 and remove it C ...

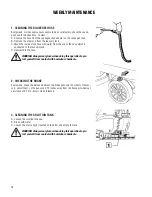
Страница 17: ...s preventing the brushes from spinning freely If the brushes are not clean 4 Loosen the thumb knob 1 5 Remove the side plate 2 with the brush drive hubs 3 6 Remove the brushes 4 and clean them with a jet of water Check the bristles for excessive wear and replace if needed The brushes should be replaced when the bristles are less than 0 5 long 7 Reassemble all of the components WARNING This operati...

Страница 18: ...ways wear gloves when doing this operation to pro tect yourself from contact with hazardous chemicals 2 CHECKING THE BRAKE Every week check the distance between the brake pads and the wheels If neces sary adjust them so the pads are 0 12 inches away from the transport wheels at a distance of 0 12 in 3 mm when released 3 CLEANING THE SOLUTION TANK A Loosen the solution tank cap B Rinse with water C...

Страница 19: ... and tear and hot water no greater than 140 F 60 C NYLON BRUSH Used on all types of floors Excellent resistance to wear and tear and hot water even over 140 F 60 C ABRASIVE BRUSH The bristles of this type of brush are coated with highly aggressive abrasives It is used to clean very dirty floors To avoid floor damage work only with the brush pressure necessary THICKNESS OF THE BRISTLES Thicker bris...

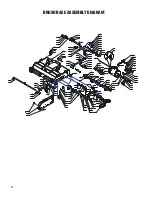
Страница 20: ...20 BRUSH DECK ASSEMBLY DIAGRAM 1 9 1 16 1 10 1 3 1 4 1 11 1 15 1 17 1 12 1 5 1 2 1 13 1 1 1 7 1 8 1 6 1 14 5 4 13 5 4 3 2 1 2 6 2 9 2 4 2 5 2 8 2 5 2 2 2 5 2 3 2 7 6 10 17 12 11 7 1 18 8 15 14 9 16 ...

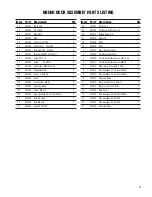
Страница 21: ...2 E22506 Bolt M6 x 30 1 2 3 E88024 Spring CM 70 HS 1 2 4 E22507 Nut M6 x 8 1 2 5 E83799 Flat Washer M6 6x18x2 SS 3 2 6 E86275 Barbed Elbow 3 8 1 2 7 E81944 Grommet 1 2 8 E22508 Blade 1 2 9 E22509 Filter 1 3 E22510 Brush Base Assembly 1 4 E83850 Flat Washer M5x20 SS 8 5 E20290 Flat Hd Soc Machine Screw M5x16 SS 8 6 E22511 Flat Hd Soc Machine Screw M6x16 4 7 E22512 Brush General Purpose 0 4mm 2 8 E2...

Страница 22: ...81 57 73 28 74 5 12 24 38 11 1 38 24 10 5 74 28 25 73 88 73 5 14 39 35 13 57 44 20 6 20 1 29 74 5 92 90 39 63 39 77 94 58 73 44 74 2 42 86 87 7 41 67 77 58 73 16 91 39 63 39 74 5 19 37 30 57 81 58 73 46 52 55 23 73 57 79 48 93 76 53 75 66 51 59 43 49 33 26 54 60 27 4 55 59 69 73 34 31 74 5 82 72 70 20 2 8 21 36 6 70 65 50 95 8 61 62 20 4 20 5 20 3 32 95 68 ...

Страница 23: ...8x30 SS 2 47 E83831 Flat Hd Soc Machine Screw M6x20 SS 1 48 E22511 Flat Hd Soc Machine Screw M6x16 5 49 E22547 Screw 2 50 E83947 Hex Nut M6x5 SS 2 51 E20113 Hex Jam Nut M6X4 SS 2 52 E85499 Hex Nut M8x6 5 SS 2 53 E20117 Nyloc Hex Jam Nut M6x9 SS 2 54 E81342 Nyloc Hex Jam Nut M8 SS 2 55 E20119 Nyloc Hex Nut M8 SS 4 56 E22548 Cage Nut 4 57 E81934 Flat Washer M6x12x1 6 SS 5 58 E83799 Flat Washer M6 6x...

Страница 24: ...ECK LIFT ASSEMBLY DIAGRAM 16 28 11 28 25 25 28 11 28 16 25 27 28 11 28 16 11 28 29 15 5 28 34 6 33 23 25 26 2 19 30 10 3 4 31 32 24 20 24 32 26 30 13 25 28 8 11 28 17 9 21 25 14 22 25 27 12 1 28 16 28 18 35 ...

Страница 25: ...c 1 18 E83830 Hex Bolt M8x40 Zinc 1 19 E22289 Hex Bolt M10x50 Zinc 1 20 E20112 Hex Nut M6x6 Zinc 1 21 E83852 Hex Nut M6x5 1 22 E82808 Hex Jam Nut M8X5 Zinc 1 23 E81673 Hex Nyloc Nut M3 Zinc 2 24 E83550 NyLoc Hex Nut M6 Zinc 2 25 E86853 Nyloc Hex Nut M8 Zinc 7 26 E83381 Nyloc Hex Nut M10 Zinc 2 27 E81874 Flat Washer M8x17x1 6 Zinc 3 28 E83404 Flat Washer M9x24x2 5 Zinc 17 29 E83704 Lock Washer M8x1...

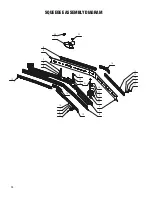
Страница 26: ...26 SQUEEGEE ASSEMBLY DIAGRAM 1 22 22 9 15 16 18 2 16 18 3 17 20 5 17 19 21 11 7 10 10 15 9 4 8 11 6 10 10 13 12 13 14 ...

Страница 27: ... Squeegee Blade Kit 42 75 1 10 E22385 O Ring 7mm 52 11 E22346 Custom Cap Screw 26 12 E22352 Center Front Squeegee Blade Clamp 1 13 E22354 Outer Front Squeegee Blade Clamp 2 14 E22355 Center Rear Squeegee Blade Clamp 1 15 E22357 Outer Rear Squeegee Blade Clamp 2 16 E86255 Flat Washer M10x21x2 SS 2 17 E86164 Flat Washer M9x24x2 5 SS 4 18 E20128 Lock Washer M10 SS 2 19 E20252 Lock Washer M8x13x2 2 SS...

Страница 28: ... 4 5 12 7 10 16 1 18 17 19 3 6 3 8 3 7 3 20 3 16 3 30 3 10 3 15 3 23 3 21 3 14 3 25 3 17 3 5 3 18 3 31 3 19 3 2 3 9 3 24 3 28 3 32 3 3 3 22 3 4 3 12 3 29 3 23 3 13 3 18 3 31 3 33 3 27 3 35 9 15 4 3 33 3 27 6 8 14 13 3 11 3 26 3 1 3 34 3 26 2 ...

Страница 29: ... E83824 Square Nut M8 SS 3 3 24 E83550 NyLoc Hex Nut M6 Zinc 2 3 25 E86853 Nyloc Hex Nut M8 Zinc 1 3 26 E20121 Flat Washer M5x15x1 5 Zinc 2 3 27 E82761 Flat Washer M6x12x1 6 Zinc 6 3 28 E83278 Flat Washer M6 5x24x2 Zinc 2 3 29 E82774 Lock Washer M6 Zinc 2 3 3 E20125 Flat Washer M8x17x1 6 SS 1 3 31 E85722 Flat Washer M13x24x2 5 Zinc 2 3 32 E81406 External Serrated Lock Washer M13x18 Zinc 1 3 33 E82...

Страница 30: ... 30 31 11 8 1 14 45 40 27 28 13 19 16 43 23 39 7 12 1 24 29 25 10 9 6 5 4 3 42 12 3 12 4 12 9 12 12 12 13 12 10 12 11 12 2 12 8 25 29 38 34 18 25 21 17 15 12 7 12 6 12 5 38 12 8 22 37 36 33 24 3 16 26 26 46 32 34 18 15 2 35 20 41 ...

Страница 31: ...Bolt M6x20 Zinc 6 16 E81657 Bearing 6204 2RS 2 17 E88239 Screw 2 18 E81917 Bolt Hex M8x20 Zinc 5 19 E22592 Screw M6 x 35 4 20 E20390 Soc Hd Cap Screw M8x22 Zinc 2 21 E20111 Flat Hd Soc Machine Screw M6x20 Zinc 3 22 E83835 Screw M6 x 12 4 23 E20247 Flat Hd Soc Machine Screw M8x18 Zinc 2 24 E82808 Hex Jam Nut M8X5 Zinc 2 25 E83550 NyLoc Hex Nut M6 Zinc 4 26 E86853 Nyloc Hex Nut M8 Zinc 6 27 E20250 C...

Страница 32: ...32 TANK ASSEMBLY DIAGRAM A 15 14 1 7 3 12 11 1 3 1 4 1 2 1 6 4 13 1 5 1 1 8 2 4 2 9 2 1 2 2 6 9 2 5 2 6 2 8 2 7 2 3 6 9 8 5 7 10 17 18 16 19 19 6 19 7 19 9 19 8 19 4 19 2 19 4 19 1 19 3 19 5 19 1 A ...

Страница 33: ... 3 E22603 Solution Hose 1 4 E22604 Solution Hose 1 5 E22605 Cable 1 6 E83833 Hex Bolt M8x25 Zinc 2 7 E20107 Screw Pan Hd Phil Self Tap M4 2x16 SS 4 8 E82808 Hex Jam Nut M8X5 Zinc 2 9 E20127 Flat Washer M9x18x1 5 Zinc 2 10 E85762 Hose Clamp 2 11 E86275 Barbed Elbow 3 8 1 12 E20651 Tee Fitting 1 13 E82269 Barbed Fitting 3 8 in 1 14 E20190 Spacer Block 2 15 E22606 Plate 2 17 E22074 Plug Vac Lid Bale ...

Страница 34: ...VACUUM LID ASSEMBLY DIAGRAM 1 2 24 2 14 2 3 2 17 2 11 2 15 2 25 2 2 2 10 2 22 2 1 2 16 2 4 2 6 2 5 2 13 2 7 4 2 30 2 23 3 2 26 2 12 2 21 4 1 2 21 3 2 21 1 2 21 2 2 21 4 2 21 2 21 4 2 2 28 2 18 2 9 2 19 2 8 ...

Страница 35: ...Sound Deadening Foam 1 2 17 E20182 Sound Deadening Foam 1 2 18 E22519 Gasket 1 2 19 E22075 Hook Vac Lid Bale 1 2 21 E88291 Vacuum Motor 24VDC 310W 1 2 21 1 E83897 Connector Electrical Housing 30A 2 2 21 2 E83883 Lug Electrical 30A 2 2 21 3 E83935 Wire Tie 2 2 21 4 2 E22624 Carbon Brush Vacuum Motor 2 2 22 E81006 Vacuum Splash Guard 1 2 23 E20122 Flat Washer M5 x 15 x 1 5 SS 5 2 24 E88290 Hose Vacu...

Страница 36: ...36 SOLUTION ASSEMBLY DIAGRAM 19 5 9 11 20 5 13 19 1 19 5 7 16 15 8 1 8 2 14 6 2 6 4 6 3 6 1 3 19 21 22 12 10 17 23 25 19 18 18 2 4 19 ...

Страница 37: ...8293 Battery Check Card Hour Meter 1 9 E82705 Valve Lever 1 10 E82322 Solenoid Valve 24v 10w 3 Port Nylon 1 11 E83858 Oval Hd SL Machine Screw M4x12 SS 1 12 E83617 O Ring 14x2 5mm Buna N 1 13 E20098 Hex Bolt M8x18 Zinc 1 14 E83838 Screw Flat Hd M4x15 Zinc 4 15 E86853 Nyloc Hex Nut M8 Zinc 1 16 E81874 Flat Washer M8x17x1 6 Zinc 1 17 E20253 Flat Washer M21x60x3 Nylon 2 18 E22611 Hose Clamp 3 19 E857...

Страница 38: ...38 HANDLEBAR ASSEMBLY DIAGRAM 1 1 22 9 21 20 17 13 12 1 4 1 2 1 3 1 5 3 8 3 3 3 7 3 13 3 4 3 17 3 14 3 1 3 2 24 3 6 3 10 3 15 8 3 11 3 9 3 16 3 12 7 23 10 6 11 5 3 17 14 26 19 2 3 5 4 15 16 18 25 27 ...

Страница 39: ... M6x45 Zinc 1 3 16 E20362 Set Screw Hex Soc Dog Point M5x30 Zinc 1 3 17 E20382 Nyloc Hex Nut M5 x 5 Zinc 2 4 E22615 Pin 2 5 E83836 Hex Bolt M5x16 Zinc 1 6 E20288 Soc Hd Cap Screw M8x30 Zinc 4 7 E20242 Pan Hd Phil Machine Screw M3x20 Zinc 2 8 E88042 Flat Hd Soc Machine Screw M6x16 Zinc 2 9 E20346 Flat Hd Soc Machine Screw M8x25 SS 2 10 E81673 Hex Nyloc Nut M3 Zinc 2 11 E20121 Flat Washer M5x15x1 5 ...

Страница 40: ...40 ELECTRICAL CONTROL ASSEMBLY DIAGRAM 1 4 13 12 14 7 11 6 15 3 22 19 17 10 21 20 5 2 16 8 18 9 23 ...

Страница 41: ...x1 6 Zinc 2 11 E20124 Flat Washer M8x17x1 6 SS 6 12 E20252 Lock Washer M8x13x2 2 SS 2 13 E20484 Fuse Block 1 14 E83170 Fuse 80 Amp 1 15 E20448 Bracket 1 16 E20129 Cap 4 17 E20468 Flat Hd Phil Machine Screw M5x12 Zinc 6 18 E81998 Pan Hd Phil Machine Screw M4x10 SS 3 19 E20382 Nyloc Hex Nut M5 x 5 Zinc 4 20 E20475 Lock Washer M4 Zinc 2 21 E20301 Flat Hd Phil Machine Screw M4x20 Zinc 2 22 E82569 Vari...

Страница 42: ...42 ELECTRICAL DIAGRAM ...

Страница 43: ...12 E82270 Micro Switch 13 E82270 Micro Switch 14 E82270 Micro Switch 15 E82824 Potentiometer 16 E82569 Variable Speed Controller 17 E83952 Circuit Breaker 30A 17A ET1002 Part Placeholder for Fimap Parts FI1241 18 E88249 Micro Switch 19 E88249 Micro Switch 20 E20402 Electrical Connector 30A 21 E20402 Electrical Connector 30A 22 E83959 Circuit Breaker 20A M1 E22595 Traction Motor 250W M2 E82738 Brus...

Страница 44: ...44 ELECTRICAL DIAGRAM ...

Страница 45: ...the LED which turn on correspond to the current set up Verify that if the machine uses wet cell batteries the adjustment is on position 1 Verify that if the machine uses GEL batteries the adjustment is on posi tion 4 WARNING A wrong set up of the battery control card can compromise the battery efficiency and damage then in ir reversible way 1 Verify the cleanness and functionality of the solution ...

Страница 46: ...egee hose adapter 6 Vacuum micro switch adjustment 7 Adjust the vacuum micro switch in a manner that when the cam on the squeegee lift lever pushes on the micro switch there is 0 5 mm of clearance between the micro switch roller and the cam BRAKE ADJUSTMENT 1 Adjust the brake pads on the wheels to lock the wheels when the brake lever reaches the third ratchet notch 2 To adjust the pads Unscrew the...

Страница 47: ...eegee wheels using the knob such that the squee gee blade has an inclination between 30 and 45 degrees 3 Verify that the squeegee assembly in up position does not interfere with the brush deck foot lever by adjusting the nyloc nut internal to the squeegee cable spring 4 Adjust the spring tension so that the squeegee blades deflect when they contact the floor by tightening the nyloc nut ...

Страница 48: ...unctionality of the vacuum motor Check the functionality of the brakes Check the functionality of batteries and power cables Functional test of the machine Fill the tanks completely and verify that there are no leaks Adjust the inclination and the height of the squeegee blades Adjust the inclination of the brush deck Check the function of the parking brake Verify the forward and backward movement ...

Страница 49: ...h s u r b t h g i r e h t k c e h C Check brush attachments rust ruined parts cracks 250 Check wear of spraying guard 50 400 0 0 1 0 5 s e h s u r b f o r a e w k c e h C Check function of the lifting lowering element 250 BRUSH MOTOR 0 0 1 t e l n i g n i l o o c r i a f o s s e l n a e l c k c e h C 0 0 4 0 5 2 s e h s u r b n o b r a c f o r a e w k c e h C Check amps consumption and noise level...

Страница 50: ...ide Squeegee 40 SH Gum Rubber E88953 Squeegee Blade Kit 42 75 E22264 Squeegee Blade Kit Poly 42 75 E22265 Squeegee Blade Kit Latex 42 75 E22557 Brush Drive Belt E22559 Brush Drive Belt E86277 Battery 6V 235 AH Wet E88031 Battery 6V 200AH AGM E88036 Charger 24VDC 25AMP 120VAC EXT WET RSB5175 E88548 Charger 24VDC 25AMP 120VAC EXT AGM GEL RSB175 WEAR ITEMS Stealth ASC24BT ...

Страница 51: ...51 ...
Страница 52: ...ts except wear items are warranted by Betco for a period of 3 years Wear Items exempt from Warranty consideration include but may not be limited to power cords transport wheels vacuum bags belts squeegee blades pad drivers clutch plates handle grips filters screens throttle cables brushes and carbon brushes Subject to the conditions and exceptions stated in this warranty Betco warrants the Betco p...

Отзывы: