background image

4

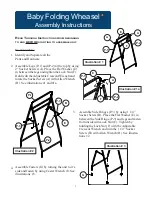
Illustration # 4

Illustration # 5

P-2

C

P-4

P-1

D

P-5

D

6.

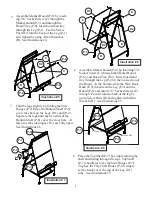
5. Assemble Marker Board (P-5) by insert-

ing 5/8” Socket Screw (C) through the
Marker Board (P-5) and through the
Board Tray (P-4). Insert board and tray
through the Leg (P-1).  Use the Screw
Post (D) from the back of the Leg (P-1)
and  tighten by using  Allen Wrenches
(H). See illustrations #4.

P-6

P-2

D

P-4

C

P-9

8. Place the Top Shelf (P-7) by simply turning the

shelf and sliding through the legs.  Top Shelf
(P-7) should rest over the Side Hinges (P-3).
To place the Flip Chart Hooks (P-10) simply
set the hooks over the top of the Leg (P-1)
tube.  See illustrations #7.

Assemble Marker Board (P-6) by inserting 5/8”
Socket Screw (C) through the Marker Board
(P-6), and Board Tray (P-4).  Insert board and
tray through the Leg (P-2) in the mid section of
the Board.  At the bottom, slide the Wire Book
Rack (P-9) in between the Leg (P-2) and the
Board (P-6) and insert 5/8” Socket Screws (C)
through.  Fasten from the back of the leg by
using Screw Posts (D) and tighten with Allen
Wrench (H) . See illustrations #5.

P-7

P-3

P-10

Illustration # 7

P-1

D

C

7.

Fold the legs slightly by folding the Side
Hinges (P-3) Place the Bottom Shelf (P-8)
over cross bars on the Legs (P-1) and (P-2).
Seperate the legs until the two ends of the
Bottom Shelf (P-8) cover the cross bars.  At
this time the side hinges (P-3) are fully open.
See illustrations #6.

P-8

P-1

P-2

cross bar

cross bar

Illustration # 6

P-3

Содержание Baby Folding Wheasel 784

Страница 1: ...78901212345678901234 123456789012345678901234567890121234567890123456789012345678901212345678901234 123456789012345678901234567890121234567890123456789012345678901212345678901234 123456789012345678901234567890121234567890123456789012345678901212345678901234 123456789012345678901234567890121234567890123456789012345678901212345678901234 123456789012345678901234567890121234567890123456789012345678901...

Страница 2: ...2258 Tool required Adjustable Crescent Wrench P 1 Leg wide 1 EA P 2 Leg narrow 1 EA P 3 Side Hinge 2 EA P 4 Board Tray 2 EA P 5 Marker Board wide leg 1 EA P 6 Marker Board narrow leg 1 EA P 7 Top Shelf 1 EA P 8 Bottom Shelf 1 EA P 9 Wire Book Rack 1 EA P 10 Flip Chart Hook 2 EA A 2 Socket Screw 2 EA B 1 1 4 Socket Screw 4 EA C 5 8 Socket Screw 12 EA D Screw Post 12 EA E Flat Washer 6 EA F Lock Nut...

Страница 3: ...OM BEGINNING TO END BEFORE STARTING TO ASSEMBLE UNIT 1 2 A 3 P 2 P 1 F E A Illustration 1 P 2 P 1 E A F Illustration 1a Assemble Side Hinges P 3 by using 1 1 4 Socket Screw B Place the Flat Washer E in between the Side Hinge P 3 and legs and fasten from inside with Lock Nut F Tighten by holding the Lock Nut F with the Adjustable Crescent Wrench and turn the 1 1 4 Socket Screw B with Allen Wrench H...

Страница 4: ...trations 7 Assemble Marker Board P 6 by inserting 5 8 Socket Screw C through the Marker Board P 6 and Board Tray P 4 Insert board and tray through the Leg P 2 in the mid section of the Board At the bottom slide the Wire Book Rack P 9 in between the Leg P 2 and the Board P 6 and insert 5 8 Socket Screws C through Fasten from the back of the leg by using Screw Posts D and tighten with Allen Wrench H...

Отзывы: