background image

13

Temperature Units 

1. Remove the meter’s rubber protective jacket and select the

desired temperature units using the °F/°C slide switch located

in the battery compartment.

2. Replace the protective jacket and connect the sensor to the

sensor input jack on top of the meter.

Data Hold (Air Temperature) 

1. While taking measurements, press the

 PROBE

TEMPERATURE HOLD

 button to freeze the air temperature

reading.

2. The HOLD indicator will appear in the bottom of the LCD

display.

3. Press 

PROBE TEMPERATURE HOLD

 again to return to

normal operation.

Max/Min Record (Air Temperature) 

This allows the user to record and view the highest (MAX), lowest 

(MIN) air temperature readings. 

1. Press the TEMPERATURE MAX/MIN button once. The 

MAX

indicator will appear on the display and the meter will begin

keeping track of the MAX/MIN air temperature values.

2. Press the button again to view the minimum reading. The 

MIN

indicator along with the minimum air temperature reading will

appear on the LCD display.

3. Press the button again to return to normal operation.

Содержание BST-AFM05

Страница 1: ...TEK User s Manual CFM CMM Thermo Anemometer lnfraRed Thermometer Model BST AFMOS 101 k 99 Washington Street Melrose MA 02176 Phone 781 665 1400 Toll Free 1 800 517 8431 Visit us at www TestEquipmentDepot com ...

Страница 2: ... use of this meter can cause damage shock injury or death Read and understand this user manual before operating the meter Inspect the condition of the probe and the meter itself for any damage before operating the meter Repair or replace any damage before use If the equipment is used in a manner not specified by the manufacturer the protection provided by the equipment may be impaired This device ...

Страница 3: ...ded periods of time Specifications Air Velocity Range Resolu on Accuracy mis meters per sec 0 40 30 00 mis O Q1 mis 3 rdg 0 20 mis km h kilometers hour 1 4 108 0 km h 0 1 km h 3 rdg 0 8 km hr ft min feet per minute 80 5900 ftlmin 1 ft min 3 rdg 40 ftlm o mph miles por hour 0 9 67 0 mph 0 1 mph 3 rdg 0 4 MPH knots nautical MPH 0 8 to 58 0 knots 0 1 knots t 3 rdg 0 4 knots Airflow Range Resolution A...

Страница 4: ...es to preserve battery life Operating Temperature 32 F to 122 F 0 C to 50 C Storage Temperature 14 to 140o F 10 to 60o C Operating Humidity 80 RH Storage Humidity 80 RH Operating Altitude 2000 meters 7000ft maximum Battery One 9 volt NEDA 1604 battery Battery life 80 hours approx if Backlight and Laser are used continuously the battery life is reduced to 2 to 3 hours approx Battery current 8 3 mA ...

Страница 5: ...1 8 Airflow buttons 4 9 Air Temperature function buttons 2 10 Vane 11 Airflow Average button 12 Backlight button Note The battery compartment tilt stand and tripod mount are located on the rear of the instrument Keypad 0 Press to tum the meter ON or OFF IR Laser Pointer Press and hold to measure MAX MIN Record and store the highest and lowest airflow or velocity readings ...

Страница 6: ...rves as change digit button in AREA mode AREA Press and hold to manually enter the area of a duct in CFM or CMM mode Press and hold to scroll thru memory locations This button also clears memory in the Averaging mode Press to tum the backlight on off Hold to disable Auto Power Off MAX MIN Temperature Press to record and store the highest lowest readings for air temperature HOLD Temperature Press t...

Страница 7: ... Reminder that the top LCD digits represent Air Vane Temperature Indicates that the laser pointer is on IR TEMP Indicates that the larger LCD digits represent IR temperature measurement VEL indicates that meter is in air velocity mode FLOW indicates that meter is in air flow mode MAX bottom of LCD Max Hold for the IR Temperature and RH function HOLD bottom of LCD Data Hold for the IR Temperature f...

Страница 8: ...re Smaller LCD digits at top right of display for Probe Temperature CJ Low battery indicator Operation Connecting the Vane 1 The vane plug is inserted in the meter s sensor jack at the top of the meter The plug and jack are keyed so that the plug can only fit in the jack one way 2 Tum the plug carefully until it lines up with thejack and then firmly push the plug in place Do not apply undue force ...

Страница 9: ...elocity reading The upper right LCD sub display shows the temperature reading Side view of Vane Arrow airflow Air Velocity Measurements Up to 20 Point averaging 1 To enter 20 Point Averaging Mode press and hold the AVG button until it beeps twice The AVG icon will be displayed 2 Take a measurement and press the AVG button A single beep will sound and the HOLD icon will appear in the display 3 The ...

Страница 10: ...ry 6 To return to standard velocity measuring mode press and hold AVG button until meter beeps twice 7 Note In AVG mode press and hold the AVG button until the meter beeps twice to return to normal operation 99 Washington Street Melrose MA 02176 Phone 781 665 1400 Toll Free 1 800 517 8431 Visit us at www TestEquipmentDepot com ...

Страница 11: ...T button to move the decimal Side view of Vane Arrow airflow Use RIGHT button to select the other digits After all of the digits are entered press and hold the AREA button until meter beeps twice to save the area into memory and return to CFM or CMM measuring mode 5 Place the sensor in the air stream Ensure that the air enters the vane as indicated by the arrow sticker placed inside the vane Refer...

Страница 12: ...to return to CFM or CMM measuring mode Air Flow Measurements Up to 20 Point averaging 1 To enter 20 Point Averaging Mode press and hold the AVG button until it beeps twice The AVG icon will be displayed 2 Take a measurement and press the AVG button A single beep will sound and the HOLD icon will appear in the display 3 The average reading will be displayed and number of readings measured will appe...

Страница 13: ...tor along with the average reading will appear on the LCD display and the meter will begin keeping track of the MAX MIN and Average values 2 Press the MAX MIN button again The MAX indicator will appear on the display and display the Max reading 3 Press the MAX MIN button again to view the minimum reading The MIN indicator along with the minimum reading will appear on the LCD display and display th...

Страница 14: ...indicator will appear in the bottom of the LCD display 3 Press PROBE TEMPERATURE HOLD again to return to normal operation Max Min Record Air Temperature This allows the user to record and view the highest MAX lowest MIN air temperature readings 1 Press the TEMPERATURE MAX MIN button once The MAX indicator will appear on the display and the meter will begin keeping track of the MAX MIN air temperat...

Страница 15: ...Red Non Contact Temperature Measurements 1 The IR sensor is located at the top of the meter 2 Point the sensor toward the surface to be measured 3 Press and hold the red IR button to begin measuring the surface temperature of a desired target IR TEMP and will appear on the display The laser pointer will switch on to help aim the meter 4 The measured IR surface temperature will appear at the center...

Страница 16: ...ir Temperature display WARNING Do not directly view or direct the laser pointer at an eye Low power vis ble lasers do not normally present a hazard but may present some potential for hazard if viewed directly for extended periods of time t AVOID EXPOSURE Laserradiation isemitted from tfisapertu e CAUTION LASER IADIATION DO NOTSIDE IIIIQ IE AM ClflPUT lmW WAYELBGlH 630 67c im Cl A 2 LASII PIODOCI B...

Страница 17: ...ent and replace the meter s protective jacket You as the end user are legally bound Battery ordinance to return all used batteries and accumulators disposal in the household garbage is prohibited You can hand over your used batteries I accumulators gratuitously at the collection points for our branches in your community or wherever batteries accumulators are sold 99 Washington Street Melrose MA 02...

Страница 18: ...perature measurements quickly followed by high temperature measurements may require several minutes to stabilize as a result of the IR sensor cooling process If the surface of the object under test is covered with frost oil grime etc clean before taking measurements If an object s surface is highly reflective apply masking tape or flat black paint before measuring Steam dust smoke etc can obstruct...

Страница 19: ...into an LCD reading IR Field of View Ensure that the desired target is larger than the spot size as shown in the diagram below As the distance from an object increases the spot size of the area measured by the meter becomes larger The meter s field of view ratio is 8 1 meaning that if the meter is 8 inches from the target the diameter spot of the object under test must be at least 1 inch Other dis...

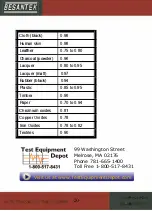
Страница 20: ...black paint Allow time for the tape to reach the same temperature as the material underneath then measure the temperature of the tape or the painted surface Thermal emissivity Table for Common Materials Material Emissivity Asphalt 0 90 to 0 98 Concrete 0 94 Cement 0 96 Sand 0 90 Earth 0 92 to 0 96 Water 0 67 Ice 0 96 to 0 98 Snow 0 83 Glass 0 85 to 1 00 Ceramic 0 90 to 0 94 Marble 0 94 Plaster 0 8...

Страница 21: ...0 to 0 95 Lacquer matt 0 97 Rubber black 0 94 Plastic 0 85 to 0 95 Timber 0 90 Paper 0 70 to 0 94 Chromium oxides 0 81 Copper Oxides 0 78 Iron Oxides 0 78 to 0 82 Textiles 0 90 99 Washington Street Melrose MA 02176 Phone 781 665 1400 Toll Free 1 800 517 8431 Visit us at www TestEquipmentDepot com ...

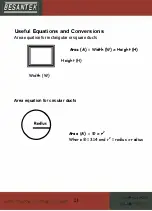
Страница 22: ...TEK Useful Equations and Conversions Area equation for rectangular or square ducts Width W Al H A Width W x Height M Height H Area equation for circular ducts Al eG A x 1 2 Where 3 14 and r2 radius x radius ...

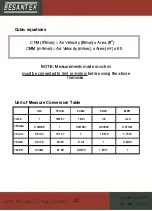
Страница 23: ...rementsmade in inches must be converted to feet or meters before using the above formulae Unit of Measure Conversion Table mis ft min knots km h MPH 1 mis 1 19687 1944 3 6 224 1 ft min 0 00508 1 0 00987 0 01829 0 01138 1 knot 0 5144 101 27 1 1 8519 1 1523 1 km h 0 2778 54 69 0 54 1 06222 1 MPH 0 4464 87 89 0 8679 16071 1 ...

Отзывы: