Bergstrom Bycool green Series Скачать руководство пользователя страница 17

SLIM FIT

17

EN

®

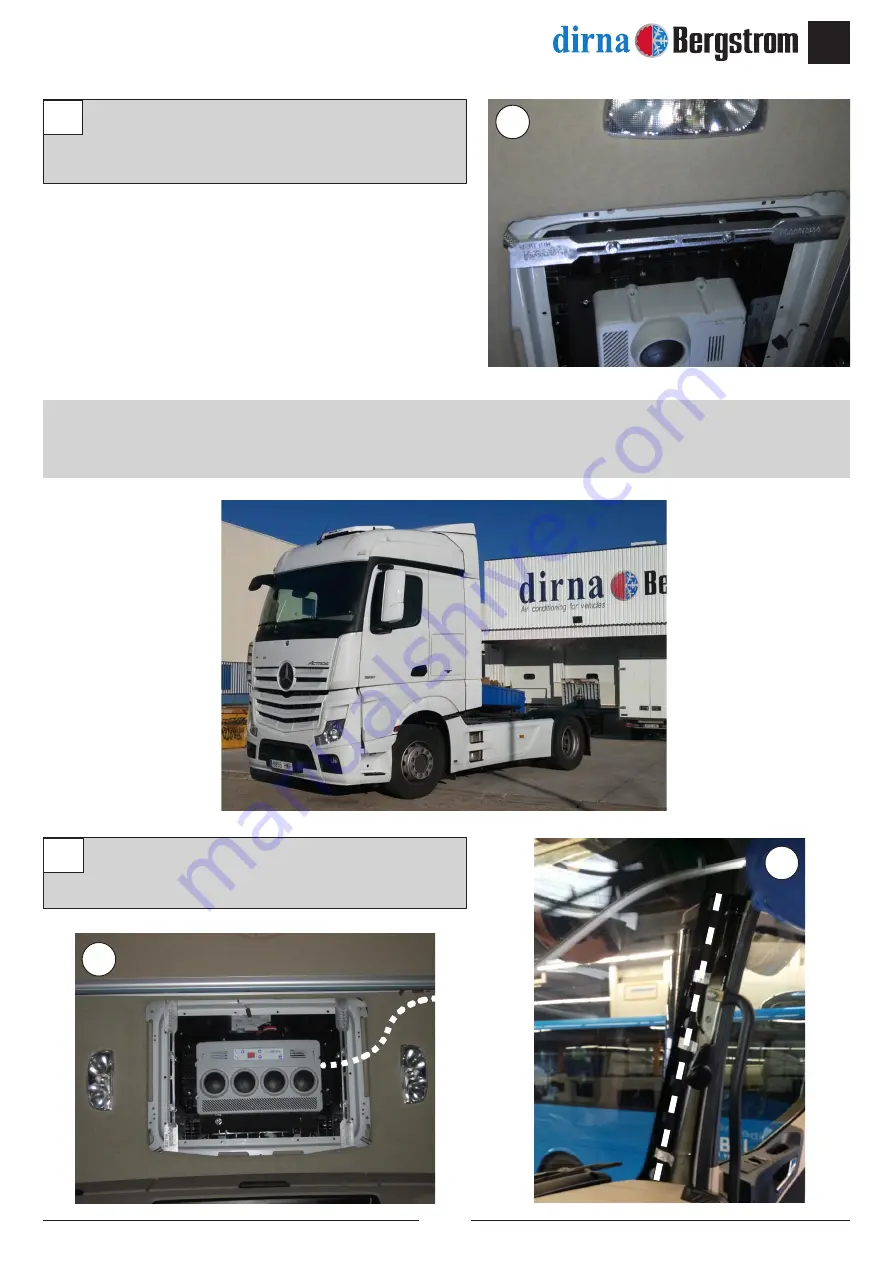
Remove  the  console  and  tighten  M8/125x45 

screws until it comes up against the hexagons 
in order to secure the unit. 

9

9

DETAILED INSTRUCTIONS ON
POWER CABLE CONNECTION

Run the cables inside the upholstery to the side 
downpipe with the help of a guide.

10

10

10

Содержание Bycool green Series

Страница 1: ...s de Montaje ES Spanish Mounting Instructions EN English Instructions de Montage FR French Montageanweisungen GE German Istruzioni di Montaggio IT Italian MERCEDES ACTROS MP4 FR EURO 6 IATF 16949 Cali...

Страница 2: ...ntaci n inclu da Instrucciones de montaje 1001249409 Manual del usuario 220AA35378 Diagnosis de aver as 220AA35379 Advertencias El personal instalador debe poseer una formaci n suficiente en Aire Acon...

Страница 3: ...montar escotilla y los elementos de fijaci n y entregar stos al cliente 1 1 1 1 1 1 1 1 Pegue la junta EPDM 30x15 alrededor del hueco escotilla mirar detalle para cortar los bordes finales de la uni n...

Страница 4: ...ar que las salidas de desag e no queden obstruidas por la junta EPDM 3 Escotilla Junta Junta Eliminar Junta Junta Junta Techo cabina Junta 100 mm Aprox papel protector 15 mm A COMO CORTAR LA JUNTA EPD...

Страница 5: ...la plana arandela grower y tornillo M8 125x45 sin apretar 5 5 5 4 4 Hex gono M8 125x40 Arandela goma Base Arandela plana Roscar 4 hex gonos M8 125x40 con arandela goma arandela plana en insertos de la...

Страница 6: ...ela plana y apretar con un par de apriete de 4 75 10 Nm Roscar 2 hex gonos M6 L 68 en la parte delantera del equipo sentido de la marcha con arandela de goma y arandela plana y apretar con un par de a...

Страница 7: ...los M8 125x45 hasta hacer tope con los hex gonos para fijar el equipo 9 9 INSTRUCCIONES DETALLADAS SOBRE CONEXI N CABLEADO ALIMENTACI N Llevar cableado por dentro de tapizado con ayuda de una gru a y...

Страница 8: ...ada despu s grapar terminal suministrado y conectarlo en caja de fusibles posici n F3 F4 Poner fusible 30A suministrado Grapar el otro extremo y llevar cableado hasta positivo Llevar cable negro negat...

Страница 9: ...LA FIJACI N DE LAS CONSOLAS VISTA EXPLOSIONADA HASTA LA FIJACI N DE LOS SOPORTES Junta EPDM 30x15 Techo cabina Tapizado Soporte fijaci n 8 125x45 8 125x45 M8 M H L 40 M8 M H L 40 Arandela goma Arandel...

Страница 10: ...10 SLIM FIT ES Volver a montar consola con 4 tornillos 6 100x15 allen y colocar despu s 4 tap n embellecedor 12 12 12...

Страница 11: ...imentaci n en el equipo Si esto sucediera el panel de control no se enciende y el equipo no funciona Az Azul N Negro R Rojo V Verde B Blanco A Amarillo Na Naranja M Marr n Sensor aire de retorno Sopla...

Страница 12: ...1249409 User s guide 220AA35378 Troubleshooting 220AA35379 Warnings The installing personnel must have a sufficient training in vehicles air conditioning dirna Bergstrom s l shall not be responsible f...

Страница 13: ...T 13 EN Take down the hatch and the fastening elements and hand them over to the customer 1 1 1 1 1 1 1 1 Attach the EPDM 30x15 seal around the hatch gap see the details to cut the ends of the seal jo...

Страница 14: ...k that the wastewater run offs are not blocked by the EPDM seal 3 Hatch Gasket Gasket Remove Gasket Gasket Gasket Cabin roof Gasket 100 mm Approx protection paper 15 mm A HOW TO CUT EPDM GASKET TO AVO...

Страница 15: ...h a flat washer grower washer and M8 125x45 screw without tightening 5 5 5 4 4 Hexagon M8 125x40 Rubber washer Base Flat washer Screw 4 M8 125x40 hexagons with rubber washer flat washer in the base in...

Страница 16: ...washer and flat washer and tighten with a torque of 4 75 10 Nm Screw 2 M6 L 19 hexagons on the rear of the unit direction of travel with rubber washer and flat washer and tighten with a torque of 4 75...

Страница 17: ...tighten M8 125x45 screws until it comes up against the hexagons in order to secure the unit 9 9 DETAILED INSTRUCTIONS ON POWER CABLE CONNECTION Run the cables inside the upholstery to the side downpi...

Страница 18: ...d measurement then clamp the supplied terminal and connect it to fuse box position F3 and F4 Insert the supplied 30A fuse Clamp the other end and run the cable to positive Run the black cable negative...

Страница 19: ...x45 8 125x45 M8 M H L 40 M8 M H L 40 Rubber washer 8 Flat washer 2 M6 M H L 19 2 M6 M H L 68 6 Flat washer 6 Flat washer Rubber washer Rubber washer EXPLODED SIDE VIEW THROUGH TO CONSOLE ATTACHMENT 30...

Страница 20: ...20 SLIM FIT EN Replace the console with 4 6 100x15 Allen screws and then position 4 decorative caps 12 12 12...

Страница 21: ...to the power supply If this were to happen the control panel would not come on and the unit would not work Az Blue N Black R Red V Green B White A Yellow Na Orange M Brown Return air sensor Centrifuga...

Страница 22: ...n included Instructions de montage 1001249409 Guide de l utilisateur 220AA35378 Solution des probl mes 220AA35379 Garantie L installateur devra poss der la formation pertinente en air conditionn sur v...

Страница 23: ...monter l coutille et les l ments de fixation et les remettre au client 1 1 1 1 1 1 1 1 Coller le joint EPDM 30x15 autour du creux de l coutille observer le d tail pour couper les bords finaux de l un...

Страница 24: ...es sorties d coulement ne soient pas bouch es par le joint EPDM 3 coutille Joint Joint liminer Joint Joint Joint Plafond cabine Joint 100 mm environ papier protecteur 15 mm A COMMENT COUPER LE JOINT E...

Страница 25: ...elle grower et vis M8 125x45 sans serrer 5 5 5 4 4 Hexagone M8 125x40 Rondelle caoutchouc Base Rondelle plate Visser 4 hexagones M8 125x40 avec une rondelle en caoutchouc une rondelle plane sur les in...

Страница 26: ...lane puis serrer avec un couple de serrage de 4 75 10 Nm Visser 2 hexagones M6 L 19 sur la partie arri re de l appareil sens de la marche avec une rondelle en caoutchouc et une rondelle plane puis ser...

Страница 27: ...5 jusqu atteindre la but e des hexagones pour fixer l quipement 9 9 INSTRUCTIONS D TAILL ES SUR LA CONNEXION DU C BLAGE D ALIMENTATION Porter le c blage l int rieur de la tapisserie l aide d un guide...

Страница 28: ...e Ensuite agrafer le terminal fourni et le connecter la bo te fusibles position F3 F4 Placer le fusible 30A fourni Agrafer l autre extr mit et porter le c blage jusqu au positif Porter le c ble noir...

Страница 29: ...L 40 M8 M H L 40 Rondelle caoutchouc Rondelle plate 8 2 M6 M H L 19 2 M6 M H L 68 Rondelle plate 6 Rondelle plate 6 Rondelle caoutchouc Rondelle caoutchouc VUE CLAT E LATERALE JUSQU A LA FIXATION DES...

Страница 30: ...30 SLIM FIT FR Monter nouveau la console avec 4 vis 6 100x15 allen et placer ensuite 4 bouchon enjoliveur 12 12 12...

Страница 31: ...i cela se produisait la Panneau De Contr le ne s allumerait pas et l quipement ne fonctionnerait pas Az Bleu N Noir R Rouge V Vert B Blanc A Jaune Na Orange M Marron Sonde d air de retour Souffleur ce...

Страница 32: ...rma Schraubendreher Mitgelieferte unterlagen Montageanweisungen 1001249409 Benutzerleitfaden 220AA35378 Fehlerdiagnose 220AA35379 Warnhinweise DerInstallateurmussimBereichFahrzeug Klimaanlagen ausreic...

Страница 33: ...en Befestigungselemente ausbauen und diese dem Kunden aush ndigen 1 1 1 1 1 1 1 1 EPDM Dichtung 30x15 mm um die Lukenaussparung herum kleben siehe Detailzeichnung f r das Zurechtschneiden der u eren F...

Страница 34: ...t von der EPDM Dichtung zusammengedr ckt werden 3 Luke Dichtung Dichtung Entfernen Dichtung Dichtung Dichtung Kabinendach Dichtung Ca 100 mm Schutzpapier 15 mm A WIE DIE EPDM DICHTUNG GESCHNITTEN A WI...

Страница 35: ...etzen ohne anzuziehen 5 5 5 4 4 Sechskant Verbindungsmutter M8 125x40 Gummiunterlegscheibe Grundplatte Flachscheibe 4 Sechskant Verbindungsmuttern M8 125x40 mit Gummi Unterlegscheibe und Flachscheibe...

Страница 36: ...schrauben und mit einem Anzugsmoment von 4 75 10 Nm anziehen 2 Sechskant Verbindungsmuttern M6 L 19 am hinteren Teil des Ger ts Fahrtrichtung mit Gummi Unterlegscheibe und Flachscheibe einschrauben un...

Страница 37: ...x45 bis zum Anschlag an die Sechskant Verbindungsmuttern anziehen um das Ger t zu befestigen 9 9 DETAILLIERTE HINWEISE ZUM ANSCHLUSS DES NETZKABELS Kabel mithilfe einer F hrung unter der Verkleidung h...

Страница 38: ...efertenKabelschuhanbringen und am Sicherungskasten am Positionanschluss F3 F4 anschlie en Mitgelieferte 30A Sicherung einsetzen Das andere Ende befestigen und Kabel bis zum Positivanschluss f hren Sch...

Страница 39: ...125x45 M8 M H L 40 M8 M H L 40 Gummiunterlegscheibe Flachscheibe 8 2 M6 M H L 19 2 M6 M H L 68 Flachscheibe 6 Flachscheibe 6 Gummiunterlegscheibe Gummiunterlegscheibe SEITLICHE EXPLOSIONSANSICHT BIS Z...

Страница 40: ...40 SLIM FIT GE Konsole mit 4 Innensechskantschrauben 6 100x15 wieder montieren und danach 4 Zierkappen aufsetzen 12 12 12...

Страница 41: ...nicht vertauscht werden Ist dies der Fall schaltet sich die Elektroniktafel nicht ein und das Ger t funktioniert nicht Az Blau N Chwarz R Rot V Gr n B Weiss A Gelb Na Oranbe M Braun Sensor R ckluft Ze...

Страница 42: ...one dei problemi 220AA35379 Avvertenze L installatore deve essere in possesso della formazione necessaria in materia di aria condizionata per veicoli dirna Bergstrom s l declina ogni responsabilit per...

Страница 43: ...ettuccio apribile e gli elementi di fissaggio e consegnarli al cliente 1 1 1 1 1 1 1 1 Incollare la guarnizione EPDM 30x15 intorno al vano del tettuccio apribile vedi il particolare per tagliare i bor...

Страница 44: ...uite dalla guarnizione EPDM 3 Tettuccio apribile Guarnizione Guarnizione Rimuovere Guarnizione Guarnizione Guarnizione Tettuccio della cabina Guarnizione Circa 100 mm carta protettiva 15 mm A INCOLLAR...

Страница 45: ...la grower e vite M8 125x45 senza stringere 5 5 5 4 4 Perno esagonale M8 125x40 Rondella di gomma Base Rondella piana Avvitare 4 perni esagonali M8 125x40 con rondella di gomma e rondella piana sugli i...

Страница 46: ...gere con una coppia di serraggio di 4 75 10 Nm Avvitare 2 perni esagonali M6 L 19 nella parte posteriore dell impianto senso di marcia con rondella di gomma e rondella piana e stringere con una coppia...

Страница 47: ...125x45 fino a battuta con i perni esagonali per fissare l impianto 9 9 ISTRUZIONI PARTICOLAREGGIATE SULLA CONNESSIONE DEL CABLAGGIO DI ALIMENTAZIONE Servendosi di una guida condurre il cablaggio all i...

Страница 48: ...raffare il terminale in dotazione e collegarlo alla scatola dei fusibili in posizione F3 F4 Inserire il fusibile 30A in dotazione Aggraffare l altra estremit e condurre il cablaggio fino al positivo C...

Страница 49: ...8 M H L 40 M8 M H L 40 Rondella di gomma Rondella piana 8 2 M6 M H L 19 2 M6 M H L 68 Rondella piana 6 Rondella piana 6 Rondella di gomma Rondella di gomma ESPLOSO LATERALE FINO AL FISSAGGIO DELLE CON...

Страница 50: ...50 SLIM FIT IT Rimontare la console con 4 viti 6 100x15 a brugola e quindi inserire 4 tappini decorativi 12 12 12...

Страница 51: ...ione all impianto altrimenti il quadro comandi non si accende e l impianto non funziona Az Blu N Nero R Rosso V Verde B Bianco A Giallo Na Arancione M Marrone Sensore aria ritorno Supporto centratore...

Страница 52: ...na Bergstrom si riserva il diritto di effettuare modifiche in qualsiasi momento ai dati contenuti in questa pubblicazione per motivi tecnici o commerciali Ed 01 03 2016 Md 05 11 2018 Francisco Alonso...

Отзывы: