background image

9


General

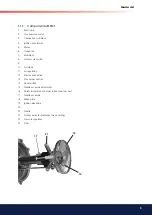
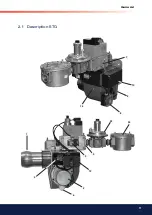
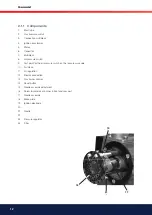
1.1.1  Components BFG1

1. 

Blast tube

2. 

Gas pressure switch

3. 

Connection multiblock

4. 

Ignition transformer

5. 

Motor

6. 

Capacitor

7. 

Multiblock

8. 

Air pressure switch

9. 

10.  Air intake

11.  Air regulation

12.  Electric connection

13.  Gas burner control

14.  Reset button

15.  Nozzle assembly adjustment

16.  Screw for division of burner in front and rear part

17.  Nozzle assembly

18.  Brake plate

19.  Ignition electrode

20. 

21.  Nozzle

22.  Air fl ow indicator (indicates the air setting)

23.  Pressure regulator

24.  Filter

18

19

17

21

Содержание BFG1

Страница 1: ...Providing sustainable energy solutions worldwide 178 111 35 2 2018 03 06 Installation and maintenance instruction BFG1 STG146 Biogas...

Страница 2: ......

Страница 3: ...___________________________________________12 3 MULTIBLOC____________________________________________________________13 3 1 DMV DLE ___________________________________________________________13 3 1 1...

Страница 4: ...in a dry environment max 80 relative humidity no condensation Temperature 20 to 60 C Check that the burner is compatible with the boiler s output range All components must be installed without being...

Страница 5: ...not be put into operation without proper safety and protection devices A Class BE fire extinguisher is recommended It is forbidden to alter thedesign or use accessories which have not been approved b...

Страница 6: ...Leakage check 1 year 3000 hrs Filter 1 year replacement at p 10 mbar 3000 hrs replacement at p 10 mbar Electrodes Replacement Cleaning 1 year Replacement Cleaning 3000 hrs Brake disc Replacement Clean...

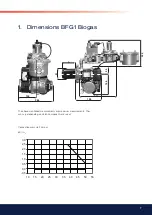
Страница 7: ...sions BFG1 Biogas The above mentioned measurements are maximum measurements They can vary depending on which components are used 135 286 B A 0 5 0 0 0 5 1 0 1 5 2 0 2 5 3 0 10 15 20 25 30 35 40 45 50...

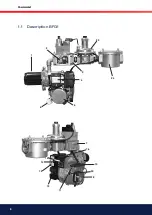
Страница 8: ...8 General 1 1 Description BFG1 7 8 10 11 12 13 14 15 16 22 1 2 3 4 5 6 24 23...

Страница 9: ...essure switch 9 10 Air intake 11 Air regulation 12 Electric connection 13 Gas burner control 14 Reset button 15 Nozzle assembly adjustment 16 Screw for division of burner in front and rear part 17 Noz...

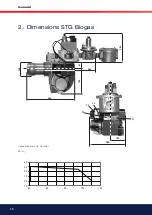
Страница 10: ...10 General 2 Dimensions STG Biogas 290 139 11 13 14 15 244 192 450 103 61 249 1 0 0 0 1 0 2 0 3 0 4 0 40 60 80 100 120 Connection pressure 45 mbar 60 H4...

Страница 11: ...11 General 7 8 10 9 1 2 3 5 6 12 4 2 1 Description STG 23 24 16...

Страница 12: ...ressure switch 9 Test point for the air pressure switch on the low pressure side 10 Air intake 11 Air regulation 12 Electric connection 13 Gas burner control 14 Reset button 15 Nozzle assembly adjustm...

Страница 13: ...DMV D 11 Type DMV DLE 11 Nominal widths Rp 1 2 Rp 2 Electrical connection IEC 730 1 VDE 0631 T1 Volt U n AC 230 V Valve 2 x Class A Ambient temperature 15 C 60 C IP 54 Family 1 2 3 Max operating press...

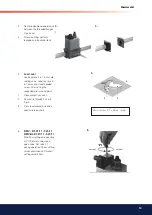
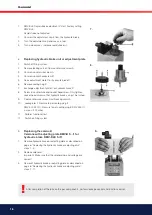
Страница 14: ...ol and function control 1 Loosen screws A and B do not remove Figs 1 and 2 2 Remove screws C and D Figs 1 and 2 1 2 3 1 1 Disassembly of the the Multiblock Screw plugs 1 2 3 may also be replaced by a...

Страница 15: ...ing valve Lead seal eye 3 in 1 5mm cap stand headed screw After setting the requested pressure setpoint 1 Close protective valve 1 2 Route wire through 2 and 3 Fig 2 3 Press lead around wire ends keep...

Страница 16: ...ten socket head screw so that hydraulic brake can just be turned 9 Coat countersunk screw A with locking varnish 10 Leakage test Pressure tap at sealing plug 2 DMV 507 520 11 Pressure tap at sealing p...

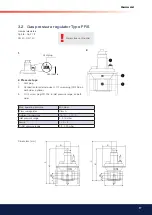
Страница 17: ...nge 5 500 mbar Family 1 2 3 Outlet pressure range 2 5 200 mbar Dimensions mm e c f h DN a f e d b b h d DN c a 3 2 Gas pressure regulator Type FRS Nominal diameters Rp 3 8 Rp 2 1 2 DN 40 DN 150 2 Pres...

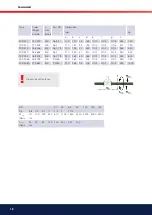
Страница 18: ...4 G1 4 365 2 50 FRS 520 058 628 500 Rp 2 170 250 47 310 G1 2 G1 4 G1 4 450 3 50 FRS 525 083 303 500 Rp 2 1 2 230 285 60 365 G1 2 G1 4 G1 4 550 6 00 FRS 5065 058 792 500 DN 65 290 285 95 405 G1 2 G1 4...

Страница 19: ...clockwise Reducing outlet pressure setpoint 1 Check setpoint 2 Screw on protective cap A 3 Attach lead seal Page 5 Replace setting spring 3 4 1 Remove protective cap A Release spring by turning adjus...

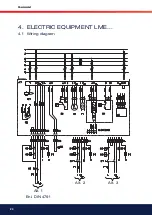
Страница 20: ...20 General 4 ELECTRIC EQUIPMENT LME 4 1 Wiring diagram Alt 1 Enl DIN 4791 Alt 2 Alt 3...

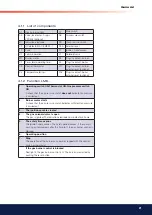
Страница 21: ...ON Thermostat ON Gas pressure switch ON A check that the air pressure switch does not indicate fan pressure is carried out 2 Burner motor starts A check that the air pressure switch indicates sufficie...

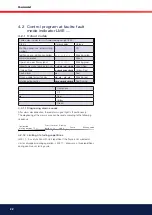
Страница 22: ...ng green Illegal flame signal during start up Green Red Undervoltage Yellow Red Fault alarm Red Blinking code for fault codes Blinking red Interface diagnostics Red flicking 4 2 1 1 Diagnosing alarm c...

Страница 23: ...g defective or fouled fuel valves defective or fouled flame monitoring Blinking 8 x Free Blinking 9 x Free Blinking 10 x Connection fault or internal fault outgoing contacts or other faults Blinking 1...

Страница 24: ...24 General...

Страница 25: ...25 General...

Страница 26: ...26 General...

Страница 27: ......

Страница 28: ...Enertech AB P O Box 309 SE 341 26 Ljungby www bentone se www bentone com...

Отзывы: