background image

28  Troubleshooting and service information

Eng
lish

Technical support

For technical assistance, free driver updates, product information, and news releases, visit 
the following web site:

http://www.BenQ.com

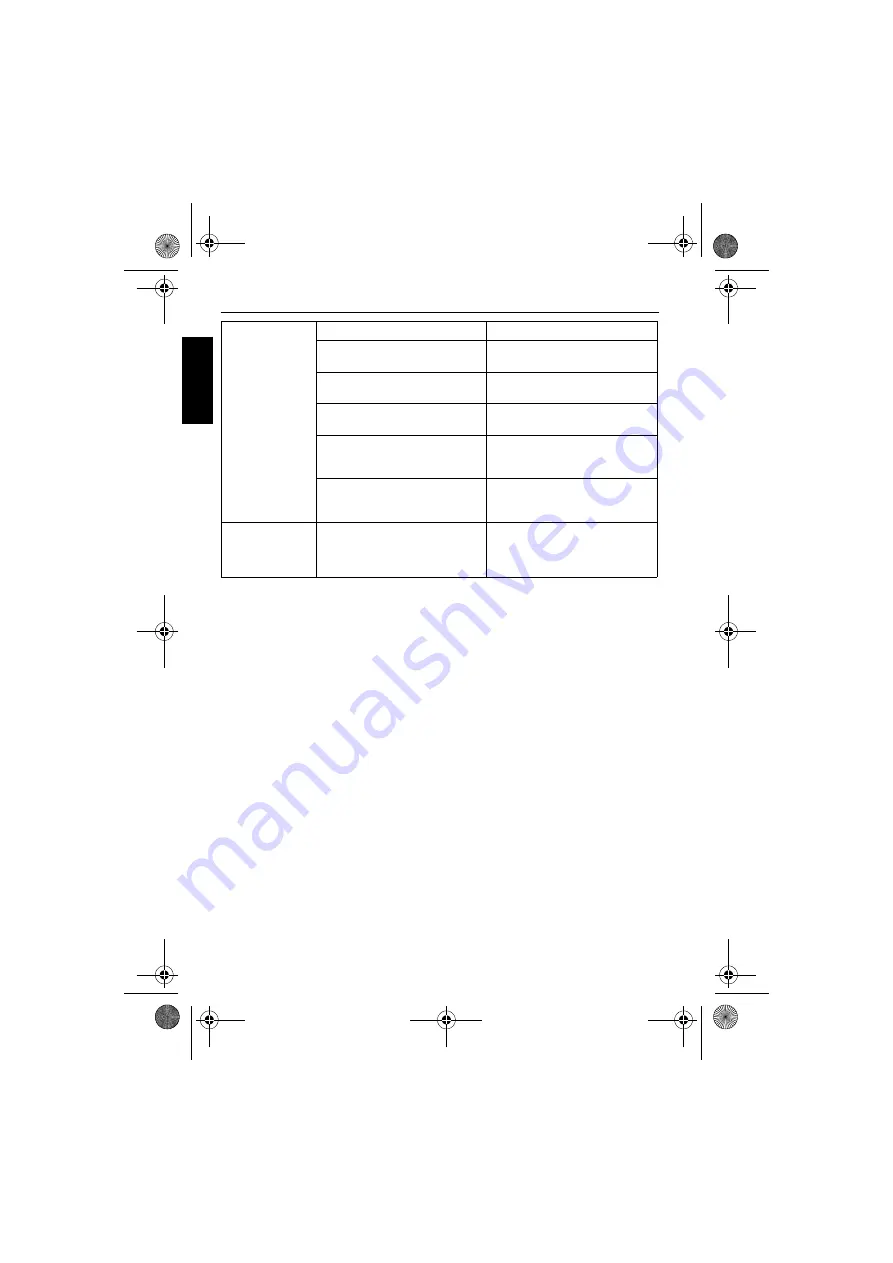
The camera does 
not shoot even 
when pressing the 
shutter button.

The battery is running low.

Recharge the battery.

The camera is not in the Capture 
mode.

Switch to the Capture mode.

The shutter button was not pressed 
all the way down.

Press the shutter button all the way 
down.

The internal memory or memory 
card does not have any free space.

Load a new card or delete 
unwanted files.

The flash is recharging.

Wait until the flash mode icon, 
indicated on the screen, stops 
flashing.

The camera does not recognize the 
memory card.

Format the memory card before the 
initial use or before using with 
another camera.

I cannot print 
images with 
PictBridge-
compliant printers.

The camera is connected to the 
printer when the camera is 
powered off.

Turn on the camera, select 
PictBridge, and then connect to the 
printer.

L1050_UM - EN.book  Page 28  Friday, April 10, 2009  10:17 AM

Содержание L1050

Страница 1: ...Welcome L1050 Digital Camera User Manual L1050_UM EN book Page 1 Friday April 10 2009 10 17 AM ...

Страница 2: ...lcohol to clean your camera If the lens is dirty use a lens brush or soft cloth to clean the lens Do not touch the lens with your fingers To prevent electric shock do not attempt to disassemble or repair your camera by yourself Water may cause a fire or electric shock Therefore store your camera in a dry place Do not use your camera outdoors when it is raining or snowing Do not use your camera in ...

Страница 3: ...ons However there is no guarantee that interference will not occur in a particular installation If this equipment does cause harmful interference to radio or television reception which can be determined by turning the equipment off and on the user is encouraged to try to correct the interference by one or more of the following measures Reorient or relocate the receiving antenna Increase the separa...

Страница 4: ...osion and fire may occur Warranty Warranty is void if damage or system failure occurred due to outside factors such as collision fire flood dirt sewage earthquake and other force majeure events as well as incorrect usage of electricity or use of non original accessories It is the sole responsibility of the user if problems such as data loss and system failure occurred due to non factory installed ...

Страница 5: ...unlock position Otherwise all data if any on the memory card is protected and the card cannot be edited or formatted Operating environment Do not use or store your camera in the environments listed below Direct sunlight Dusty places Next to an air conditioner electric heater or other heat sources In a closed car that is in direct sunlight Unstable locations Do not use your camera outdoors when it ...

Страница 6: ...wer ASAP When the camera is not in use always turn the power off and make sure the lens has retracted successfully before storing the camera in its case If you do not intend to use the camera for a long time please remove the battery from the camera and store the battery carefully Keep your camera away from sharp objects and avoid collision When the camera is not in use please place it in a steady...

Страница 7: ...d time 5 Operating the camera 6 Capture mode 7 More capture options in FUNC menu 8 Image size 8 Flash mode 9 Macro mode 9 Image quality 10 Battery status 10 Setting EV 10 White balance 11 ISO 11 AE metering 12 Effect 12 Scene mode 13 Aperture Priority 15 Shutter Priority 15 Manual mode 15 Drive mode 16 Auto Exposure Bracketing AEB 16 AF area 16 AF Assist Lamp 17 Setting sharpness saturation and co...

Страница 8: ... eye Removal 22 Voice memo 22 Effect 23 Z Lighting 23 Rotating an image 23 Trimming 23 Resizing 24 Startup screen 24 DPOF 24 Working with computer and AV system 25 Bundled software 25 Connecting the camera to a computer 25 Connecting the camera to an AV system 25 Printing images 25 Printing with PictBridge 25 Troubleshooting and service information 27 Technical support 28 Specifications 29 L1050_U...

Страница 9: ...re missing or damaged contact your dealer Save the packaging for future shipment or storage Camera Front view and bottom view 1 User Manual Quick Guide 2 Digital camera 3 USB cable 4 Battery 5 Hand strap 6 Leather case 7 Software CD 8 Battery charger 9 AC power adapter 10 AV cable 1 Shutter button 2 Flash 3 S S F Super Shake Free button 4 Power button Status LED indicator 5 AF Assist Lamp Self tim...

Страница 10: ...to become warm during operation because metal camera casing can conduct heat The LCD display on this camera is manufactured with sophisticated technology and more than 99 99 of the pixels on the LCD display meet standard specifications Yet it is possible that less than 0 01 of the pixels on the LCD display may have some light spots or show unusual colors This is normal and does not indicate displa...

Страница 11: ...to the battery charger 2 Connect one end of the AC power adapter to the battery charger 3 Connect the other end of the AC power adapter to a wall outlet 4 When the battery is being charged the charger LED indicator lights up in red When the battery is fully charged it turns into green Damage caused by the use of an incorrect battery charger set is not covered under the warranty The battery may be ...

Страница 12: ...es with internal memory for storing captured images video clips or audio files You can also add an SD card to store more files Before initial use of an SD card press Manage Memory Format Yes to format the card first To install an SD card 1 Make sure the camera is turned off 2 Open the memory card cover 3 Insert an SD card in the correct direction 4 Close the memory card cover To remove an SD card ...

Страница 13: ...etting date and time When first time using the camera or the battery has been removed from the camera for a long time you need to set the date and time They are used to record when a file was captured To set date and time 1 Press Step 1 is needed only after the initial setting is done 2 Press or to locate Date Time and then press or 3 Press or to select date and time and date format Press or to mo...

Страница 14: ...o capture 6 Release the shutter 7 In the Movie Record mode press the shutter to stop video recording 8 Press to view captured images or recorded videos and then press or to move to different images videos You can also press or to zoom in out a captured image or press to view 9 images on the screen During zoom in out there is a separator in the zoom bar between and For best image quality it is reco...

Страница 15: ... balance 11 15 ISO 11 In the Capture mode press to toggle among 4 display modes standard complete none and rule of thirds Use the rule of thirds display mode to improve your composition by placing subjects on at least one of the intersections of these 4 imaginary lines While the shutter is pressed halfway the shutter speed and the aperture are also shown on the screen not available in the Movie Re...

Страница 16: ...confirm the setting Image size To select an image size 1 Press Resolution 2 Press or to select a setting 3 Press to confirm setting Icon Description Icon Description 10 megapixels 3648 x 2736 5 megapixels 2592 x 1944 3 2 8 megapixels 3648 x 2432 3 megapixels 2048 x 1536 16 9 8 megapixels 3648 x 2048 HD 16 9 1920 x 1080 in full HD format 8 megapixels 3264 x 2448 VGA 640 x 480 My Mode the most recen...

Страница 17: ...to ask the subject to look at the camera lens or get as close to the camera as possible The flash fires automatically based on the photographic conditions Force on The flash always fires regardless of the surrounding lighting conditions Select this mode when capturing images with high contrast backlighting and deep shadows Slow sync Fires the flash immediately at the beginning of exposure with a l...

Страница 18: ... To select an EV 1 Press EV 2 Press or to select an EV from the EV bar and then press to confirm setting Icon Mode Description Fine Best image quality with the lowest compression rate File size is the largest Normal Better image quality with medium compression rate File size is medium Economy Good image quality with the highest compression rate File size is the smallest Icon Description Battery po...

Страница 19: ...cture as you increase the ISO value Icon Mode Description Auto Adjusts white balance automatically Daylight Used in bright daylight conditions Cloudy Used in twilight or shady conditions Tungsten Used when subjects lit by tungsten incandescent lighting Fluorescent H Fluorescent L Adjusts for fluorescent lighting Corrects the green hue of fluorescent lighting Ideal for indoor photos under fluoresce...

Страница 20: ... metering Center Weight Detects the exposure of the entire shooting screen but gives more importance to the values near center Automatic Exposure metering Spot Detects the exposure based on the center spot in the subject area Icon Mode Description Normal No effects are added Vivid Adds an effect with very clear and bright color tones Sepia Adds an effect with dark reddish brown color tones so the ...

Страница 21: ...bject Manual Lets you decide all available shooting parameters Movie Record Captures videos with sound When viewing the captured video file later the icon shows indicating that this is a video file Portrait Makes the subject usually a person stand out with a brighter look Landscape Used when taking pictures of natural scenery Sports Captures a fast moving subject Backlight Compensates for exposure...

Страница 22: ...here usually under indoor light source Text Takes a picture of clear text by reducing image distortion usually found on paper magazines or books Child Retains enough colors and skin tones of the subject Sunset Captures the warmth and atmosphere of sunset Flower Captures brightly colored flowers by enhancing their soft outlines Pet Takes a clear picture of a pet by showing its correct fur color Smi...

Страница 23: ... field is needed To adjust aperture value 1 Go to the Capture mode with Aperture Priority mode selected 2 Press to adjust the aperture value Shutter Priority Shutter priority is often used when shooting moving subjects In general use a shorter shutter speed to catch a fast moving object To adjust shutter speed in Shutter Priority 1 Go to the Capture mode with Shutter Priority mode selected 2 Press...

Страница 24: ...ime Self timer Automatically takes a picture after 2 or 10 second delay This mode is useful when you want to be part of the picture Double Performs delay and capture twice 1 Performs a 10 second delay then captures the image 2 Performs another 2 second delay then captures the image again Burst Continuously takes pictures as long as you keep pressing the Shutter The flash is always off in this mode...

Страница 25: ...etting sharpness saturation and contrast Adjusts how colors appear in the pictures by setting sharpness saturation and contrast To set sharpness saturation or contrast 1 Press and then select Sharpness Saturation or Contrast 2 Press or and then select High Normal or Low 3 Press Digital Zoom This feature controls the digital zoom mode The camera enlarges the image using optical zoom up to 5x Due to...

Страница 26: ...w 2 Press or and then select or 3 Press Movie Record mode settings Digital Zoom Turns on the digital zoom feature OFF Turns off the digital zoom feature Icon Description Video Format 16 9 848 x 480 VGA 640 x 480 QVGA 320 x 240 or Web sharing 640 x 480 Videos captured in Web sharing mode are stored under the XXXUTUBE directory XXX are numbers with the file size limited to 100 MB or 10 minutes per v...

Страница 27: ...ly enters the standby mode to save battery power Date Time Sets date and time and date format Language Sets the displayed language on the screen File Numbering Use this function if the camera experiences a Folder cannot be created error or if you want to restart numbering for example after erasing all files Series Stores the latest used file number no matter deleting files or inserting a new memor...

Страница 28: ... 2 Indicates that the file is protected and cannot be deleted 22 3 Indicates this file has a voice memo or the file is an audio file 22 4 Indicates the file is marked for printing 5 Displays the shooting parameters when you took the picture or playback controls Press to toggle between different displayed information 6 Date and time when the file was created 7 File number 8 Histogram 9 File name fi...

Страница 29: ...screen Press or to select a file and then press or to view it in its normal viewing size Slideshow Sets the time interval for presenting a series of captured image and video files first frame only To play a slideshow 1 Press Slideshow or 2 Change the slideshow settings Use the four way control to set one of the following slideshow effects Horizontal Changes files from right to left Shrink Changes ...

Страница 30: ...rotection Red eye Removal The Red Eye Correction function is used to reduce red eye in captured images This function is only available for still images Red eye correction can be applied to an image several times but the quality may gradually deteriorate 1 Press or to move to the image you want to apply Red eye Removal 2 Press Red eye Removal or 3 Press to confirm the change and how to save the ima...

Страница 31: ...s Rotate 3 Select Rotate and press to rotate the image 4 Repeat step 3 until desired orientation is achieved 5 Select Exit to save and exit the function Trimming Crops part of an image file reduces the image size and overwrites the image file or saves it as another new file To trim an image 1 Press or to move to the image you want to trim 2 Press Trim or Option Description Normal No effect is adde...

Страница 32: ...ng on To select a startup image 1 Press Startup Image or 2 Press or to select an image 3 Press DPOF The Digital Print Order Format DPOF setting allows you to select images on the memory card for printing and specify the number of print copies in advance using the camera This is extremely convenient for sending the images to a photo developing service or for printing on a direct print function comp...

Страница 33: ...n audio input jack left channel on your AV system 3 Turn on the AV system and then switch to the AV source connecting to the camera 4 Turn on the camera 5 Follow the on screen instructions to operate the camera via the TV or projector screen Printing images In addition to printing images by connecting the camera to a printer via a computer or bringing the memory card if available to a photo proces...

Страница 34: ...an available USB port on your printer 6 Follow the remaining on screen instructions in your camera and or printer to complete printing The above procedure may vary depending on the printer type you are using If you connect the camera to your printer while the printer is still starting up the camera will be automatically turned off Failure to follow the above procedure will make the camera show an ...

Страница 35: ...s warm The camera or flash was used continuously over a long period of time The flash does not fire or recharge The camera flash is turned off Set the flash to Auto Flash The light source is sufficient Even though the flash fired the image is dark The distance to the subject is greater than the flash s effective range Get closer to the subject and shoot The image is too bright or too dark The expo...

Страница 36: ...down Press the shutter button all the way down The internal memory or memory card does not have any free space Load a new card or delete unwanted files The flash is recharging Wait until the flash mode icon indicated on the screen stops flashing The camera does not recognize the memory card Format the memory card before the initial use or before using with another camera I cannot print images with...

Страница 37: ...r 2 or 10 second delay Double and Burst Exposure compensation 2 to 2 EV in 0 3 step increments ISO Auto 50 100 200 400 800 1600 3200 for resolution 3M or less only White balance Auto Daylight Cloudy Tungsten Fluorescent H Fluorescent L and Manual File format Still Image JPEG Exif 2 2 compatible and DCF compatible 10 megapixels 3648 x 2736 3 2 3648 x 2432 16 9 3648 x 2048 8 megapixels 3264 x 2448 5...

Страница 38: ...rce Rechargeable Lithium ion battery CIPA 200 PCS Working temperature 0 40 degrees Celsius Dimensions W x H x D 96 3 x 57 7 x 17 8 mm Weight 120 g without battery SD card System requirements Pentium III 600 Mhz or higher compatible CPU 64 MB RAM Optical disc drive Windows Me 2000 XP Vista compatible 128 MB free hard disk space Available USB port L1050_UM EN book Page 30 Friday April 10 2009 10 17 ...

Отзывы: