background image

Using BIOS setup

19

Navigating the BIOS setup screen

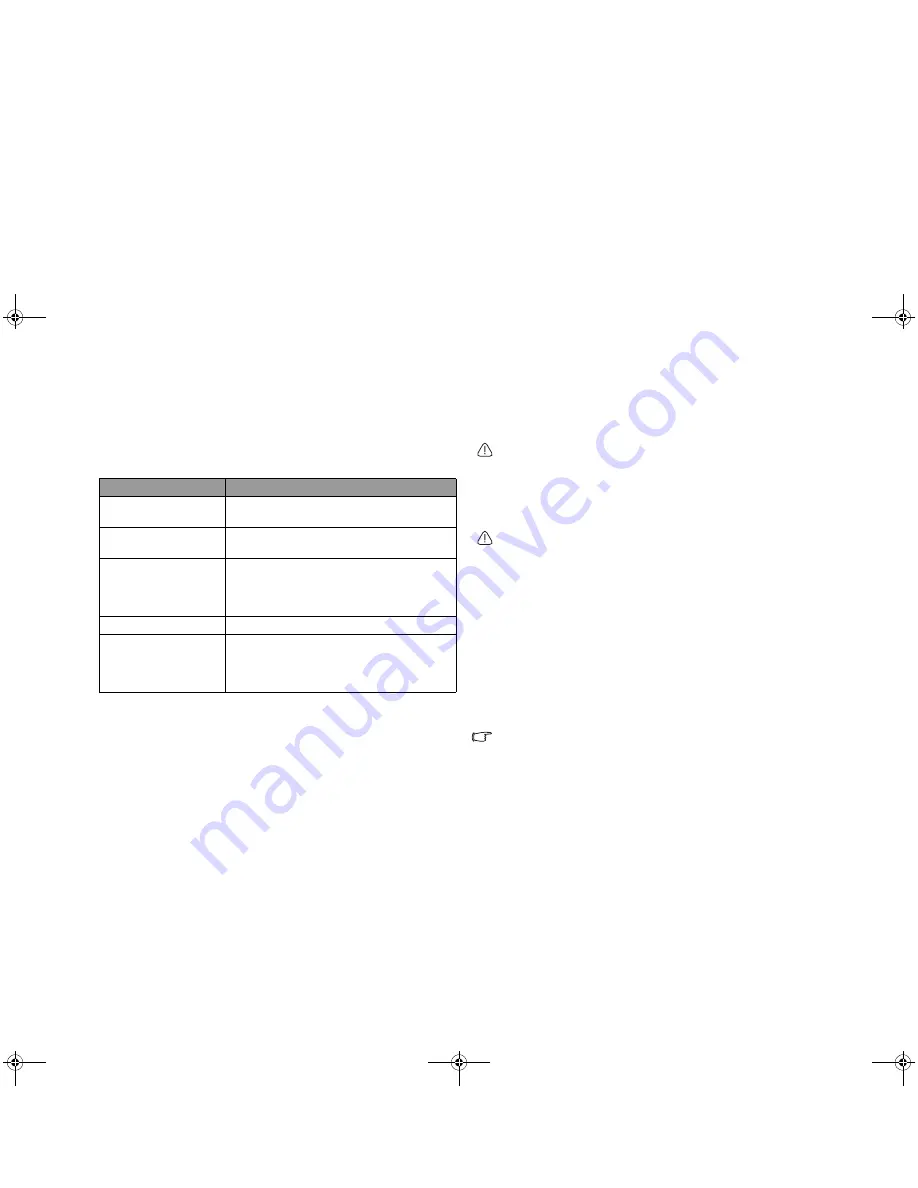
Keyboard information can be found at the bottom of the screen. A brief 
description of keyboard usage is listed below:

Main menu

The Main menu contains the basic configuration settings of the system 
and shows some system information, such as the BIOS version, CPU type 
and speed, and the system memory, etc.

• 

System Time: allows you to set the time of the system. Type in the value 

and then press <Enter>, <Tab> or <Shift> + <Tab> to change the next 
value.

• 

System Date: allows you to set the date of the system. Type in the value 

and then press <Enter>, <Tab> or <Shift> + <Tab> to change the next 
value.

Advanced menu

The Advanced menu contains advanced I/O (Input/Output) 
configuration settings of the system.

• 

Quiet Boot: controls the display of BenQ logo during system boot.

• 

Legacy USB Support: allows the support of legacy USB devices during 

system boot and under DOS.

• 

Frame Buffer Size: allows you to adjust the size of the video memory in 

your system.

If you are not familiar with the items in Advanced Configuration menu, 
you are advised to keep the default.

Security menu

The Security menu contains the security settings, which safeguard your 
system against unauthorized use.

Do NOT set the BIOS security password without having memorized it or 
written it down and stored it with your Joybook warranty documentation. 
Should you happen to forget or mislay the password once set, you will be 
greatly inconvenienced in gaining subsequent access to your Joybook.

• 

Set Supervisor Password: This set of password controls access to the 

whole BIOS setup menu. It must be set before User Password can be set. 
When typing the password, first make sure that Num Lock is off, and 
then type your password in the entry fields and press <Enter>. Confirm 
your password by typing it again and pressing <Enter>.

• 

Set User Password: This set of password controls access to part of the 

BIOS setup menu.

• 

Password on boot: This item determines if a password will be prompted 

during system boot. When this item is enabled, the password is always 
required to boot the computer.

If Set Supervisor Password and Set User Password are both set, you can 
enter either one of them during the password prompt. To have full 
privileges in BIOS setup, enter Supervisor Password.

Boot menu

The Boot menu contains the boot configuration settings of the system. A 
list of devices will be displayed under Boot priority order. 

• 

Use < > or < > to select a device, and then press <F6> to move it up or 

<F5> to move it down.

• 

To select a boot device manually, press the <F9> key when the BenQ 

logo appears on the screen during system startup. The Boot Menu will 
appear. Use the up and down arrow keys ( ,  ) to select a boot device, 
and then press <Enter> to confirm.

• 

To exclude or include a device in the “Boot priority order” list, press the 

<x> key.

Key

Function

Left and right arrow 

keys (

,


)

Selects a menu title.

Up and down arrow 

keys ( ,  )

Selects an item or option.

Enter

Displays the sub-menu when an item with 

the arrow 

sign is selected.

Opens or closes the option window when 

an item is selected.

Tab

Jumps from one item to another.

Esc

Exits BIOS setup.

Returns to the previous menu if in a sub-

menu.

Closes the options window if one is open.

JB_A52.book  Page 19  Monday, February 12, 2007  10:44 AM

Содержание Joybook A52 Series

Страница 1: ...Welcome Joybook A52 C41 Series User Manual JB_A52 book Page i Monday February 12 2007 10 44 AM...

Страница 2: ...ar purpose Further BenQ Corporation reserves the right to revise this publication and to make changes from time to time in the contents hereof without obligation of this company to notify any person o...

Страница 3: ...enu 19 Boot menu 19 Exit menu 20 Boot from LAN 20 Recovering your system 21 Using QDataTrove 21 Launching QDataTrove 21 Backing up your files 21 Recovering your backup files 22 Restoring your backup i...

Страница 4: ...nformation about the modem 37 Caution 37 Disposal of Waste Electrical and Electronic Equipment by users in private households in the European Union 37 Declaration of Conformity 37 Safety instructions...

Страница 5: ...bout using system recovery tools Connecting to external display devices Information about how to connect your Joybook to external display devices Installing additional memory Information about how to...

Страница 6: ...g the battery pack Turn your Joybook upside down and put it on a soft clean cloth With the label side of the battery pack facing down slide it gently into the battery compartment until it snaps into p...

Страница 7: ...the right and then lift the lid up 4 Performing initial setup Press the Power button to start up your Joybook and then follow the on screen instructions to complete the initial Windows Vista setup You...

Страница 8: ...of your Joybook Connect a telephone line to the modem port of your Joybook and dial up to the Internet or send a fax Access local area network LAN by connecting a network cable to the LAN port of you...

Страница 9: ...of discs and enjoy movies or music Connect an earphone to the audio output socket to output sounds Connect a microphone to the microphone socket to record sounds Connect USB peripherals to the USB po...

Страница 10: ...6 Audio output socket Can be used to connect to an earphone headset or external speaker for playing Joybook audio 7 Wireless connection switch Wireless LAN WLAN is available on selected models If you...

Страница 11: ...sipating heat and keeping the computer at an optimal temperature 4 USB port For connecting peripherals such as mice digital cameras and MP3 players that use the USB 2 0 interface 5 PCMCIA Card expansi...

Страница 12: ...e indicator Flashes in green when Joybook is accessing data in the optical drive 3 Optical drive ejection button Discs can be inserted ejected by pressing this ejection button 4 Manual tray opening If...

Страница 13: ...memory slot of Joybook There is also a MiniCard slot for using an optional MiniCard A wireless network card in the MiniCard form factor design may have been pre installed on selected models To remove...

Страница 14: ...such as mice digital cameras and MP3 players that use the USB 2 0 interface 3 15 pin D sub video socket For connecting external display devices such as monitors and projectors 4 Anti theft Kensington...

Страница 15: ...Hard disk drive activity indicator Flashes in green when Joybook is accessing data in the hard disk drive 4 Caps Lock indicator Lights up in green when the Caps Lock is activated 5 Scroll Lock indicat...

Страница 16: ...chronize the system clock with an Internet time server How to locate download and install latest system device drivers How to setup scheduled events for system maintenance Turning off your Joybook pro...

Страница 17: ...one of the following Click Start Control Panel Mobile PC and then click Windows Mobility Center Click the battery meter icon or in the notification area located in the lower right corner of the deskto...

Страница 18: ...rdware and Sound and Mouse The touchpad is a pressure sensitive device that requires proper care to avoid damage Do not rest heavy objects on the touchpad or its buttons Do not scratch the touchpad wi...

Страница 19: ...n external monitor projector or allows simultaneous display switches between internal external display Fn F11 Increases volume Fn F6 Enables or disables system beep When enabling system beep by pressi...

Страница 20: ...ss and hold the Windows key and then press Tab to switch between windows R Activates the Run dialogue box E Opens the Computer window for browsing disks and files Caps Lock Capitalizes all text entere...

Страница 21: ...rea 2 Slide the Wireless connection switch on the Joybook to the right to activate WLAN 3 Click on the WLAN icon in the notification area located at the lower right corner of the desktop to display a...

Страница 22: ...reference only The actual items or settings on your Joybook may differ The BIOS setup program may have been updated after the publication of this manual The settings you select in your operating syst...

Страница 23: ...set of password controls access to the whole BIOS setup menu It must be set before User Password can be set When typing the password first make sure that Num Lock is off and then type your password in...

Страница 24: ...etup without saving the changes you have made Load Setup Defaults loads factory default values for all the items Discard Changes cancels all changes since last save without exiting the BIOS setup util...

Страница 25: ...ess press the F10 key when you see Press F10 key to enter QDataTrove on the upper left part of the screen 3 The following options will then display on the screen Click Backup or Restore to proceed acc...

Страница 26: ...sc and Drivers and Applications discs will cause the QDataTrove function to become unavailable You will also need to install the device drivers manually from the Drivers and Applications discs Do not...

Страница 27: ...d to go to Chipset and Audio to perform the driver installation first To make your system work properly install all drivers and applications that are available for your model 3 Follow the remaining on...

Страница 28: ...as a projector or monitor Once the VGA cable is connected properly simultaneous display will be available on your Joybook and the external display device automatically Pressing the Fn F3 hotkey combi...

Страница 29: ...the upgrade or memory replacement For details about the limit of maximum memory refer to the product information from http BenQ com Please follow the steps below to consult the FAQ information and fi...

Страница 30: ...cover Ground yourself to your Joybook with professional grounding equipment like an anti static wristband or touch the metal surface on the inside of your Joybook to discharge any static electricity H...

Страница 31: ...e screws 10 Place the battery on its original position 1 and then slide the battery retainer B to the to the lock position 2 Connect the AC adapter When you start Joybook it will automatically test an...

Страница 32: ...d I do with the battery if I will not use my Joybook for a long time Recharge the battery or discharge it to about 40 full and then store it in a dry place at about 15 C to 25 C Extremely high or low...

Страница 33: ...f the telephone lines A 56K modem does not guarantee all connections at 56K rather it s the ability to connect at up to 56K speed Can t connect to the Internet with the built in network interface on J...

Страница 34: ...ograms from the Startup folder also helps to prevent programs from running when Windows starts up To do so follow the steps below 1 Right click anywhere in the open area on the desktop and select New...

Страница 35: ...a result the palm rest gets warm The location of the processor is typically underneath the keyboard and since heat rises the keyboard may slightly get warm There is no need to be concerned However si...

Страница 36: ...u can still hear that noise If the noise persists the earphone may be out of order If you can hear the noise only when inserting it is the result of high instantaneous current It is a normal phenomeno...

Страница 37: ...se simultaneous display When I connect the Joybook to an external monitor the display is abnormal The instructions below will guide you through the troubleshooting process Use the Fn F3 function key c...

Страница 38: ...extreme heat Do not incinerate Exposure of battery to extreme heat may result in an explosion 8 Do not use AC adapters other than the one provided with the Joybook 9 Do not place the battery within r...

Страница 39: ...tains answers to frequently asked questions about the Joybook as well as additional tips Contact Center Here you can directly contact BenQ Customer Service for answers and advice to your questions You...

Страница 40: ...on the AC adapter or power cord 12 The AC adapter is a high voltage component Do not attempt to repair it yourself Should it become damaged please contact an authorized BenQ distributor or service ce...

Страница 41: ...t protects human health and environment Declaration of Conformity For the following equipment Type of Equipment Notebook PC Brand name or mark BenQ Model designation s Model no s DHR503 Joybook A52 C4...

Страница 42: ...i i numai cu acela i tip sau cu un tip echivalent recomandat de produc torul echipamentului Arunca i bateriile folosite n conformitate cu instruc iunile produc torului 4 Conecta i adaptorul la o surs...

Страница 43: ...lietojiet un neveiciet telefona l nijas piesl gumu negaisa laik Hrvatski 1 Pridr avajte se svih uputa i upozorenja u vezi sa sustavom 2 Ne postavljajte ra unalo u podru je jakih magnetskih polja 3 Nep...

Страница 44: ...Appendix 40 Memo JB_A52 book Page 40 Monday February 12 2007 10 44 AM...

Отзывы: