background image

Introduction  

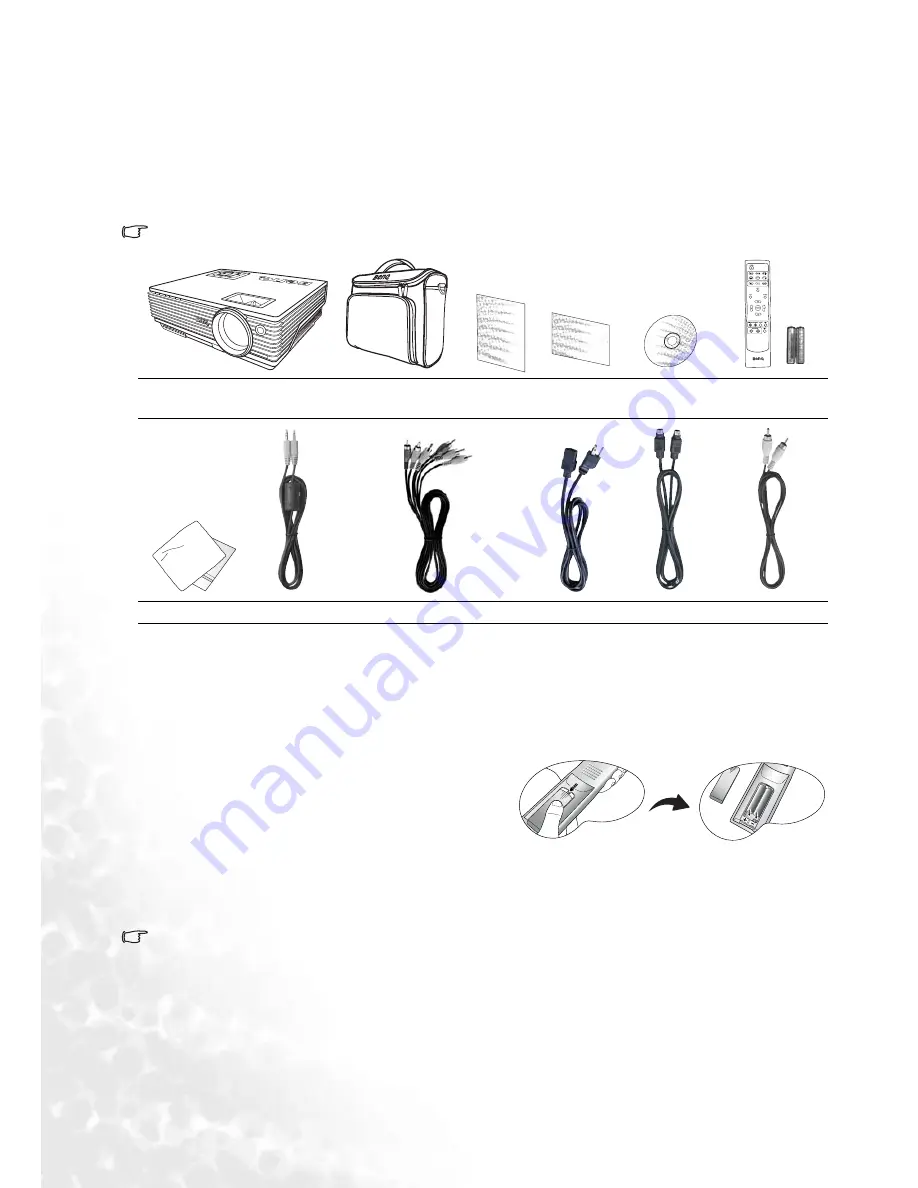
Shipping contents

The projector is shipped with the cables required for connection to a PC and to video equipment. Carefully 
unpack and verify that you have all of the items shown below. If any of these items are missing, please contact 
your place of purchase.

Standard accessories

The supplied accessories will be suitable for your region, and may differ from those illustrated.

Optional accessories

Remote control batteries

1.

To open the battery cover, turn the remote control 
over to view its back, push on the finger grip on the 
cover and slide it down in the direction of the arrow 
as illustrated. The cover will slide off. 

2.

Remove any existing batteries (if necessary) and 
install two new AAA batteries observing the battery 
polarities as indicated in the base of the battery compartment. Positive (+) goes to positive and negative(-) 
goes to negative. 

3.

Refit the cover by aligning it with the case and sliding it back up into position. Stop when it clicks into place. 

Notes on handling batteries

• Do not mix old batteries with new ones, or mix different types of batteries.
• Avoid leaving the remote control and batteries in an excessive heat or humid environment like the kitchen, 

bathroom, sauna, sunroom, or in a closed car.

• Dispose of used batteries according to the battery manufacturer’s instructions and local environment 

regulations for your region.

• If the remote control will not be used for an extended period of time, remove the batteries to avoid damage to 

the control from possible battery leakage.

Projector

Soft carry case

User’s 

manual

Quick start 

guide

User’s manual 

CD

Remote control 

with batteries

Cleaning cloth

Audio cable

Component Video cable

Power cord S-Video cable

Video cable 

W100

PUSH

C

T

1.

Spare lamp kit

2.

Ceiling mount kit

3.

DVI cable

4.

Component Video to VGA (D-sub) adaptor cable

Содержание Home Entertainment W100

Страница 1: ...W100 Digital Projector Home Entertainment Series User s Manual ...

Страница 2: ...taining a preferred projected image size 13 Connection 17 Connecting Video source devices 17 Operation 23 Start up 23 Switching input signal 23 Adjusting the projected image 24 Operating in a high altitude environment 26 Personalizing the projector menu display 26 Optimizing the image 27 Shutting down the projector 30 Menu operation 30 Maintenance 37 Care of the projector 37 Lamp information 38 Tr...

Страница 3: ...Safety instructions 1 Please read this user s manual before you operate your projector Keep this manual in a safe place for future reference 2 Do not look straight into the projector lens during operation The intense light beam may harm your sight 3 When you think service or repair is required take the projector only to a suitably qualified technician 4 In areas where the mains voltage may fluctua...

Страница 4: ...ce Do not place inflammables near the projector If the ventilation holes are seriously obstructed overheating inside the unit may result in a fire 10 Do not place this projector in any of the following environments space that is poorly ventilated or confined Allow at least 50 cm clearance from walls and free flow of air around the projector locations where temperatures may become excessively high ...

Страница 5: ...laying inverted images for ceiling mount installation Use only BenQ s Ceiling Mount Kit for mounting 15 Do not step on the projector or place any objects upon it Besides probable physical damage to the projector doing so may result in accidents and possible injury 16 Do not block the projection lens with any objects when the projector is under operation as this could cause the objects to become he...

Страница 6: ...mful interference to radio or television reception which can be determined by turning the equipment off and on the user is encouraged to try to correct the interference by one or more of the following measures Reorient or relocate the receiving antenna Increase the distance between the equipment and receiver Connect the equipment into an outlet on a circuit different from that to which the receive...

Страница 7: ...ative 16 9 aspect ratio 2 sets of Component Video sockets allowing a second Component Video device to remain connected and standing by so that it can be readily selected without swapping cables A DVI connector with HDCP function making digital viewing quality possible The apparent brightness of the projected image will vary depending on the ambient lighting conditions selected input source contras...

Страница 8: ...ositive goes to positive and negative goes to negative 3 Refit the cover by aligning it with the case and sliding it back up into position Stop when it clicks into place Notes on handling batteries Do not mix old batteries with new ones or mix different types of batteries Avoid leaving the remote control and batteries in an excessive heat or humid environment like the kitchen bathroom sauna sunroo...

Страница 9: ...6 Focus ring and Zoom ring 7 Front IR remote sensor 8 Rear adjuster foot 9 AC power cord inlet 10 Kensington anti theft lock slot 11 RS232 control port 12 Component 1 supports YPbPr or YCbCr video signal 13 Component 2 supports YPbPr or YCbCr video signal 14 DVI I socket supports DVI D video signal and DVI A PC signal 15 Video socket 16 S Video socket 17 Audio socket 18 IR remote sensor 19 Speaker...

Страница 10: ... the image size and clarity on page 24 for details Adjusts the focus of the projected image 14 Zoom ring See Fine tuning the image size and clarity on page 24 for details Adjusts the size of the image 1 Power See Start up on page 23 and 1 Selecting the aspect ratio on page 27 for details Toggles the projector between standby mode and on When the projector is in standby press once to turn the proje...

Страница 11: ...TO See page Auto adjusting the image on page 24 for details Automatically determines the best picture timings for the displayed image This function only works when a computer source is connected 5 MODE See page 2 Selecting an application mode on page 28 for details Depending upon which input signal is selected there are several picture setup options available 6 MENU and directional buttons See pag...

Страница 12: ...st common way to position the projector for quick setup and portability 3 Floor rear Select this location with the projector placed near the floor behind the screen Note that a special rear projection screen is required Set in the Advance Mirror menu after you turn the projector on 2 Ceiling front Select this location with the projector suspended upside down from the ceiling in front of the screen...

Страница 13: ...ight angle square to the horizontal centre of the screen This prevents image distortion caused by angled projections or projecting onto angled surfaces The modern digital projector does not project directly forward like older style reel to reel film projectors did Instead digital projectors are designed to project at a slightly upward angle above the horizontal plane of the projector This is so th...

Страница 14: ...d this projector and would like to know what screen size will fit in your room The maximum screen size is limited by the physical space available in your room 1 Determine the aspect ratio of your screen 16 9 or 4 3 If you have a 16 9 screen refer to Installation for a 16 9 ratio screen on page 15 If you have a 4 3 screen refer to Installation for a 4 3 ratio screen on page 16 2 Measure the distanc...

Страница 15: ... Offset in mm Feet Inches mm Min length with max zoom Average Max length with min zoom 4 48 1219 1800 1931 2063 97 1500 2215 2376 2538 120 5 60 1524 2250 2414 2578 122 6 72 1829 2700 2897 3094 146 2000 2953 3168 3384 160 7 84 2134 3150 3380 3610 171 8 96 2438 3600 3863 4125 195 2500 3691 3960 4230 200 9 108 2743 4050 4346 4641 219 3000 4430 4753 5076 240 10 120 3048 4500 4829 5157 244 3500 5168 55...

Страница 16: ...of the lens Diagonal Floor Installation 4 3 Screen Diagonal Distance from Screen in mm Vertical Offset in mm Feet Inches mm Min length with max zoom Average Max length with min zoom 4 48 1219 2205 2366 2526 119 1500 2713 2910 3108 147 5 60 1524 2756 2957 3158 149 6 72 1829 3307 3548 3790 179 2000 3617 3881 4144 196 7 84 2134 3858 4140 4421 209 8 96 2438 4410 4731 5053 239 2500 4521 4851 5180 245 9...

Страница 17: ... device as described below Best video quality The best available video connection method is DVI if your source device is equipped with a DVI socket Based on the type of DVI connector you have you can enjoy a digital or high end analog video quality See Connecting a DVI source device on page 19 for how to connect the projector to a DVI source device and other details If no DVI source is available t...

Страница 18: ...rojector speaker If you have a separate sound system you will most likely want to connect the audio output of your Video source device to that sound system instead of to the mono audio projector The audio connections illustrated in the following sections are provided for informational purposes only You need not connect audio to the projector if there is an alternate sound system available or if au...

Страница 19: ...d DVI or VGA D Sub output socket available If so you can continue with this procedure If not you will need to reassess which method you can use to connect to the device To connect the projector to a DVI source device or a computer either through a DVI cable or VGA to DVI A cable Many notebooks do not turn on their external video ports when connected to a projector Usually a key combo like FN F3 or...

Страница 20: ...tors to the YPb Cb Pr Cr sockets on the projector Again match the color of the plugs to the color of the sockets green to green blue to blue and red to red 3 If you wish to make use of the projector mixed mono speaker take a suitable audio cable and connect one end of the cable to the audio output sockets of the video device and the other end to the AUDIO socket of the projector Once connected the...

Страница 21: ...ed the audio can be controlled by the projector volume and mute settings See Mute and Volume on page 34 for details The final connection path should be like that shown in the following diagram The projector is only capable of playing mixed mono audio even if a stereo audio input is connected See Connecting Audio on page 18 for details If the selected video image is not displayed after the projecto...

Страница 22: ... the video device and the other end to the AUDIO socket of the projector Once connected the audio can be controlled by the projector volume and mute settings See Mute and Volume on page 34 for details The final connection path should be like that shown in the following diagram The projector is only capable of playing mixed mono audio even if a stereo audio input is connected See Connecting Audio o...

Страница 23: ...ress SOURCE on the projector or remote control to select your desired input signal For more information please refer to Switching input signal on page 23 If the frequency resolution of the input signal exceeds the projector s operating range you will see the message Out of Range displayed on a blank screen Please change to an input signal which is compatible with the projector s resolution or set ...

Страница 24: ...projector Screw the rear adjuster foot in a reverse direction If the screen and the projector are not perpendicular to each other the projected image becomes vertically trapezoidal To correct this situation adjust the value of Keystone in the Picture menu on the projector control panel or on the remote control Auto adjusting the image In some cases you may need to optimize the picture quality To d...

Страница 25: ...ress or on the remote control to display the status bar labelled Keystone then press to correct keystoning at the top of the image or press to correct keystoning at the bottom of the image Press MENU on the projector or MENU on the remote control Go to Picture Keystone and adjust the values by pressing on the projector or Left Right on the remote control For example C T C 0 Keystone 6 Keystone 0 K...

Страница 26: ... you should switch to High Altitude mode to solve these symptoms However this is not to state that this projector can operate under any and all harsh or extreme conditions Personalizing the projector menu display The On Screen Display OSD menus can be set according to your preferences The following settings do not affect the projection settings operation or performance OSD Time in Setting menu set...

Страница 27: ...r or changing the ratios in the Pro Picture Aspect Ratio menu Select an aspect ratio to suit the format of the signal and your display requirements There are three aspect ratios available In the pictures below the grey portions are inactive areas and the white portions are active areas 1 16 9 default Scales an image so that it is displayed in the center of the screen with a 16 9 aspect ratio This ...

Страница 28: ...olor saturation and contrast with a low brightness level This is most suitable for enjoying movies in a totally dark environment as you would find in a commercial cinema 3 Gaming Mode is suitable for playing video games in a bright living room 4 Photo Mode designed for viewing digital pictures in a living room 5 Family Room Brightness is emphasis in this mode and is best suited for use in rooms wi...

Страница 29: ...ue the more greenish the image becomes The lower the value the more reddish the image becomes Use this to adjust the color tones of the image 5 Selecting a color temperature This function is only accessible through the OSD system To select a preferred color temperature press Left Right on remote control or projector There are four color temperature settings available 1 T1 With the highest color te...

Страница 30: ...ct the lamp when you attempt to re start the projector the fans will run for a few minutes to cool down Press POWER again to start the projector after the fans stop Menu operation Using the menus The projector is equipped with multilingual on screen display OSD menus for making various adjustments and settings You can set your OSD language in the Advance Language menu before browsing through the m...

Страница 31: ...lication Mode Keystone Color Temp Brightness Contrast Application Mode Keystone Color Temp Brightness Contrast Color Tint Pro Picture Aspect Ratio H Position V Position Phase H Size IRE Aspect Ratio IRE Aspect Ratio Sharpness Setting Mute Volume OSD Time Quick Cooling Reset Advance Mirror Source Scan Language Splash Screen High Altitude Mode Auto Off Economic Mode Information Source Resolution App...

Страница 32: ...ng keystone on page 25 for details Color Temp depends on the selected Application mode Sets a preferred color temperature See 5 Selecting a color temperature on page 29 for details Brightness depends on the selected input source Adjusts the brightness of the image See 1 Adjusting brightness on page 28 for details Contrast depends on the selected input source Adjusts the degree of difference betwee...

Страница 33: ...ingly Aspect Ratio 16 9 There are three aspect ratio settings See 1 Selecting the aspect ratio on page 27 for details 1 16 9 for a wide screen 2 Real 3 4 3 for a standard screen 16 9 aspect ratio is only sourced through the Component Video input when being fed an appropriate 16 9 aspect signal See Connecting a Component Video source device on page 20 and Obtaining a preferred projected image size ...

Страница 34: ... after your last button press The range is from 5 to 100 seconds Quick Cooling off Enables or disables the Quick Cooling function Selecting On enables the function and projector cooling time will be shortened from a normal 90 second duration to approximately 30 seconds Reset Returns all settings to the factory preset values The following settings will still remain Mirror Language High Altitude Mod...

Страница 35: ...edish Dutch Turkish Czech Portuguese Thai and Polish Use Left Right on the projector or remote control to select your desired language Splash Screen BenQ logo Allows you to select which logo screen will display during projector start up Three modes are available Default BenQ logo black screen or blue screen High Altitude Mode off A mode for operation in areas like high altitude or high temperature...

Страница 36: ... in use Unavailable adjustments are not shown on the screen FUNCTION DESCRIPTION Source Shows the current signal source Resolution Shows the native resolution of the input signal Application Mode Shows the selected mode in the Picture menu Equivalent Lamp Hour Displays the number of hours the lamp has been used System Shows the Video input system format NTSC SECAM or PAL ...

Страница 37: ...d unplug the power cord To remove dirt or dust wipe the case with the supplied cleaning cloth To remove stubborn dirt or stains moisten a soft cloth with water and a neutral pH detergent Then wipe the case Never use wax alcohol benzene thinner or other chemical detergents These can damage the case Storing the projector If you need to store the projector for an extended time please follow the instr...

Страница 38: ...e power back on please contact your dealer The following Lamp warning displays will remind you to change the lamp Message Status The lamp has been in operation for 2800 hours Install a new lamp for optimal performance If the projector is normally run with Economic Mode selected See Economic Mode on page 35 you may continue to operate the projector until the 2950 hour lamp warning appears The lamp ...

Страница 39: ...of this lamp in a proper manner 1 Turn the power off and disconnect the projector from the wall socket If the lamp is hot avoid burns by waiting for approximately 45 minutes until the lamp has cooled 2 Protect the projector s surface by clearing a flat open area on your desk and placing a soft item on the desk for padding 3 Turn the projector over Then loosen the screw on the lamp cover Be careful...

Страница 40: ...ents inside it could cause color unevenness and distortion of the projected images 8 As shown in the figure hold the new lamp and align the two locators on the lamp with the holes on the projector and then insert the lamp all the way into the projector 9 Connect the lamp connector to the projector 10 Tighten the screw that secures the lamp Loose screw may cause a bad connection which could result ...

Страница 41: ...projector off and contact qualified service personnel for further help For more information please refer to Indicators below Indicators Illustration Blank Light OFF O Orange light Light flashing R Red light Light ON G Green light Light Status Description Power Temp Lamp Power events Stand by mode The Power indicator light is flashing during powering up The projector is under normal operation 1 The...

Страница 42: ...will shutdown again Please contact your dealer for assistance 1 The projector needs 90 seconds to cool down Or 2 Please contact your dealer for assistance Thermal events The projector has shutdown automatically If you try to re start the projector it will shutdown again Please contact your dealer for assistance O R R R R R R G R R R G R R O R R G R ...

Страница 43: ... to the input source device Check the connection The input signal has not been correctly selected Select the correct input signal with the SOURCE button on the projector or the Source buttons on the remote control The lens cap is still attached to the lens Remove the lens cap Cause Remedy The projection lens is not correctly focused Adjust the focus of the lens using the focus ring The projector a...

Страница 44: ...onsumption 285W Max Mechanical Weight 6 lbs 2 724 Kg Input terminal Computer input RGB input DVI I x 1 using DVI A signal Video signal input S VIDEO Mini DIN 4 pin port x 1 VIDEO composite RCA x 1 SD HDTV signal input Analog Component x 2 Digital DVI HDTV only Audio signal input Audio in Mini jack stereo port Output Speaker mixed mono 2 watt x 1 Environmental Requirements Operating temperature 0 C...

Страница 45: ...5 061 56 250 SVGA_85 1024 x 768 48 363 60 004 65 000 XGA_60 56 476 70 069 75 000 XGA_70 60 023 75 029 78 750 XGA_75 68 667 84 997 94 500 XGA_85 1280 x 1024 63 981 60 020 108 000 SXGA_60 Signal Format Horizontal Frequency kHz Vertical Frequency Hz 480i 525i 60Hz 15 73 59 94 480p 525p 60Hz 31 47 59 94 576i 625i 50Hz 15 63 50 00 576p 625p 50Hz 31 25 50 00 720p 750p 60Hz 45 00 60 00 720p 750p 50Hz 37 ...

Страница 46: ...To obtain warranty service immediately notify the dealer from which you purchased the product of any defects Important The above warranty shall be void if the customer fails to operate the product in accordance with BenQ s written instructions especially the ambient humidity must be in between 10 and 90 temperature in between 0 C and 40 C altitude lower than 10000 feet and avoiding to operate the ...

Страница 47: ...rporation Disclaimer BenQ Corporation makes no representations or warranties either expressed or implied with respect to the contents hereof and specifically disclaims any warranties merchantability or fitness for any particular purpose Further BenQ Corporation reserves the right to revise this publication and to make changes from time to time in the contents hereof without obligation to notify an...

Отзывы: