background image

  5

  Getting started

Getting started

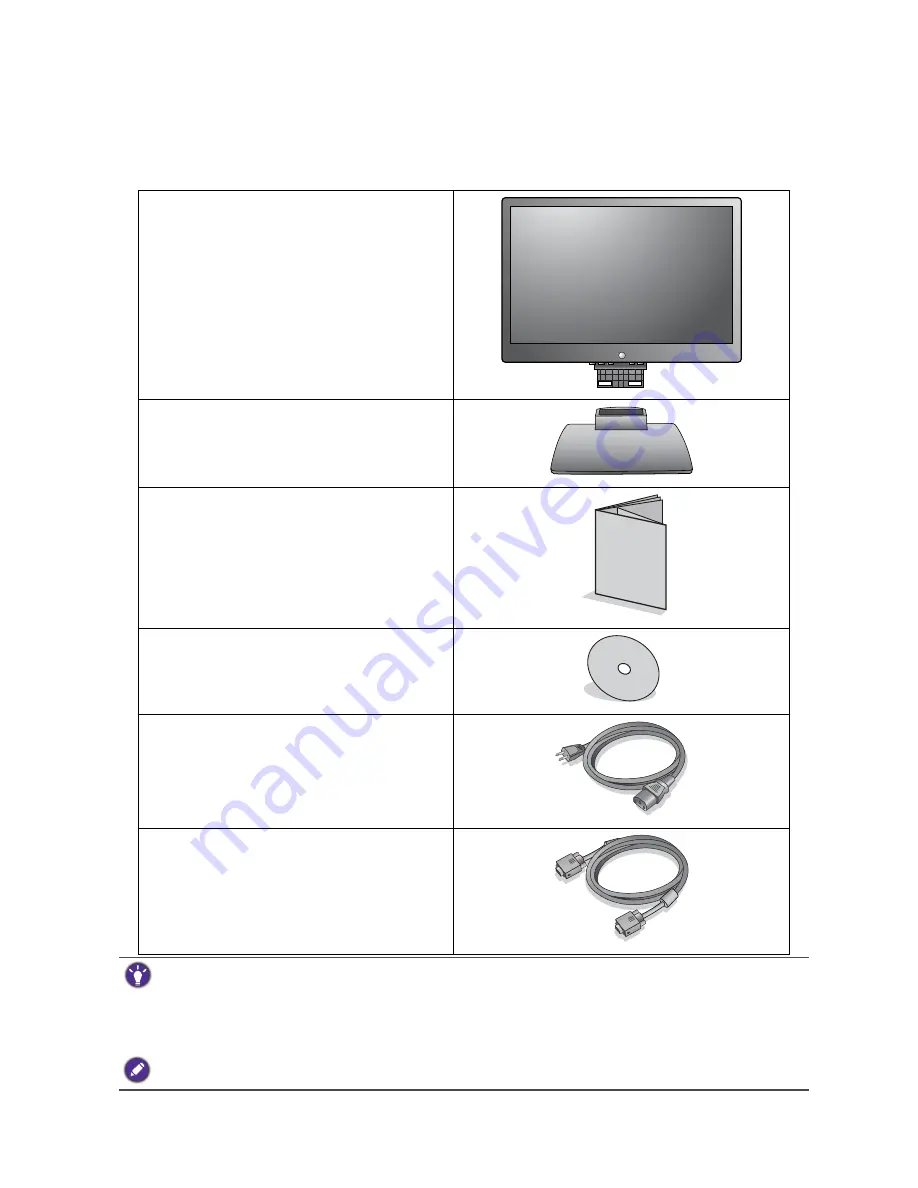
When unpacking please check you have the following items. If any are missing or damaged, 
please contact the place of purchase for a replacement.


BenQ LCD Monitor

Monitor Base

Quick Start Guide


CD-ROM


Power Cord
(Picture may differ from product supplied 
for your region.)

Video Cable: D-Sub 

• Available accessories and the pictures shown here may differ from the actual contents and the product 

supplied for your region. For cables that are not supplied with your product, you can purchase them 
separately.

• Consider keeping the box and packaging in storage for use in the future when you may need to transport the 

monitor. The fitted foam packing is ideal for protecting the monitor during transport. 

Always keep the product and accessories out of reach of small children. 

Содержание G910WAE

Страница 1: ...G910WAL G910WAE LCD Monitor User Manual...

Страница 2: ...a power disconnect device for pluggable equipment The socket outlet should be installed near the equipment and be easily accessible This product should be operated from the type of power indicated on...

Страница 3: ...ds pertaining to environmental management BenQ has spared no efforts in pushing our initiatives further to incorporate life cycle design in the aspects of material selection manufacturing packaging tr...

Страница 4: ...ng kit 11 Getting the most from your BenQ monitor 12 How to install the monitor on a new computer 13 How to upgrade the monitor on an existing computer 14 How to install on Windows 8 system 15 How to...

Страница 5: ...ion Video Cable D Sub Available accessories and the pictures shown here may differ from the actual contents and the product supplied for your region For cables that are not supplied with your product...

Страница 6: ...Getting to know your monitor Front view Back view 1 Control buttons 2 Power button 1 2 3 AC power input jack 4 D Sub socket 4 3 Above diagram may vary depending on the model Picture may differ from pr...

Страница 7: ...ack the glass or damage the LCD substrate voiding your warranty Sliding or scraping the monitor around on your desk will scratch or damage the monitor surround and controls Protect the monitor and scr...

Страница 8: ...at the end without the ferrite filter to the monitor video socket Connect the other end of the cable at the end with the ferrite filter to the computer video socket Tighten all finger screws to preven...

Страница 9: ...nect to and turn on the power Plug the other end of the power cord into a power outlet and turn it on Picture may differ from product supplied for your region Turn on the monitor by pressing the power...

Страница 10: ...nd placing a soft item like a towel on the desk for padding before laying the screen face down on a flat clean padded surface Please be careful to prevent damage to the monitor Placing the screen surf...

Страница 11: ...Ensure that the wall material is stable to support the weight of the monitor Turn off the monitor and the power before disconnecting the cables from the LCD monitor 1 Remove the monitor base Lay the...

Страница 12: ...ng the monitor to your computer Windows will automatically recognize the new or different hardware and will launch its Found New Hardware wizard Follow the wizard instructions until it asks you to sel...

Страница 13: ...plays the option to Install Hardware Device Drivers 2 Insert the BenQ LCD Monitor CD ROM into a CD drive on the computer 3 Check Search for a suitable driver for my device option and click Next 4 Chec...

Страница 14: ...itor you have connected and letting Windows install the corresponding driver files from the CD You need only steer it in the right direction Windows has an Upgrade Device Driver Wizard to automate the...

Страница 15: ...then the Properties button 5 Click the Driver tab and the Update Driver button 6 Insert the BenQ LCD Monitor CD ROM into a CD drive on the computer 7 In the Update Driver Software window select the o...

Страница 16: ...d the Update Driver button 6 Insert the BenQ LCD Monitor CD ROM into a CD drive on the computer 7 In the Update Driver Software window select the option Browse my computer for driver software 8 Click...

Страница 17: ...and the Update Driver button 6 Insert the BenQ LCD Monitor CD ROM into a CD drive on the computer 7 In the Update Driver Software window select the option Browse my computer for driver software 8 Clic...

Страница 18: ...m However we recommend that you use auto exe As you run auto exe a test pattern displays 2 Press the AUTO key on the monitor 3 Press the MENU key to access the monitor On Screen Display OSD menu 4 Use...

Страница 19: ...the hot key for Mode 4 Power Turns the power on or off 5 Contrast Brightness key For Right Increase adjustment The key is the hot key for Brightness and Contrast 6 ENTER key Enters sub menus and selec...

Страница 20: ...s the key to display the Brightness and Contrast indicators Further press the or keys then the ENTER key to select Brightness or Contrast The key will increase the level while the key will decrease th...

Страница 21: ...ase refer to the following pages Display menu on page 22 Picture menu on page 23 Picture Advanced menu on page 25 System menu on page 29 Depending on your purchased model different OSD menus are avail...

Страница 22: ...Function Operation Range Auto Adjustment Optimizes and adjusts the screen settings automatically for you The AUTO key is a hot key for this function Press the ENTER key to select this option and make...

Страница 23: ...ENTER MENU Select Move Back 3 Item Function Operation Range Brightness Adjusts the balance between light and dark shades Press the key to increase the brightness and press the key to decrease the bri...

Страница 24: ...gs Press the or keys and the ENTER key to select Red Green or Blue Then use the or keys to make the color adjustments Red Tailors the image color tint Decreasing one or more of the colors will reduce...

Страница 25: ...he previous menu press the MENU button PICTURE ADVANCED MODE Standard Picture Mode Senseye Demo Dynamic Contrast Display Mode Color Format 5 Standard OFF YUV ENTER MENU Exit Select Move Item Function...

Страница 26: ...ages of Standard mode while the right window presents the images under the specified mode Press the or keys to change the settings ON OFF Dynamic Contrast The function is to automatically detect the d...

Страница 27: ...ng on the purchased model aspect images Aspect The input image is displayed without geometric distortion filling as much of the display as possible Depending on the purchased model 16 9 or 16 10 image...

Страница 28: ...rom PC The default Color Format is RGB D Sub Component from a video device The default Color Format is YUV You might need to manually set the Color Format if colors shown on the monitor screen do not...

Страница 29: ...justments or selections 5 To return to the previous menu press the MENU button ENTER MENU Exit Select Move SYSTEM MODE Standard OSD Settings DDC CI Auto Power off Information Reset All Enter Item Func...

Страница 30: ...OSD controls when the OSD is preset to be locked press and hold the MENU key for 15 seconds to enter the OSD Lock option and make changes Alternatively you may use the or keys to select NO in the OSD...

Страница 31: ...All Resets all mode color and geometry settings to the factory default values Press the or keys to change the settings YES NO Item Function Operation Range DDC CI short for Display Data Channel Comman...

Страница 32: ...al pixels is permanently black one or more pixels are permanently white one or more pixels are permanently red green blue or another color Clean the LCD screen Cycle power on off These are pixels that...

Страница 33: ...instructions on the link Adjusting the Screen Resolution on the CD and then select the correct resolution refresh rate and make adjustments based on these instructions You are running the monitor at i...

Отзывы: