background image

  21

  How to adjust your monitor

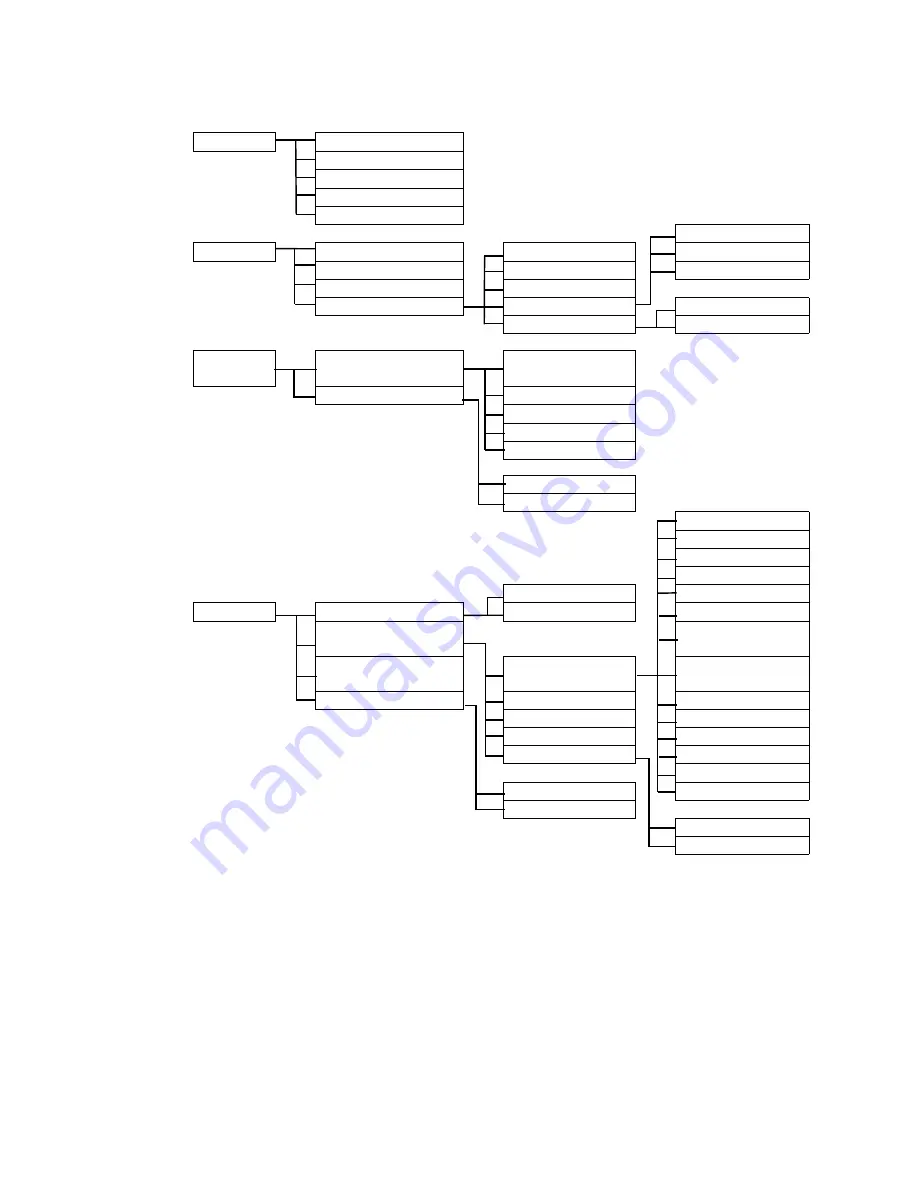
On Screen Display (OSD) menu structure 

DISPLAY

Auto Adjustment
H. Position
V. Position
Pixel Clock
Phase

Red

PICTURE

Brightness

Normal

Green

Contrast

Bluish

Blue

Sharpness

Reddish

Color

User Mode

Yes

Reset Color

No

PICTURE 
ADVANCED

Picture Mode

Standard

Senseye Demo

Movie
Dynamics
Photo
sRGB

ON
OFF

English
French
German
Italian

DVI

Spanish

SYSTEM

Input

D-sub

Polish/Japanese

OSD Settings

Czech/Traditional 
Chinese

Information

Language

Hungarian/Simplified 
Chinese

Reset All 

H. Position

Sebro-Croatian

V. Position

Romanian

Display Time

Dutch

OSD Lock

Russian
Swedish

Yes

Portuguese

No

ON
OFF

Содержание FP93G P

Страница 1: ...Welcome FP93G S FP93G P LCD Color Monitor 19 0 LCD Panel Size User Manual ...

Страница 2: ...m the AC supply The power supply cord serves as a power disconnect device for pluggable equipment The socket outlet should be installed near the equipment and be easily accessible This product should be operated from the type of power indicated on the marked label If you are not sure of the type of power available consult your dealer or local power company Care And Cleaning Cleaning Always unplug ...

Страница 3: ...on a new computer 13 How to upgrade the monitor on an existing computer 14 How to install on Windows Vista systems 15 How to install on Windows XP system 16 How to adjust the screen resolution 17 How to adjust the screen refresh rate 18 Picture optimization 19 How to adjust your monitor 20 The control panel 20 On Screen Display OSD menu structure 21 Hot key mode 22 Main menu mode 23 Troubleshootin...

Страница 4: ...r a replacement Consider keeping the box and packaging in storage for use in the future when you may need to transport the monitor The fitted foam packing is ideal for protecting the monitor during transport BenQ LCD Monitor Quick Start Guide CD ROM Power Cord Picture may differ from product supplied for your region Signal Cable D Sub Signal Cable DVI D optional ...

Страница 5: ...5 Getting to know your monitor 2 Getting to know your monitor Front view Back view 1 AC power input jack 2 DVI D input socket 3 D Sub input socket ...

Страница 6: ...trols Protect the monitor and screen by clearing a flat open area on your desk and placing a soft item like the monitor packaging bag on the desk for padding Gently lay the screen face down on a flat clean padded surface While holding the monitor firmly against the desk pull the monitor stand arm upwards clear of the monitor Orient and align the stand base socket with the end of the stand arm then...

Страница 7: ...n source video and digital LCD monitors or projectors The digital video signals produce a superior quality picture than analog video signals Connect the plug of the D Sub cable at the end without the ferrite filter to the monitor D Sub socket Connect the other plug of the D Sub cable at the end with the ferrite filter to the computer video D Sub socket Tighten all finger screws to prevent the plug...

Страница 8: ...bles neatly in place behind the monitor stand 5 Connect to and turn on the power Plug the other end of the power cord into a power outlet and turn it on Picture may differ from product supplied for your region Turn on the monitor by pressing the power button on the front of the monitor Turn on the computer too and follow the instructions in Section 4 Getting the most from your BenQ monitor on page...

Страница 9: ... glass or damage the LCD substrate voiding your warranty Sliding or scraping the monitor around on your desk will scratch or damage the monitor surround and controls Protect the monitor and screen by clearing a flat open area on your desk and placing a soft item like a towel on the desk for padding before laying the screen face down on a flat clean padded surface 2 Release the locking clip on one ...

Страница 10: ...ff the monitor and the power before disconnecting the cables from the LCD monitor 1 Remove the monitor base Lay the screen face down on a clean and well padded sur face Detach the monitor base as instructed in How to detach the stand base on page 9 2 Remove the monitor stand Use a a cross pointed screwdriver to release the screws that fixing the monitor stand to the monitor The use of a magnetic h...

Страница 11: ... you purchased to complete the installation 1 Tilt the rear cover forward and insert the two tabs on the front edge into the recesses of the screw plate No tools are required 2 Position the two tabs on left side of the rear cover to fit into the grooves in the screw plate 3 Push the other two tabs on the right side of the rear cover inward so that they could snap into the aligned grooves There wil...

Страница 12: ...the very next time you turn on your computer after connecting the monitor to your computer Windows will automatically recognise the new or different hardware and will launch its Found New Hardware wizard Follow the wizard instructions until it asks you to select a monitor model At that point click the Have Disk button insert the BenQ LCD Monitor CD ROM and select the appropriate monitor model Furt...

Страница 13: ...ed you should not be following these instructions You should instead be following the instructions for How to upgrade the monitor on an existing computer 1 Follow the instructions in How to assemble your monitor hardware on page 6 When Windows starts it will automatically detect the new monitor and launch the Found New Hardware Wizard Follow the prompts until it displays the option to Install Hard...

Страница 14: ...time of writing BenQ has done no testing of this driver on other versions of Windows and cannot guarantee its operation on those systems Installing monitor driver software involves selecting an appropriate information file inf on the BenQ LCD Monitor CD ROM for the particular model monitor you have connected and letting Windows install the corresponding driver files from the CD You need only steer...

Страница 15: ...ties button 4 Click Continue in the prompted User Account Control window 5 Click the Driver tab and the Update Driver button 6 Insert the BenQ LCD Monitor CD ROM into a CD drive on the computer 7 In the Update Driver Software window select the option Browse my computer for driver software 8 Click Browse and select Driver Windows Vista FP93GS FP93GP from the CD and click the Next button This will c...

Страница 16: ...e correct model is not currently shown you will need to continue with these instructions 5 Click the Driver tab and the Update Driver button The Hardware Update Wizard will display Follow the wizard instructions noting the steps below 6 Insert the BenQ LCD Monitor CD ROM into a CD drive on the computer you attached the monitor to 7 Check the option Install from a list or specific location and clic...

Страница 17: ...pending upon the image type and its initial resolution To take full advantage of LCD technology you should select the native resolution setting of 1280 x 1024 1 Open Display Properties and select the Settings tab You can open Display Properties by right clicking on the Windows desktop and selecting Properties from the pop up menu 2 Use the slider in the Screen area section to adjust the screen res...

Страница 18: ...he factory modes in the specification section of this User s Manual Supported PC Timings on page 35 You can choose 60 70 and 75 Hertz but not 72Hz for the native resolution of 1280 x 1024 1 Double click the Display icon in Control Panel 2 From the Display Properties window select the Settings tab and click the Advanced button 3 Select the Adapter tab and select an appropriate refresh rate to match...

Страница 19: ...has provided a screen test image utility which you can use to check for screen color grayscale and line gradient display 1 Run the test program auto exe from CD ROM You could also use any other image such as the desktop of your operating system However we recommend that you use auto exe As you run auto exe a test pattern displays 2 Press the i key on the monitor 3 Press the ENTER key to access the...

Страница 20: ... key is the hot key for Contrast 4 X Right key For Right Increase adjustment Right key is the hot key for Brightness 5 Enter key Activate OSD enter sub menu select items and confirm selection 6 Power Turn the power on or off OSD On Screen Display The hot keys will display a graduated scale for adjusting the value of that setting and will only operate while the OSD menu is not currently displaying ...

Страница 21: ...olor User Mode Yes Reset Color No PICTURE ADVANCED Picture Mode Standard Senseye Demo Movie Dynamics Photo sRGB ON OFF English French German Italian DVI Spanish SYSTEM Input D sub Polish Japanese OSD Settings Czech Traditional Chinese Information Language Hungarian Simplified Chinese Reset All H Position Sebro Croatian V Position Romanian Display Time Dutch OSD Lock Russian Swedish Yes Portuguese ...

Страница 22: ...ghtness indicator Further press the X key to increase or the W key to decrease the screen brightness and press the Exit key to exit Press the W key to display the Contrast indi cator Further press the X key to increase or the W key to decrease the screen contrast and press the Exit key to exit Press the Exit key to toggle between different PC video signal inputs that may be connected to your monit...

Страница 23: ...ee Language on page 31 under OSD Settings for more details For more information on each menu please refer to the following pages Display menu on page 24 Picture menu on page 26 Picture Advanced menu on page 28 System menu on page 30 There are four main OSD menus 1 Display 2 Picture 3 Picture Advanced 4 System Use the W left or X right keys to high light a menu item and press the ENTER key to enter...

Страница 24: ...t that item 4 Press the W or X keys to make adjustments or selections 5 To return to the previous menu press the Exit button Item Function Operation Range Auto Adjustment Optimizes and adjusts the screen settings automatically for you The i key is a hot key for this function When you connect a digital video output using a digital DVI cable to your monitor the i key and the Auto Adjustment function...

Страница 25: ...reen image 0 to 100 Pixel Clock Adjusts the pixel clock frequency timing to synchronize with the analog input video signal Not applicable to a digital input signal See also Picture optimization on page 19 0 to 100 Phase Adjusts the pixel clock phase timing to synchronize with the analog input video signal Not applicable to a digital input signal See also Picture optimization on page 19 0 to 63 ...

Страница 26: ...to 100 Contrast Adjusts the degree of difference between darkness and lightness Press the X key to increase the contrast and press the W key to decrease the contrast 0 to 100 Sharpness Adjusts the clarity and visibility of the edges of the subjects in the image Press the X key to improve the crispness of the display and press the W key to have softness effect on the display 1 to 5 Color Press ENTE...

Страница 27: ...fluence on the color tint of the image e g if you reduce the Blue level the image will gradually take on a yellowish tint If you reduce Green the image will become a magenta tint Press the W or X keys and the ENTER key to select Red Green or Blue Then use the W or X keys to make the color adjustments Red 0 to 100 Green 0 to 100 Blue 0 to 100 Reset Color Resets the User Mode custom color settings t...

Страница 28: ...ake adjustments or selections 5 To return to the previous menu press the Exit button Item Function Operation Range Picture Mode Selects a picture mode that best suits the type of images shown on the screen Standard for basic PC application Movie for viewing videos Dynamics for viewing landscape specific videos and playing games Photo for viewing still images sRGB for better color matching represen...

Страница 29: ...een images under the selected mode from Pic ture Mode The screen will be divided into two win dows the left window demonstrates images of Standard mode while the right window presents the images under the spec ified mode Press the W or X keys to change the settings ON OFF ...

Страница 30: ...and then press the ENTER key to select that item 4 Press the W or X keys to make adjustments or selections 5 To return to the previous menu press the Exit button Item Function Operation Range Input Selects the D sub analog or DVI digital input Use this to change the input to that appropriate to your video cable connection type Press the W or X keys to change the settings DVI D sub OSD Settings Pre...

Страница 31: ...n English French German Italian Spanish Polish Japanese Czech Traditional Chinese Hungarian Simplified Chinese Serbo Croatian Romanian Dutch Russian Swedish Portuguese H Position Adjusts the horizontal position of the OSD menu Press the W or X keys to change the settings 0 to 100 V Position Adjusts the vertical position of the OSD menu 0 to 100 Display Time Adjusts the display time of the OSD menu...

Страница 32: ...hold the ENTER key for 15 seconds to enter the OSD Lock option and make changes Alternatively you may use the W or X keys to select OFF in the OSD Lock submenu from the OSD Settings menu and all OSD controls will be accessible ON OFF Press Exit to leave the OSD Settings menu Information Displays the current monitor property settings Press the ENTER key to select this option Reset All Resets all mo...

Страница 33: ...n Cycle power on off These are pixels that are permanently on or off and is a natural defect that occurs in LCD technology The image has a faulty coloration It has a yellow blue or pink appearance Select ENTER PICTURE Color Reset Color and then choose Yes in the Caution message box to reset the color settings to the factory defaults If the image is still not correct and the OSD also has faulty col...

Страница 34: ... resolution refresh rate and make adjustments based on these instructions The image is displaced in one direction Read the How to adjust the screen resolution on page 17 section and then select the correct resolution refresh rate and make adjustments based on these instructions The OSD controls are inaccessible To unlock the OSD controls when the OSD is preset to be locked press and hold the Enter...

Страница 35: ...omputer s power management function Incoming display mode Input timing Resolution Horizontal Frequency KHz Vertical Frequency Hz Pixel Frequency MHz Comment 640x350 31 47 P 70 08 N 25 17 DOS 720x400 31 47 N 70 08 P 28 32 DOS 640x480 31 47 N 60 00 N 25 18 DOS 640x480 35 00 N 67 00 N 30 24 Macintosh 640x480 37 86 N 72 80 N 31 50 VESA 640x480 37 50 N 75 00 N 31 50 VESA 800x600 35 16 P 56 25 P 36 00 V...

Страница 36: ...gy i key automatic image setting 5 buttons and i key Contrast brightness vert hor image position phase pixel clock color balance color palette multiple language OSD OSD position status indicator input selection picture mode Senseye demo Power management Max power consumption Power saving mode VESA DPMS EPA 40 Watt 1 Watt Input signal Synchronization RGB analog 0 7 Vpp 75 Ohm positive Digital DVI D...

Страница 37: ...play of moving images without ghosting The Response Time quoted for many LCD monitors is specific to transitions from black to white and back again it does not specify the time required to switch between the many gray levels or colors that make up an image Operating voltage Dimensions H x W x D Weight Automatic switched mode power supply 100 240 V 50 60 Hz 410 1 x 404 2 x 168 2 mm 5 0 kg ...

Страница 38: ...htness vert hor image position phase pixel clock color balance color palette multiple language OSD OSD position status indicator input selection picture mode Senseye demo Power management Max power consumption Power saving mode VESA DPMS EPA 40 Watt 1 Watt Input signal Synchronization RGB analog 0 7 Vpp 75 Ohm positive Digital DVI D optional TTL separate signal connection 15 pin mini D sub cable T...

Страница 39: ...d back again it does not specify the time required to switch between the many gray levels or colors that make up an image Gray to Gray or GTG Response Time Real world video content contains a combination of grayscale images It generally takes longer for a pixel to transition to an intermediate level of intensity i e a gray or color level than it does for it to turn completely black or completely w...

Отзывы: