background image

  7

  Getting to know your monitor

Getting to know your monitor

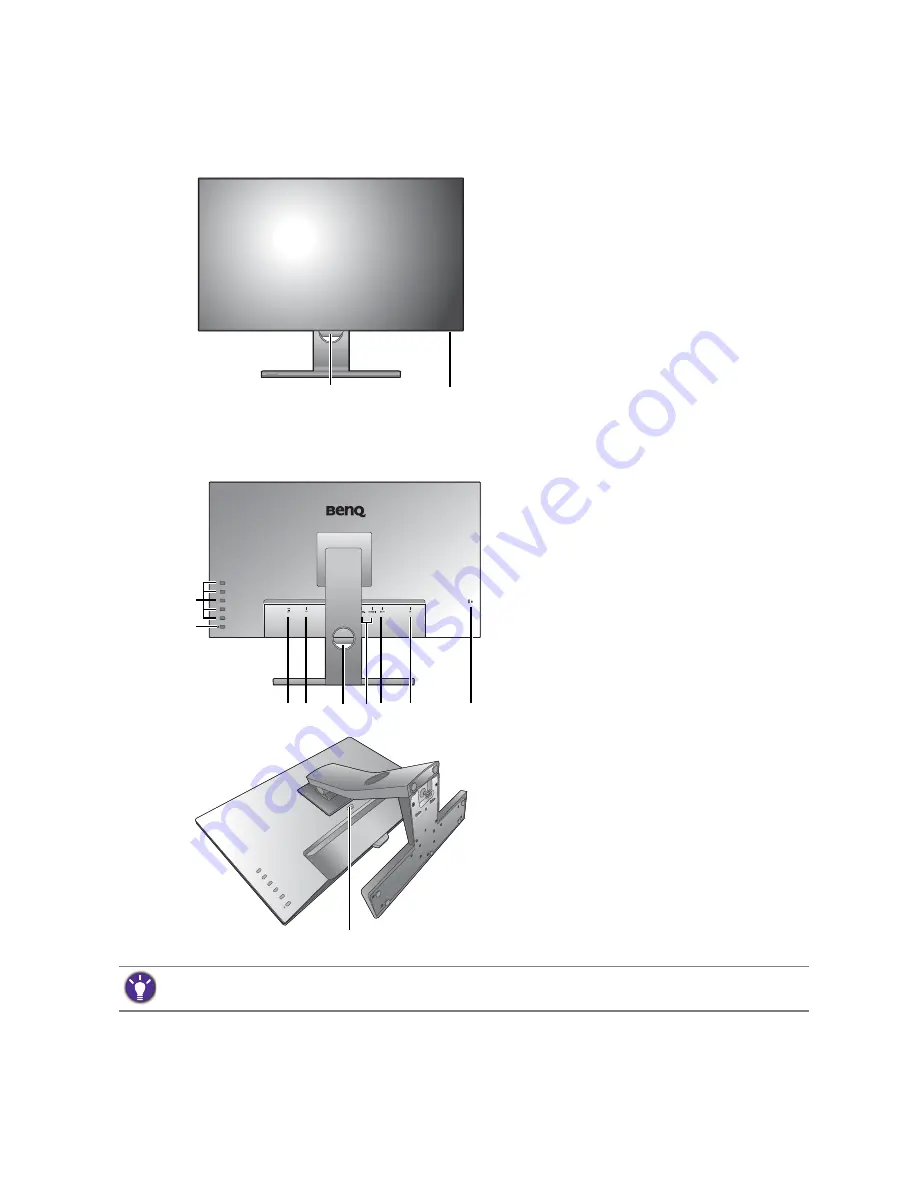
Front view

Back view

1.  Light sensor
2.  Power LED indicator

1

2

3.  Control buttons
4.  Power button
5.  AC power switch
6.  AC power input jack
7.  Cable management hole
8.  HDMI socket x 2
9.  DisplayPort socket
10. Headphone jack
11. Kensington lock slot
12. Quick release button

• Above diagram may vary depending on the model.
• Picture may differ from product supplied for your region.

7

5

8

10

11

6

9

3

4

12

Содержание EW2770QZ

Страница 1: ...E Series LCD Monitor User Manual...

Страница 2: ...he above mentioned external factors Applicable for flicker free models only Power Safety The AC plug isolates this equipment from the AC supply The power supply cord serves as a power disconnect devic...

Страница 3: ...Life corporate vision with the ultimate goal to achieve a low carbon society Besides meeting international regulatory requirement and standards pertaining to environmental management BenQ has spared...

Страница 4: ...17 How to install on Windows 8 8 1 system 18 How to install on Windows 7 system 19 How to adjust your monitor 20 The control panel 20 Basic menu operation 21 Customizing the hot keys 22 Adjusting disp...

Страница 5: ...ems If any are missing or damaged please contact the place of purchase for a replacement BenQ LCD Monitor Monitor Stand Monitor Base Quick Start Guide CD ROM Power Cord Picture may differ from product...

Страница 6: ...d the package contents may subject to change without prior notice For cables that are not supplied with your product you can purchase them separately Consider keeping the box and packaging in storage...

Страница 7: ...ontrol buttons 4 Power button 5 AC power switch 6 AC power input jack 7 Cable management hole 8 HDMI socket x 2 9 DisplayPort socket 10 Headphone jack 11 Kensington lock slot 12 Quick release button A...

Страница 8: ...ur monitor Connection The following connection illustrations are for your reference only For cables that are not supplied with your product you can purchase them separately For detailed connection met...

Страница 9: ...e monitor Placing the screen surface on an object like a stapler or a mouse will crack the glass or damage the LCD substrate voiding your warranty Sliding or scraping the monitor around on your desk w...

Страница 10: ...ld position the monitor and angle the screen to minimize unwanted reflections from other light sources Your monitor is an edge to edge monitor and should be handled with care Adjust the screen angle b...

Страница 11: ...cable and re connect the DP cable To go to the OSD menu see Basic menu operation on page 21 The video cables included in your package and the socket illustrations on the right may vary depending on t...

Страница 12: ...ON Turn on the monitor by pressing the power button on the monitor Turn on the computer too and follow the instructions in Getting the most from your BenQ monitor on page 14 to install the monitor sof...

Страница 13: ...mage to the monitor Placing the screen surface on an object like a stapler or a mouse will crack the glass or damage the LCD substrate voiding your warranty Sliding or scraping the monitor around on y...

Страница 14: ...nnecting the monitor to your computer Windows will automatically recognize the new or different hardware and will launch its Found New Hardware wizard Follow the wizard instructions until it asks you...

Страница 15: ...launch the Found New Hardware Wizard Follow the prompts until it displays the option to Install Hardware Device Drivers 2 Insert the BenQ LCD Monitor CD ROM into a CD drive on the computer 3 Check Se...

Страница 16: ...itor you have connected and letting Windows install the corresponding driver files from the CD You need only steer it in the right direction Windows has an Upgrade Device Driver Wizard to automate the...

Страница 17: ...on the computer 7 In the Update Driver Software window select the option Browse my computer for driver software 8 Click Browse and navigate to the following directory d BenQ_LCD Driver where d is the...

Страница 18: ...nd then the Properties button 5 Click the Driver tab and the Update Driver button 6 Insert the BenQ LCD Monitor CD ROM into a CD drive on the computer 7 In the Update Driver Software window select the...

Страница 19: ...d the Update Driver button 6 Insert the BenQ LCD Monitor CD ROM into a CD drive on the computer 7 In the Update Driver Software window select the option Browse my computer for driver software 8 Click...

Страница 20: ...our monitor How to adjust your monitor The control panel No Name Description 1 Control keys Accesses the functions or menu items displayed on the screen right next to each key 2 Power key Turns the po...

Страница 21: ...esignated for particular functions 3 Select Menu to access the main menu 4 In the main menu follow the icons next to the control keys to make adjustments or selection See Navigating the main menu on p...

Страница 22: ...splay mode on the monitor 1 Press any of the control keys to bring up the hot key menu and press Menu to access the main menu 2 Go to Picture Advanced and Display Mode 3 Select an appropriate display...

Страница 23: ...ffect immediately Adjusting screen brightness automatically Bright Intelligence Plus The built in light sensor works with Bright Intelligence Plus technology to detect the ambient light image brightne...

Страница 24: ...t available will become grayed out And keys that are not available will be disabled and the corresponding OSD icons will disappear For models without certain functions their settings and related items...

Страница 25: ...ake adjustments or use to make selection 5 To return to the previous menu select 6 To exit the menu select Eye Care Picture Picture Advanced Display Audio System Mode Low Blue Light Low Blue Light B I...

Страница 26: ...and then balance the screen automatically ON OFF Light Meter Sets to display the light condition around the monitor on the screen ON OFF Sensor Sensitivity Adjusts sensitivity of light sensor to chan...

Страница 27: ...menu item 4 Use or to make adjustments or use to make selection 5 To return to the previous menu select 6 To exit the menu select 50 100 100 R G B 100 Eye Care Picture Picture Advanced Display Audio...

Страница 28: ...he color tint of the image Go to the succeeding R red G green and B blue menus to change the settings Decreasing one or more of the colors will reduce their respective influence on the color tint of t...

Страница 29: ...select 50 Display Picture Picture Advanced Display Audio System Mode Cinema Picture Mode Super Resolution Smart Focus Dynamic Contrast Display Mode Overscan HDMI RGB PC Range Standard Low Blue Light C...

Страница 30: ...ngs defined by users Super Resolution Simulates high resolution images by increasing pixel density of low resolution ones 0 1 2 3 Smart Focus This feature provides a highlight area to focus on certain...

Страница 31: ...eded Full Scales the input image to fill the screen Ideal for 16 9 aspect images Aspect The input image is displayed without geometric distortion filling as much of the display as possible Overscan Sl...

Страница 32: ...related items will not appear on the menu 1 Select Menu from the hot key menu 2 Use or to select Display 3 Select to go to a sub menu and then use or to select a menu item 4 Use or to make adjustment...

Страница 33: ...n functions their settings and related items will not appear on the menu 1 Select Menu from the hot key menu 2 Use or to select Audio 3 Select to go to a sub menu and then use or to select a menu item...

Страница 34: ...d items will not appear on the menu 1 Select Menu from the hot key menu 2 Use or to select System 3 Select to go to a sub menu and then use or to select a menu item 4 Use or to make adjustments or use...

Страница 35: ...egion English Fran ais Deutsch Italiano Espa ol Polski esky Magyar Rom n Nederlands Svenska Portugu s Display Time Adjusts the display time of the OSD menu 5 sec 10 sec 15 sec 20 sec 25 sec 30 sec OSD...

Страница 36: ...FF HDMI Auto Switch When this function is activated HDMI ports will be in the input auto select loop Otherwise HDMI can only be selected by input select or by hot key ON OFF Auto Power Off Sets the ti...

Страница 37: ...OSD also has faulty coloration this means one of the three primary colors is missing in the signal input Now check the signal cable connectors If any pin is bent or broken off please contact your deal...

Страница 38: ...rection Read the instructions on the link Adjusting the Screen Resolution on the CD and then select the correct resolution refresh rate and make adjustments based on these instructions The OSD control...

Страница 39: ...front bottom of the monitor Please check If you have removed the sensor protection sticker If the Bright Intelligence Plus function has been turned on Check Eye Care B I Bright Intelligence Plus If t...

Отзывы: