background image

Eng
lish

Touring Your Camera

1

1

T

OURING

 Y

OUR

 C

AMERA

1.1

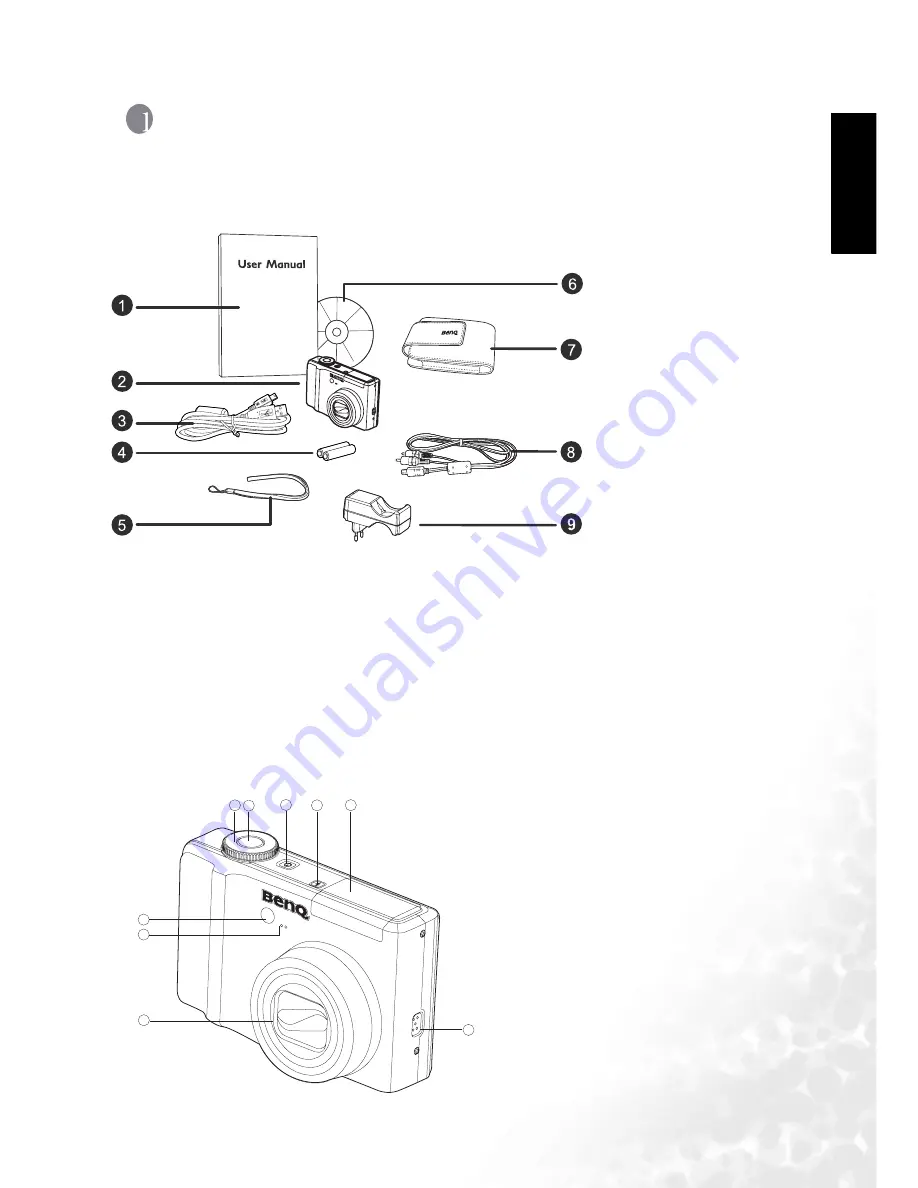
Checking the package contents

Carefully unpack your kit box and ensure that you have the following items.

Available accessories may vary depending on sales region.

If any of the items are missing or appear to be damaged, contact your dealer. Save the 
packaging in case you need to ship your camera for service.

All electronic accessories (such as USB, AV cable, adapter, charger, and battery) are 
designed to work with this BenQ Digital Camera only. Do not use them with other 
Digital Camera to avoid possible damage

1.2

Camera components

1.2.1 Front view

1.

 User Manual

2.

Digital camera

3.

USB cable

4.

AA Ni-MH batteries

5.

Hand strap

6.

Software CD-ROM

7.

Pouch

8.

AV cable

9.

Battery charger

5

2

3

4

1

6

7

8

9

1.

 Mode dial

2.

Shutter button

3.

Power button

4.

Flash open button

5.

Flash

6.

Speaker

7.

Lens

8.

Microphone

9.

Self-timer LED

Содержание DC P860

Страница 1: ...Welcome DC P860 Digital Camera User Manual ...

Страница 2: ... Disposal of Waste Electrical and Electronic Equipment by users in private households in the Euro pean Union This symbol on the product or on the packaging indicates that this can not be disposed of as household waste You must dispose of your waste equipment by handing it over to the applicable take back scheme for the recycling of electrical and electronic equipment For more information about rec...

Страница 3: ... 5 3 2 LCD monitor information camera mode 6 3 3 Getting started 7 3 3 1 Turning the power on off 7 3 3 2 Choosing the screen language 7 3 3 3 Setting the date and time 7 3 3 4 Using the flash 8 3 3 5 Using the self timer 8 3 3 6 Setting the Focus 9 3 3 7 EV Backlight Adjustment and AE Lock 9 3 3 8 Using the zoom function 9 3 3 9 Capture Mode 9 3 4 Menu options 10 3 4 1 Camera menu 10 3 4 2 Scene ...

Страница 4: ... Playback mode the basics 13 3 4 4 4 Playback menu 15 3 4 5 Set up mode 16 3 4 5 1 Set up menu 16 4 PC Dependent Features 18 4 1 Bundled software 18 4 2 Transferring files to your computer 18 4 2 1 Step 1 Connect the digital camera to your computer 19 4 2 2 Step 2 Download images or video clips 19 4 3 PictBridge Mode 19 5 Troubleshooting 20 6 Specifications 22 7 Service Information 23 ...

Страница 5: ...ship your camera for service All electronic accessories such as USB AV cable adapter charger and battery are designed to work with this BenQ Digital Camera only Do not use them with other Digital Camera to avoid possible damage 1 2 Camera components 1 2 1 Front view 1 User Manual 2 Digital camera 3 USB cable 4 AA Ni MH batteries 5 Hand strap 6 Software CD ROM 7 Pouch 8 AV cable 9 Battery charger 5...

Страница 6: ...Red On When the image is not in focus Flashing Accessing files in progress Flash charging in progress Accessing files in progress 1 Status LED 2 Zoom out button Thumbnail button Zoom in button Thumbnail button 3 Menu Menu button 4 USB or AV OUT terminal 5 OK Set button 6 Arrow button Up EV button AE Lock Backlight correction 7 Arrow button Right Flash button 8 Arrow button Down Self timer button 9...

Страница 7: ...s manufactured with sophisticated technology and more than 99 99 of the pixels on the LCD display meet standard specifications Yet it is possible that less than 0 01 of the pixels on the LCD display may have some light spots or show unusual colors This is normal and does not indicate display malfunction nor will this affect the pictures you take with the camera ...

Страница 8: ...emory capacity by using an optional SD Secure Digital memory card to store more files 1 Always make sure the camera is turned off before inserting or removing a memory card 2 Insert an SD memory card in the correct orientation as shown in the illustration 3 Close the battery SD memory card cover To remove the SD memory card make sure the camera is turned off Press lightly on the edge of the memory...

Страница 9: ...riority You may specify the shutter speed while the camera sets the corresponding aperture value 4 Av Aperture pri ority You may specify the aperture value while the camera sets the corresponding shutter speed 5 M Manual pho tography For full manual control over exposure aperture and other settings 6 Shake Free Select this mode to reduce blur caused by camera vibration 7 SCN SCN Point and shoot si...

Страница 10: ...3264 x 1835 2560 x 1920 1600 x 1200 640 x 480 8 Available number of shots 9 Zoom status 10 Main focus area 11 Aperture 12 Shutter speed 13 ISO 14 White balance Auto Default Incandescent Fluorescent 1 Fluorescent 2 Day Light Cloudy Manual 15 Metering Cen Weight Spot 16 EV 17 Histogram 18 AE Lock Indicator 19 Battery condition Full battery power Medium battery power Low battery power No battery powe...

Страница 11: ... the button to turn on your camera 2 Press to enter the menu and use to select Language and press the OK button 3 Use to select the language you want 4 Press the OK button to confirm 3 3 3 Setting the date and time Follow the steps below to set the date display style current date and time 1 Rotate the mode dial to mode and then press the button to turn on your camera 2 Press to enter the menu and ...

Страница 12: ...lace it on a stable surface 2 Rotate the mode dial to A P Tv Av M or SCN and then press the button to turn on your camera 3 Toggle until the desired self timer mode appears on the LCD monitor 4 Compose your image and press the shutter button The self timer function is activated The image is then captured after the preset time To cancel the self timer at any time press the shutter button If you wis...

Страница 13: ...ressing the T button continuously It is activated after your camera reaches its maximum optical zoom factor 6X A useful feature as it is however the more the image is magnified the grainer the image may become To capture a zoomed image perform the following steps 1 Adjust the magnification ratio by using the T W buttons The digital zoom function can be disabled by setting Digital Zoom in menu to O...

Страница 14: ...ed Standard Vivid Sepia Monochrome White Balance This sets the white balance for a variety of lighting conditions and permits images to be captured that approach the conditions that are seen by the human eye Auto Incandescent Fluorescent 1 Fluorescent 2 Day Light Cloudy Manual Manual WB This manually sets the white balance and stores it Use of this is convenient when the white balance does not off...

Страница 15: ...l images This function must be activated before the image is captured On Off Icon Scene mode Description High ISO Portrait Zooms in to emphasize natural skin tones while blurring the background Landscape Sets focus to infinity and reduces aperture to achieve max depth of view for outdoor secnes Sport Uses a high shutter speed to capture objects in motion Panorama Takes a series of shots and stitch...

Страница 16: ... the image is being recorded into the SD card do not open the battery SD card cover nor remove the battery or SD card Doing so might damage the SD card or destroy the data 3 4 3 3 Video menu This menu is for the basic settings to be used when recording video clips 1 Rotate the mode dial to and then press the button to turn on your camera 2 Press the MENU button 3 Press to select the desired settin...

Страница 17: ...ile number 4 Play indicator 3 4 4 3 Playback mode the basics 3 4 4 3 1 Viewing images You can display the still images you have just captured 1 Press the button to turn on your camera 2 Rotate the mode dial to The last captured image appears on the LCD monitor 3 Use to select the desired images To view the previous image press the button To view the next image press the button Press to toggle betw...

Страница 18: ...es on the LCD monitor simultaneously so you may search for a particular image 1 Rotate the mode dial to 2 Press the W button once The images are displayed in the thumbnail display Images that have been selected with the buttons will be indicated by a green frame When there are ten or more images scroll the screen with the buttons 3 Use the button to select the image to be displayed at regular size...

Страница 19: ...back automatically in sequential order This is very useful and entertaining feature for reviewing captured images and for presentations You can select the slide show display interval 3 sec 5 sec 10 sec Video clips display only the first frame and are not played back To stop the slide show press the OK button DPOF This option allows you to select the desired images to be printed and set the number ...

Страница 20: ... the newly created folder starting with image number 0001 Cancel Execute Format This option erases all images and reformats the SD memory card loaded in your camera Protected images are also erased The SD memory card cannot be formatted if it is write protected Cancel Execute Beep This option sets whether the camera sound will be muted every time when you press the camera buttons On Off Auto Off I...

Страница 21: ...n the LCD monitor Refer to 3 3 2 Choos ing the screen language for further details Video Output This option sets the video output system of the video equipment that you are going to connect to the camera PAL NTSC System Info This option displays the current firmware version of the camera ...

Страница 22: ...or post them on the Web Note that before you begin you need to check your system according to the table as shown below ArcSoft PhotoImpression 5 Combine l édition de photos avec des outils d amélioration créative et de partage d outils qui maximise votre expérience média numérique ArcSoft VideoImpression 2 Crée des présentations multimédia en combinant des photos et des clips vidéo avec de l audio...

Страница 23: ... and then choose Copy from the Edit menu Open the destination location folder and choose Paste from the Edit menu You may also drag and drop image files from the digital camera to a desired location Memory card users may prefer to use a memory card reader highly recommended Video playback application is not included with the package Make sure that video play back application has been installed in ...

Страница 24: ... The camera or flash was used con tinuously over a long period of time The flash does not fire The camera flash is turned off Set the flash to Auto Flash The light source is sufficient Even though the flash fired the image is dark The distance to the subject is greater than the flash s effective range Get closer to the subject and shoot The image is too bright or too dark The exposure is excessive...

Страница 25: ...ed on the screen stops flashing The camera does not recognize the memory card Format the memory card before the initial use or before using with another camera I cannot print images with PictBridge com pliant printers The camera is connected to the printer when the camera is powered off Please turn on the camera select PictBridge and then connect to the printer A File Full message appears and the ...

Страница 26: ...cal 6X Digital 5X Lens F no Wide 2 8 Tele 4 8 Focal length 7 8 mm 46 8 mm equivalent to 37 mm 222 mm on a 35 mm camera LCD monitor 2 5 TFT color LCD 153 6K pixels display Self timer 10 sec delay 2 sec delay Exposure compensation 2 0EV 2 0EV in 0 3EV increments White balance Auto Incandescent Fluorescent 1 Fluorescent 2 Day Light Cloudy Manual ISO Auto 100 200 400 800 Interface USB 2 0 connector A ...

Страница 27: ...English Service Information 23 7 SERVICE INFORMATION Technical Support For free driver updates product information and news releases visit the following web site http www BenQ com ...

Отзывы: