background image

Benning Elektrotechnik & Elektronik GmbH & Co. KG

Münsterstraße 135 - 137 

D - 46397 Bocholt

(0) 2871 - 93 - 0   •   Fax ++49 (0) 2871 - 93 - 429

www.benning.de   •   eMail: [email protected]

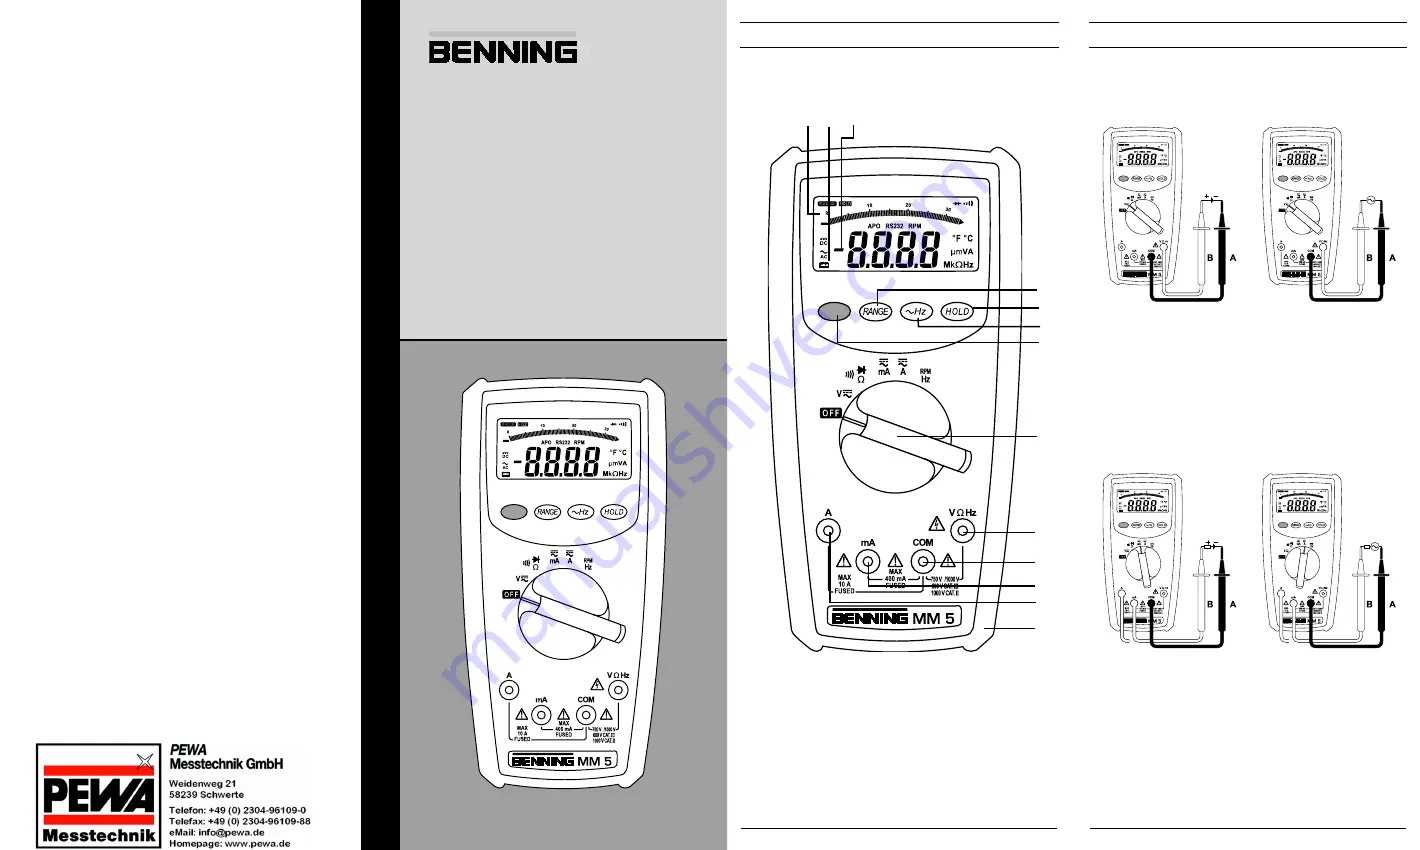
Bild 1:  Gerätefrontseite

Fig. 1:  Front tester panel

Fig. 1:  Panneau avant de l‘appareil

Fig. 1:  Voorzijde van het apparaat

Fig. 1:  Parte frontal del equipo

Fig. 1:   Framsida

ill. 1:  Lato anteriore apparecchio


 08/ 2004


BENNING MM 5


 08/ 2004


BENNING MM 5


        

        

Bild 2:  Gleichspannungsmessung

Fig. 2:  Direct voltage measurement

Fig. 2:  Mesure de tension continue 

Fig. 2:  Meten van gelijkspanning

Fig. 2:  Medición de tension contínua

Fig. 2:  Likspänningsmätning

ill. 2:  Misura tensione continua

Bild 3:  Wechselspannungsmessung

Fig. 3:  Alternating voltage measurement

Fig. 3:  Mesure de tension alternative

Fig. 3:  Meten van wisselspanning

Fig. 3:  Medición de tensión alterna

Fig. 3:  Växelspänningsmätning

ill. 3:   Misura tensione alternata

Bild 5:  Wechselstrommessung 

Fig. 5:  AC current measurement 

Fig. 5:  Mesure de courant alternatif 

Fig. 5:  Meten van wisselstroom 

Fig. 5:  Medición de corriente alterna

Fig. 5:   Växelströmsmätning 

ill. 5:  Misura corrente alternata

Bild 4:  Gleichstrommessung

Fig. 4:  DC current measurement

Fig. 4:  Mesure de courant continu

Fig. 4:  Meten van gelijkstroom

Fig. 4:  Medición de corriente contínua

Fig. 4:  Likströmsmätning

ill. 4:   Misura corrente continua


Bedienungsanleitung

  Operating manual

  Notice d‘emploi

  Gebruiksaanwijzing

  Instrucciones de servicio

  Bruksanvisning

  Istruzioni d’uso

B

E

N

N

IN

G

 M

M

 5

Содержание MM 5

Страница 1: ...continua Bild 3 Wechselspannungsmessung Fig 3 Alternating voltage measurement Fig 3 Mesure de tension alternative Fig 3 Meten van wisselspanning Fig 3 Medici n de tensi n alterna Fig 3 V xelsp nningsm...

Страница 2: ...sladdar ill 12 Avvolgimento dei cavetti di sicurezza Bild 8 Durchgangspr fung mit Summer Fig 8 Continuity Testing with buzzer Fig 8 Contr le de continuit avec ronfleur Fig 8 Doorgangstest met akoestis...

Страница 3: ...s darf nicht in Stromkreisen mit einer h heren Nennspannung als 1000 V DC und 750 V AC eingesetzt werden N heres hierzu im Abschnitt 6 Umgebungs bedingungen In der Bedienungsanleitung und auf dem BENN...

Страница 4: ...esswert die Bargraphanzeige und die Anzeige der Bereichs berschreitung Polarit tsanzeige Batterieanzeige erscheint bei entladener Batterie RANGE Taste Umschaltung automatischer manueller Messbereich H...

Страница 5: ...Batterie betr gt etwa 500 Stunden Alkalibatterie 5 1 16 Ger teabmessungen L x B x H 180 x 88 x 33 5 mm ohne Gummi Schutzrahmen L x B x H 188 x 94 x 40 mm mit Gummi Schutzrahmen Ger tegewicht 300 g oh...

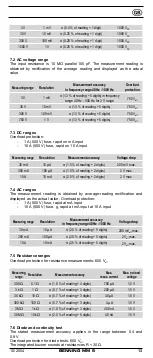
Страница 6: ...A Eingang Messbereich Aufl sung Messgenauigkeit Spannungsabfall 30 mA 10 A 1 5 des Messwertes 2 Digit 200 mV max 300 mA 100 A 1 5 des Messwertes 2 Digit 2 V max 10 A 10 mA 2 0 des Messwertes 2 Digit 2...

Страница 7: ...wertes 5 Digit 30 Veff AC V Messbereich Messgenauigkeit Minimale Empfindlichkeit 30 mA 0 01 des Messwertes 5 Digit 0 3 mAeff 300 mA 0 01 des Messwertes 5 Digit 3 mAeff 10 A 0 01 des Messwertes 5 Digit...

Страница 8: ...en Messpunkten kontaktieren Mess wert an der Digitalanzeige am BENNING MM 5 ablesen siehe Bild 4 Gleichstrommessung siehe Bild 5 Wechselstrommessung 8 3 Widerstandsmessung Mit dem Drehschalter die gew...

Страница 9: ...fernen Sie dann beide Sicherheitsmessleitungen vom BENNING MM 5 Schalten Sie den Drehschalter in die Schaltstellung OFF 9 1 Sicherstellen des Ger tes Unter bestimmten Voraussetzungen kann die Sicherhe...

Страница 10: ...das BENNING MM 5 auf die Frontseite und l sen Sie die Schlitz Schraube vom Batteriedeckel Heben Sie den Batteriedeckel im Bereich der Geh usevertiefungen vom Unterteil ab L sen Sie keine Schrauben an...

Страница 11: ...MM 5 an einen Messpunkt zu f hren Die r ckw rtige St tze am Gummi Schutzrahmen erm glicht das BENNING MM 5 schr g aufzustellen erleichtert die Ablesung oder aufzu h ngen siehe Bild 13 Der Gummi Schut...

Страница 12: ...or measurements in dry surroundings It must not be used in electrical circuits with rated voltages higher than 1000 V DC and 750 V AC for more details see section 6 Ambient conditions The following sy...

Страница 13: ...n automatic and manual measuring range HOLD button Hz button in ACV and ACA range switchover in frequency display Button blue for DC voltage and current and AC voltage and current resistance measureme...

Страница 14: ...x W x H 188 x 94 x 40 mm with protective rubber holster Weight 300 g without protective rubber holster 440 g with protective rubber holster 5 1 17 The safety test leads are 4 mm plug type leads The s...

Страница 15: ...gits 2 V max 10 A 10 mA 2 0 of reading 2 digits 2 V max 7 4 AC ranges The measurement reading is obtained by average reading rectification and displayed as the actual value Overload protection 1 A 500...

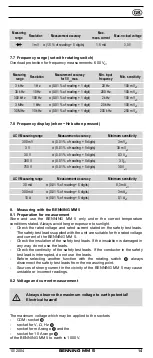
Страница 16: ...igits 0 3 mAeff 300 mA 0 01 of reading 5 digits 3 mAeff 10 A 0 01 of reading 5 digits 0 1 Aeff 8 Measuring with the BENNING MM 5 8 1 Preparation for measurement Store and use the BENNING MM 5 only und...

Страница 17: ...AC current measurement 8 3 Resistance measurement With the rotating switch select the desired function on the BENNING MM 5 Connect the black safety test lead to the COM socket on the BENNING MM 5 Conn...

Страница 18: ...circumstances the safety of the BENNING MM 5 can no longer be guaranteed This may be the case if there are visible signs of damage on the unit errors occur in measurements the unit has been stored for...

Страница 19: ...of the housing Lift the housing base at the bottom and remove it from the top of the front part Lift one end of the defective fuse out of the fuse holder Push the defective fuse out of the fuse holder...

Страница 20: ...un environnement sec et ne doit pas tre utilis dans des circuits lectriques dont la tension nominale est sup rieure 1000 V CC et 750 V CA pour plus d informations se reporter la section 6 Conditions d...

Страница 21: ...l ments et indicateurs de commande repr sent s la Fig 1 est la suivante indicateur num rique pour la valeur mesur e affichage diagramme en b tons et affichage du d passement de plage indicateur de pol...

Страница 22: ...ture de la valeur mesur e 0 15 x pr cision de mesure indiqu e C 18 C ou 28 C par rapport la valeur avec la temp rature de r f rence de 23 C 5 1 13 Le BENNING MM 5 est aliment par deux piles de 1 5 V I...

Страница 23: ...est affich e comme valeur effective Plage de mesure R solution Pr cision de mesure dans la plage de fr quence 40 Hz 1000 Hz Protection contre la surcharge 3 V 1 mV 1 3 de la valeur mesur e 5 chiffres...

Страница 24: ...f max Fr quence d entr e min Sensibilit minimum 3 kHz 1 Hz 0 01 de la valeur mesur e 1 chiffre 20 Hz 100 mVeff 30 kHz 10 Hz 0 01 de la valeur mesur e 1 chiffre 200 Hz 100 mVeff 300 kHz 100 Hz 0 01 de...

Страница 25: ...ou alternative CA avec la touche bleue du BENNING MM 5 Mettre en contact le c ble de mesure de s curit noir avec la douille COM du BENNING MM 5 Mettre en contact le c ble de mesure de s curit rouge av...

Страница 26: ...s curit rouge avec la douille pour V Hz du BENNING MM 5 Mettre en contact les c bles de mesure de s curit avec les points de mesure Si la valeur de r sistance de c ble est trop basse entre la douille...

Страница 27: ...sez le BENNING MM 5 sur le panneau avant et retirez la vis du couvercle du bo tier Retirez le couvercle du bo tier au niveau des cavit s du bo tier de la partie inf rieure Retirez les piles d charg es...

Страница 28: ...ans le cadre de protection en caoutchouc voir fig 11 Remplacement des fusibles 9 5 talonnage Pour conserver la pr cision indiqu e des mesures effectu es il faut faire talonner r guli rement l appareil...

Страница 29: ...iet worden gebruikt in elektrische circuits met een nominale spanning hoger dan 1000 V DC en 750 V AC zie ook pt 6 Gebruiksomstandigheden In de gebruiksaanwijzing en op de BENNING MM 5 worden de volge...

Страница 30: ...aangegeven informatie en bedieningselementen Digitaal display LCD voor het aflezen van gemeten waarde weergave van een staafdiagram en de aanduiding indien meting buiten bereik van het toestel valt A...

Страница 31: ...Ongeveer 15 seconden voor het automatisch afschakelen wordt door de zoemer een waarschuwingssignaal gegeven 5 1 12 De temperatuurco fficient van de gemeten waarde 0 15 x aangegeven nauwkeurigheid van...

Страница 32: ...lijkrichting en aangeduid als effectieve waarde Meetbereik Resolutie Nauwkeurigheid v d meting bij 40 Hz 1000 Hz Beveiliging tegen overbelasting 3 V 1 mV 1 3 meetwaarde 5 digits bij 40 Hz 500 Hz voor...

Страница 33: ...kHz 100 mVeff 3 MHz 1 kHz 0 01 meetwaarde 1 digit 20 kHz 100 mVeff 30 MHz 10 kHz 0 01 meetwaarde 1 digit 200 kHz 250 mVeff 7 8 Frequentieaanduiding via bediening Hz toets Meetbereik AC V Nauwkeurighei...

Страница 34: ...ewenste bereik mA of A Kies met de blauwe toets van de BENNING MM 5 de te meten stroomsoort gelijk DC of wisselstroom AC Het zwarte veiligheidsmeetsnoer inpluggen in de COM contactbus van de BENNING M...

Страница 35: ...het circuit en lees de gemeten waarde af in het display van de BENNING MM 5 Zie fig 9 frequentiemeting 9 Onderhoud De BENNING MM 5 mag nooit onder spanning staan als het apparaat geopend wordt Gevaar...

Страница 36: ...A n zekering 10 A beschermd tegen overbelasting zie fig 12 De zekeringen worden als volgt gewisseld Ontkoppel de veiligheidsmeetsnoeren van het te meten circuit Neem de veiligheidsmeetsnoeren af van...

Страница 37: ...ok zodanig in de beschermingshoes klikken dat de contactpunt vrij komt te staan en deze samen met de BENNING MM 5 naar een meetpunt kan worden gebracht Een steun aan de achterzijde van de beschermings...

Страница 38: ...para empleo en ambiente seco El equipo no puede ser empleado en circuitos con tensi n nominal superior a 1000 V DC y 750 V AC para m s detalles ver secci n 6 Condiciones ambientales En las instruccio...

Страница 39: ...rte frontal del equipo Los elementos de visualizaci n y de operaci n indicados en la fig 1 se denominan como sigue display para indicaci n del valor medido bar grafo e indicaci n del exceso de rango i...

Страница 40: ...12 Coeficiente de temperatura del valor medido 0 15 x tolerancia de medici n indicada C 18 C 28 C relativo al valor existente con una temperatura de referencia de 23 C 5 1 13 El mult metro BENNING MM...

Страница 41: ...de medici n Rango de frecuencia 40 1000 Hz Protecci n de sobrecarga 3 V 1 mV 1 3 del valor medido 5 d gitos rango de frecuencia 50 400 Hz con rango 3 V 750 Veff 30 V 10 mV 1 3 del valor medido 5 d gi...

Страница 42: ...00 mVeff 30 MHz 10 kHz 0 01 del valor medido 1 d gito 200 kHz 250 mVeff 7 8 Indicaci n de frecuencia pulsando la tecla Hz AC V Rango de medici n Exactitud de medici n Sensibilidad m nima 300 mV 0 01 d...

Страница 43: ...2 medici n de tensi n cont nua ver fig 3 medici n de tensi n alterna 8 2 2 Medici n de corriente Seleccionar con el conmutador de disco el rango y la funci n deseados mA A en el mult metro BENNING MM...

Страница 44: ...la funci n deseada Hz en el mult metro BENNING MM 5 Contactar la conducci n protegida de medici n negra con la hembrilla COM en el mult metro BENNING MM 5 Contactar la conducci n protegida de medici n...

Страница 45: ...pretadas entre las partes de la carcasa Cerrar la tapa del apartado de pilas hasta enganchar en la base y fijar el tornillo Colocar el mult metro BENNING MM 5 dentro del marco protector de goma ver fi...

Страница 46: ...indicadas en los resultados de medici n es preciso que nuestro personal de servico calibre el equipo peri dicamente Recomendamos que el intervalo de calibrado sea de un a o 10 Empleo del marco protec...

Страница 47: ...Denna bruksanvisning riktar sig till Elmont rer och elektrotekniskt utbildade personer BENNING MM 5 r avsedd f r m tning i torr milj och f r inte anv ndas i str mkretsar med en h gre m rksp nning n 10...

Страница 48: ...kt m tomr desval HOLD knapp l sning av m tv rde Hz knapp f r omkoppling till frekvensvisning vid m tning i ACV och ACA omr det Knapp bl f r omkoppling mellan liksp nning str m resp v xelsp nning str m...

Страница 49: ...gummiskyddsram 188 x 94 x 40 mm med gummiskyddsram Instrumentets vikt 300 g utan gummiskyddsram 440 g med gummiskyddsram 5 1 17 Testsladdarna r av s kerhetstyp och f rsedda med m tspetsar med 4 mm Tes...

Страница 50: ...0 mA 10 A 1 5 av m tv rdet 2 siffror 200 mV max 300 mA 100 A 1 5 av m tv rdet 2 siffror 2 V max 10 A 10 mA 2 0 av m tv rdet 2 siffror 2 V max 7 4 V xelstr msomr de M tv rdet erh lles med medelv rdesli...

Страница 51: ...5 siffror 30 Veff AC V m tomr de M tnoggrannhet Minimal k nslighet 30 mA 0 01 av m tv rdet 5 siffror 0 3 mAeff 300 mA 0 01 av m tv rdet 5 siffror 3 mAeff 10 A 0 01 av m tv rdet 5 siffror 0 1 Aeff 8 At...

Страница 52: ...omf rs Se fig 6 Resistansm tning 8 4 Diodtest V lj nskad funktion summer och diodsymbol med vredet Med den bl knappen kopplas om till diodtest tryck tv g nger p knappen Anslut den svarta testsladden t...

Страница 53: ...kontakter uts tts f r l ckande batteriv tska Om batteriv tska har l ckt ut eller kontakter och batterifack har f tt en vit bel ggning reng res dessa med en torr duk 9 3 Batteribyte Se till att BENNING...

Страница 54: ...n och sp nn de fyra skruvarna S tt tillbaka batterifacklocket och sp nn skruvarna Montera gummiskyddsramen Se fig 11 S kringsbyte 9 5 Kalibrering F r att m tnoggrannheten skall kunna inneh llas m ste...

Страница 55: ...nsione nominale superiore a 1000 V CC e 750 V CA per maggiori dettagli vedere la sezione 6 Condizioni ambientali Nelle istruzioni d uso e sul BENNING MM 5 vengono usati i seguenti simboli Questo simbo...

Страница 56: ...cazione del superamento di portata 2 Indicazione polarit 3 Indicazione carica batterie compare in caso di batterie scariche 4 Tasto RANGE commutazione automatica manuale del campo di misura 5 Tasto HO...

Страница 57: ...o prevista per il BENNING MM 5 compare sul display il simbolo di una batteria 5 1 15 La durata di una batteria di circa 500 ore batterie alcaline 5 1 16 Dimensioni apparecchio Lungh x largh x alt 180...

Страница 58: ...a da 40 Hz a 500 Hz per la portata di 3 V 750 Veff 30 V 10 mV 1 3 del valore misura 5 digit 750 Veff 300 V 100 mV 1 3 del valore misura 5 digit 750 Veff 750 V 1 V 1 3 del valore misura 5 digit 750 Vef...

Страница 59: ...Hz 1 kHz 0 01 del valore misura 1 digit 20 kHz 100 mVeff 30 MHz 10 kHz 0 01 del valore misura 1 digit 200 kHz 250 mVeff 7 8 Indicazione frequenza con azionamento del tasto Hz Portata V CA Precisione m...

Страница 60: ...l 2 Misura tensione continua Si veda ill 3 Misura tensione alternata 8 2 2 Misure di corrente Con la manopola 8 selezionare il campo desiderato e la funzione mA o A sul BENNING MM 5 Con il tasto 7 blu...

Страница 61: ...z del BENNING MM 5 Osservare la sensibilit minima per misure di frequenza del BENNING MM 5 Mettere in contatto i cavetti di sicurezza con i punti di misura leggere il valore di misura sul display digi...

Страница 62: ...tuzione dei fusibili Prima di aprire il BENNING MM 5 assicurarsi che esso non sia sotto tensione Pericolo di scariche elettriche Il BENNING MM 5 viene protetto da sovraccarico tramite un fusibile rapi...

Страница 63: ...doli intorno al guscio protettivo M ed inserendo a scatto i puntali degli stessi nel guscio protettivo si veda ill 12 Si pu inserire a scatto uno dei cavetti di sicurezza nel guscio protettivo M in mo...

Отзывы: