5. MAINTAINING YOUR AIR COMPRESSOR
•
Check oil and water levels prior to each use.
5.1 Water Tank
IMPORTANT:
Water freezes at about 32⁰F (0⁰C). DO NOT leave or store your air compressor in places, such as the garage or an
outside shed, where the temperature can drop below freezing. This can cause the water to freeze and could damage some of the
components of the compressor.
1.
Top off the water tank and make sure it is at least 80% or higher during operation.
5.2 Oil Change
It is recommended that you change the oil for the first time after the earlier of one (1) month or 25 hours of use. After the first oil
change it is recommended that you should change the oil the earlier of every three (3) months or 50 hours of use.
1.
Raise the rear of the compressor to tilt it forward.
2.
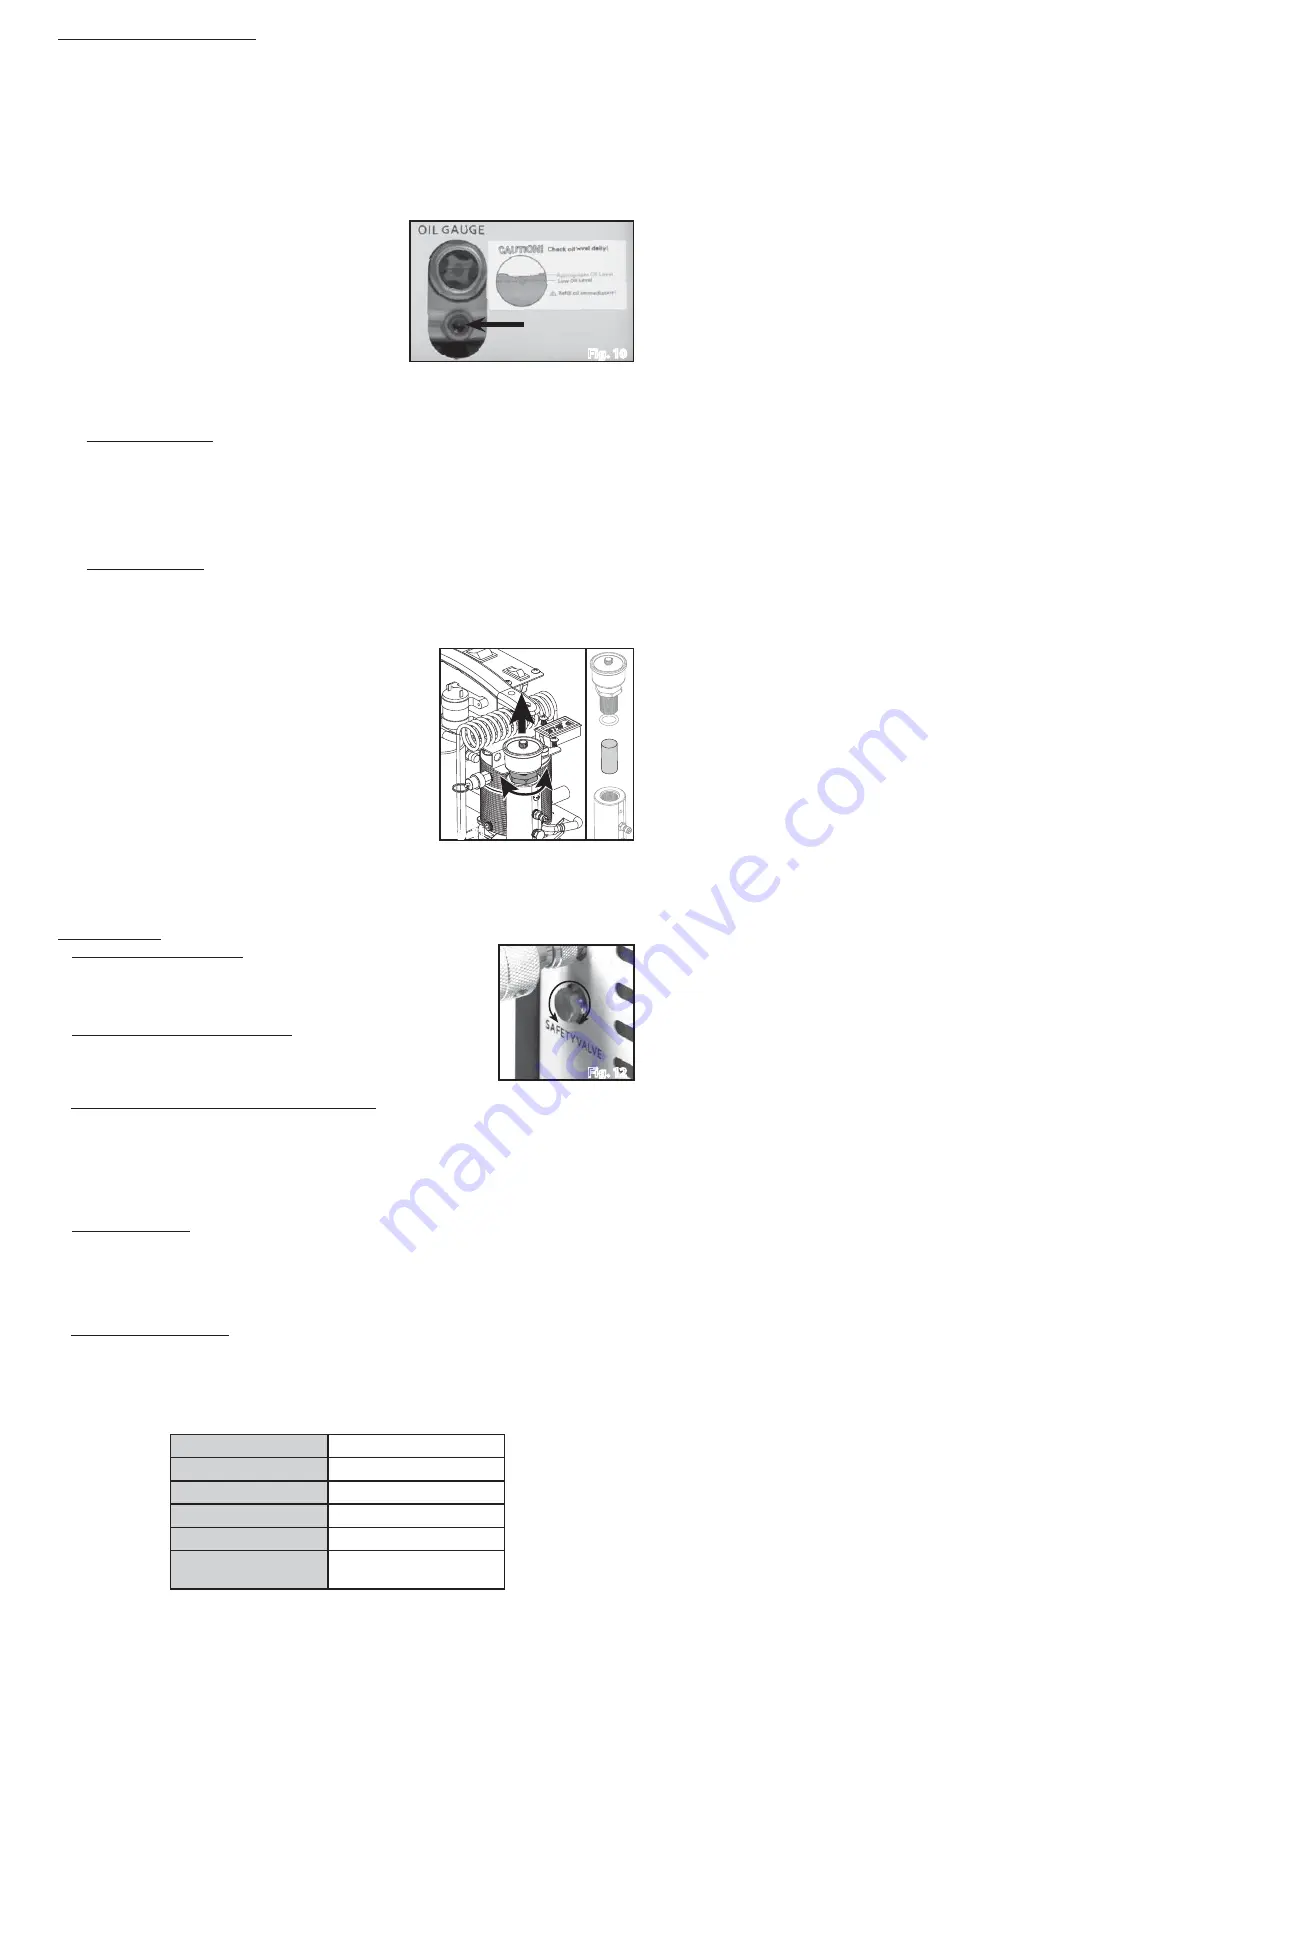
Locate the drain screw below the oil level window indicator (Fig. 10).
3.
Remove the drain screw to drain the oil. Properly dispose of the
used oil in accordance with your location’s environmental laws and
regulations.
4.
Replace and tighten the drain screw.
5.
Remove the black oil breather tube and refill the motor with air com-
pressor or 5W–40 motor oil to the appropriate level.
•
The oil level should be in between the middle and the top of the RED
dot located in the center of the Oil Level Indicator Window. DO NOT
OVER FILL.
6.
Reinstall the black oil breather tube.
5.3 Cotton Filters
a. Hose w/ In-line Air Filter
It is recommended that you change the cotton air filter if they become deformed or extremely dirty (filters sold separately).
IMPORTANT
: Before using and/or storing the compressor, inspect its cotton filter in the Hose Filter as follows:
1.
Remove the hose from the compressor.
2.
Unscrew the Hose Filter and remove the cotton air filter.
3.
Squeeze the cotton filter dry to remove excessive amount of moisture.
4.
Replace cotton filter if it becomes deformed or extremely dirty (filter sold separately).
b. Main Output Air Filter:
It is recommended that you change the cotton air filter of the main separator body after the earlier of three (3) months or
50 hours of use (filters sold separately).
The output air filters is located inside the air compressor and under the pressure gauge. This will require you to remove the outer
shell in order to change the filters.
1.
Unplug the air compressor and remove the power cord.
2.
Using a Phillips head screwdriver, remove only the screws from the top
shell of the compressor.
NOTE:
DO NOT
remove the screws on the carrying handle.
3.
Using the carrying handle, lift the main outer shell straight up and set
to the side.
4.
Use a wrench to remove the hexagon shaped adapter and gauge from
the separator main body (Fig. 11).
5.
Remove the one (1) cotton air filter and replace with new cotton
air filter.
6.
Reinstall the hexagon shaped adapter and gauge to the separator
main body.
7.
Reinstall the main top shell of the compressor.
•
Use only a dampened cloth to clean exterior of compressor.
•
Do not use any detergent or solvents which might contain chemicals that could damage plastic components and/or painted
surfaces of the compressor.
•
All other services should be performed by an Authorized Service Personnel.
6. TROUBLESHOOTING
A. Issue –
Air Compressor will not start
1. Resolution –
Check to make sure the air compressor is plugged into an active electri-
cal outlet.
2. Resolution –
Check the breaker button on the compressor, push in to reset.
B. Issue –
Air Compressor is not building pressure
1. Resolution –
Make sure release valve is closed. It should be hand tightened. If release
valve is closed and the air compressor is still not building pressure, turn off air compres-
sor and contact Customer Service.
C. Issue –
Air Compressor shuts off before reaching desired pressure
1. Resolution –
Make sure the Output Pressure (Auto Shut Off) is set properly.
2. Resolution –
If the air compressor has been running continuously for 40 minutes, simply restart the air compressor
by turning off and then on again to continue filling.
NOTE:
The air compressor is equipped with an automatic timer cutoff feature that will automatically shut off the air compressor
after 40 minutes of continuous operation. If filling a large tank from zero pressure, it will require you to restart your compressor.
Let the air compressor cool down for at least twenty minutes before you restart the compressor.
D. Issue –
Burst Disc Failure
1. Resolution –
Should the Burst Disc (Safety Valve) fail during use of the compressor, shut off the compressor and then
close the valve of the device you are filling. Open the Release Valve (Bleed Screw) to vent the remaining air from the
compressor. Remove the Burst Disc retention screw (Fig. 12) to verify the Burst Disc has failed (there will be a hole in
it). Remove the failed Burst Disc from the compressor. Additional Burst Discs are in the bag of spare parts that comes
with the compressor. Install a new Burst Disc and re-insert the Burst Disc retention screw by turning it clockwise.
E. Issue –
Air Compressor Overheats
1. Resolution –
Make sure the Water Tank is filled with water. If it is not filled at least 80% full, top off the water. Let
the air compressor cool for at least 15 minutes prior to restarting the compressor.
In the unlikely event that your air compressor malfunctions, DO NOT ATTEMPT TO FIX THE PROBLEM YOURSELF. Please contact
Customer Service.
SPECIFICATIONS
Working Voltage
110V–120V/60Hz
Motor Power
2000W
Temperature Protection
194⁰F (90⁰C)
Working Pressure
Up to 4,500 PSI
Weight
48.5 lbs
Application Range
Airgun/Paintball Cylinders or tanks
less than 6.8L
LIMITED ONE YEAR WARRANTY
This product is warranted to be free of defects in materials and workmanship for 1 year. Buyer should retain the original sales
receipt as record of date of purchase. This warranty does not cover adaptors, filters, attachments or other accessories. In the
event of a defect under this warranty, Crosman will, at its option, repair or replace the product; provided, however, its inspection
indicates that an original defect exists. Crosman reserves the right to replace any product which is no longer available with a
product of comparable value and function. If Crosman determines the repair is not covered under the warranty guidelines, there
could be a charge to you for the repair.
WHAT IS COVERED
1.
Parts and Repair of any factory defect of material or workmanship.
2.
Transportation charges to consumer for the repaired product and/or replacement product.
WHAT IS NOT COVERED
1.
Transportation charges to the Authorized Service Personnel for defective product.
2.
Normal wear and tear from regular use.
3.
Damaged parts as a result from misuse, neglect or tampering.
4.
Damage caused by abuse, modification or failure to perform normal maintenance – see Owner’s Manual.
5.
Improper installation or maintenance performed by someone other than an Authorized service personnel.
6.
Any other expense.
THIS LIMITED WARRANTY DOES NOT INCLUDE CONSEQUENTIAL DAMAGES, INCIDENTAL DAMAGES OR INCIDENTAL EXPENSES,
INCLUDING DAMAGE TO PROPERTY OR ANY OTHER EXPENSE. CROSMAN DISCLAIMS ANY IMPLIED WARRANTIES, INCLUDING THE
IMPLIED WARRANTIES OF MERCHANTABILITY AND FITNESS. SOME STATES DO NOT ALLOW THE EXCLUSION OR LIMITATION OF
INCIDENTAL OR CONSEQUENTIAL DAMAGES, OR ALLOW LIMITATIONS ON IMPLIED WARRANTIES SO THE ABOVE LIMITATIONS OR
EXCLUSIONS MAY NOT APPLY TO YOU. TO THE EXTENT ANY PROVISION OF THIS WARRANTY IS PROHIBITED BY FEDERAL, STATE OR
MUNICIPAL LAW, IT SHALL NOT BE APPLICABLE. THIS WARRANTY GIVES YOU SPECIFIC LEGAL RIGHTS, AND YOU MAY ALSO HAVE
OTHER RIGHTS, WHICH VARY FROM STATE TO STATE AND COUNTRY TO COUNTRY.
STOP – BEFORE YOU RETURN THIS PRODUCT TO THE STORE
Save on gas and avoid the trip back to the store. Contact our Customer Service/Technical Support representatives for
information and trouble-shooting help. Call 1-800-7AIRGUN (1-800-724-7486) or find answers to frequently asked questions at
www.crosman.com.
WARRANTY CLAIM AND REPAIR SERVICE
If your air compressor needs repair - DO NOT ATTEMPT TO DISASSEMBLE IT! Your air compressor requires special tools and fixtures
to repair it. Any disassembly or modification not performed by Authorized Service Personnel will void the warranty.
U.S. Customers -
Contact Crosman Customer Service at 800-724-7486 or e-mail us via www.crosman.com. You will be
instructed where and how to send your air compressor in for repair under warranty.
Crosman Corporation
Attn: Warranty Dept.
7629 Route 5 & 20
Bloomfield, NY 14469
Include with your product a copy of your receipt and a brief description of the problem. Be sure to indicate your name, mailing
address, e-mail address and telephone number. We recommend you use a method of shipping that provides you with a tracking
number and insurance options. Crosman is not liable for any damaged, lost or stolen merchandise during shipping.
Canadian Customers -
Contact the Gravel Agency, in Quebec at 866-662-4869.
Crosman and Benjamin are trademarks of Crosman Corporation.
© 2019 Crosman Corporation
02-19 OM
DRAIN SCREW
Fig. 10
Fig. 11
Fig. 12


