


!
!
!
!
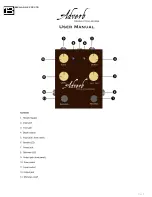
The controls
The controls marked as 3, 4 , 10, 11.
!
First let's start with
LEVEL
control (marked as 11).
!
I recommend using the
LEVEL
control to set your unity signal first. That way you will not lose volume or
increase volume when turning the pedal on.
!
Turn all controls to off position (all the way to left) keep
TONE
(marked as 10) at 12 o'clock and keep
pedal off. Set your guitar to the desired playing volume. Now turn pedal on (mark as Reverb).
!
If there is no change in volume than you're are fine. If you feel a slight decrease of volume start turning
the
LEVEL
knob (marked as 11), and keep turning the pedal on and off till you achieve unity. Now you
can safely use the pedal and never worry about your over all signal volume. ( This is something that was
very important for me when I designed that pedal).
!
1
2
Now, when unity is all set while
DEPTH (
marked as 4) and
INPUT
GAIN
(marked as 3) are still on the off position, click on
REVERB
(mark as 1).
!
Now slowly turn the
DEPTH
control (marked as 4) until achieve
desired REVERB sound.
!
The
INPUT GAIN
(marked as 3) controls the amount of signal
that comes into the chip, and gives you full control of how much of
the "SPRINGS" sound you want to hear. The higher you turn the
INPUT GAIN
, the more of the "springs" sound you'll hear.
3
For a warmer and more vintage
type effect you can dial the
TONE
, (marked as 10) to 9-10
o'clock.
!
For more modern tone and
brighter Reverb tone, turn the
TONE
, (marked as 10) above
12 o'clock as desired.
Benado effects
pg.
4
Содержание Adverb
Страница 1: ...Benado effects pg 1 ...
Страница 7: ... Diagrams 1 2 Benado effects pg 7 ...
Страница 8: ... 3 4 Benado effects pg 8 ...
Страница 9: ... This page will be updated as often as possible Users settings Benado effects ...