background image

14 

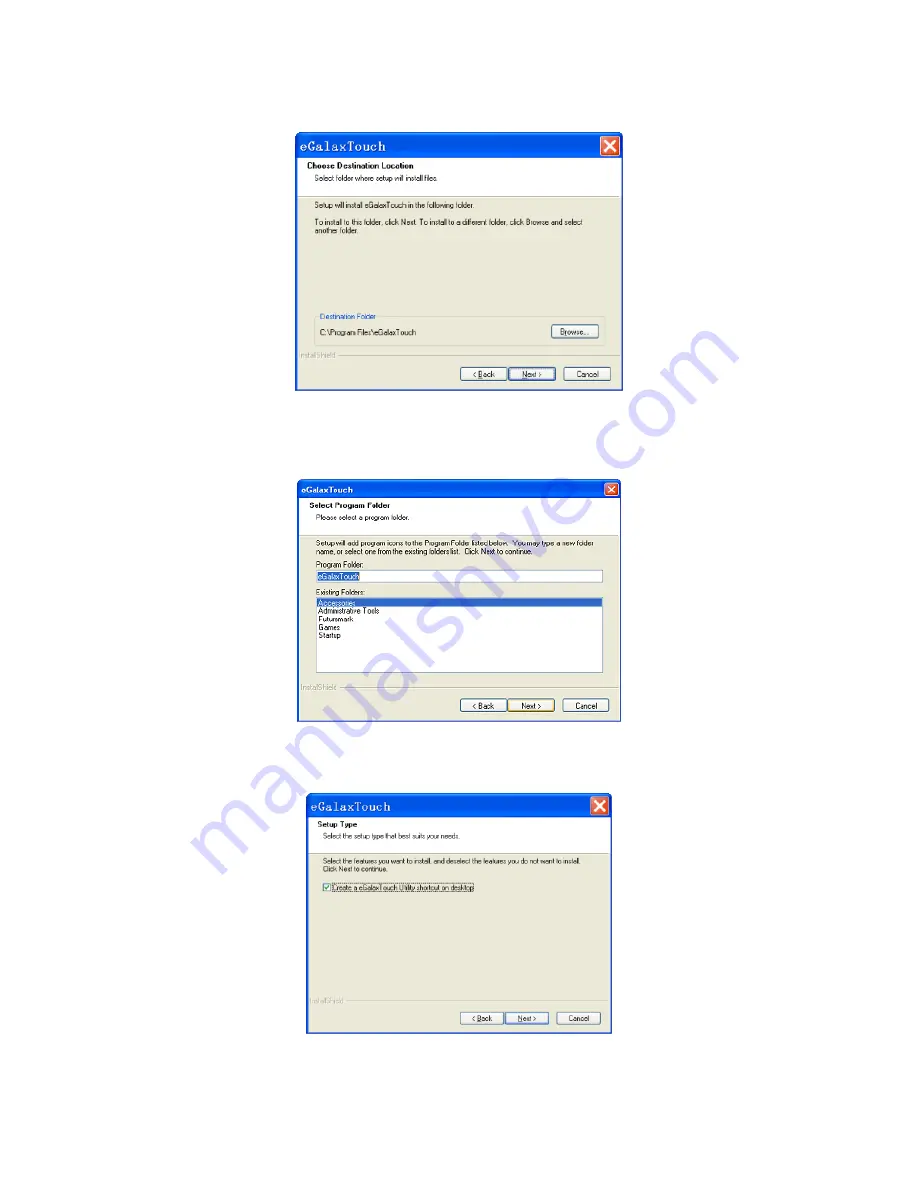
4.3.8  Select the destination location to install the touch driver. The default path is 

“C:\Program Files\eGalaxtouch”.    Click [Next] to continue installation. 


4.3.9  Select the Program Folder to install the utility.    The default is “eGalaxtouch”.   

Click [Next] to continue installation. 


4.3.10  Check the option to create a desktop shortcut icon.    Click [Next] to continue. 


Содержание LE1015

Страница 1: ...LE1015 True flat LCD Touch Monitor USER MANUAL...

Страница 2: ...Installation 5 3 1 Connections 5 3 2 Screw Specification for VESA Plate Stand or Wall Mount 6 3 3 Magnetic Stripe Reader Module Installation Optional 7 3 4 Second Display Installation Optional 8 4 Set...

Страница 3: ...ty Information Do not place anything wet on the monitor or the power cord Be sure to turn the monitor off before plugging the power cord into the socket Be sure to check the power cord and other cords...

Страница 4: ...ouncil Directive 89 336 EEC on the approximation of the laws of the Member States relating to electromagnetic compatibility Bematech Logic Controls cannot accept responsibility for any failure to sati...

Страница 5: ...e 4 Audio cable 6 USB cable 5 User manual 7 Driver CD 2 2 Features True flat bezel free design Durable and sturdy base Support integrated MSR and 2nd display Proven reliable performance Standard DB15...

Страница 6: ...VGA port 2 Connect USB cable to computer USB port 3 Connect power cord to touch monitor 4 Plug power cord to wall AC power outlet Connectors 1 AC in AC power input 2 VGA port D Sub 15 pin VGA video in...

Страница 7: ...tand or Wall Mount B 5mm Screw Length A B 6mm Mechanical Screw 4 mm Caution Please follow the Screw Specification in diagram for assembling VESA plate stand or Wall mounts plate into monitor back cove...

Страница 8: ...Module Installation Optional 1 Remove the MSR mount cover from the monitor 2 Insert the MSR module into the MSR USB port on the monitor 3 Make sure the MSR module is properly inserted and then instal...

Страница 9: ...8 3 4 Second Display Installation Optional 1 Connect USB cable to second display and Install VESA bracket set to the second display with 4x M4 screws 2 Remove the display mount cover from the monitor...

Страница 10: ...9 3 Mount the second display set to the touch monitor and install screws to secure Plug USB cable into monitor USB port USB port...

Страница 11: ...ke the OSD menu When OSD menu is displayed press this button to select the highlighted menu or function Adjust Increase volume When in OSD menu select next function When an OSD item is selected this b...

Страница 12: ...hase of the PLL Auto color Adjust color automatically Color Temperature Adjust color temperature Red Adjust Red color Green Adjust Green color Blue Adjust Blue color Mute Select Mute Unmute Volume Adj...

Страница 13: ...on program directory to find the file setup exe Double click on setup exe to start installation 4 3 2 When installation starts click Next to proceed to the next step 4 3 3 Installation in progress 4 3...

Страница 14: ...l RS232 interface driver and click Next to continue installation 4 3 6 Select option NONE click Next to continue installation 4 3 7 If there are additional touch monitors connected please check Suppor...

Страница 15: ...ault path is C Program Files eGalaxtouch Click Next to continue installation 4 3 9 Select the Program Folder to install the utility The default is eGalaxtouch Click Next to continue installation 4 3 1...

Страница 16: ...15 After install the driver successfully identify the USB controller is installed as shown below 4 3 11 Click on Settings tab to change the touch function settings as needed...

Страница 17: ...16 4 3 12 If necessary perform 4 point touch calibration and or 9 point 25 point linearization 4 3 13 Use Draw Test to check touch accuracy after calibration...

Страница 18: ...d make sure that the resolution or refresh rate match with the Display Mode 5 Touch screen is not accurate Run the touch screen calibration program with a 9 point linearization We also recommend doing...

Страница 19: ...tion program to do a 4 point calibration and or 9 point 25 point linearization 7 Touch screen does not respond to touch operations Check and make sure that touch screen controller driver is installed...

Страница 20: ...Analog 2 VESA 640x480 31 50 72 81 37 86 Analog 3 VESA 640x480 31 50 75 00 37 50 Analog 4 VESA 800x600 36 00 56 25 35 16 Analog 5 SVGA 800x600 40 00 60 32 37 88 Analog 6 VESA 800x600 50 00 72 19 48 08...

Страница 21: ...on W x D x H 14 33 x 9 06 x 12 83 364 x 230 x 326mm Color Black ELECTRICAL Power supply Built in universal power supply Input 100 240VAC 50 60Hz Power consumption 30W max Power saving mode 1W max Powe...

Страница 22: ...21 LE1015 True flat Touch Monitor...

Отзывы: