Bematech LC8710 Скачать руководство пользователя страница 14

LC8710 User Manual V1.0 


11 


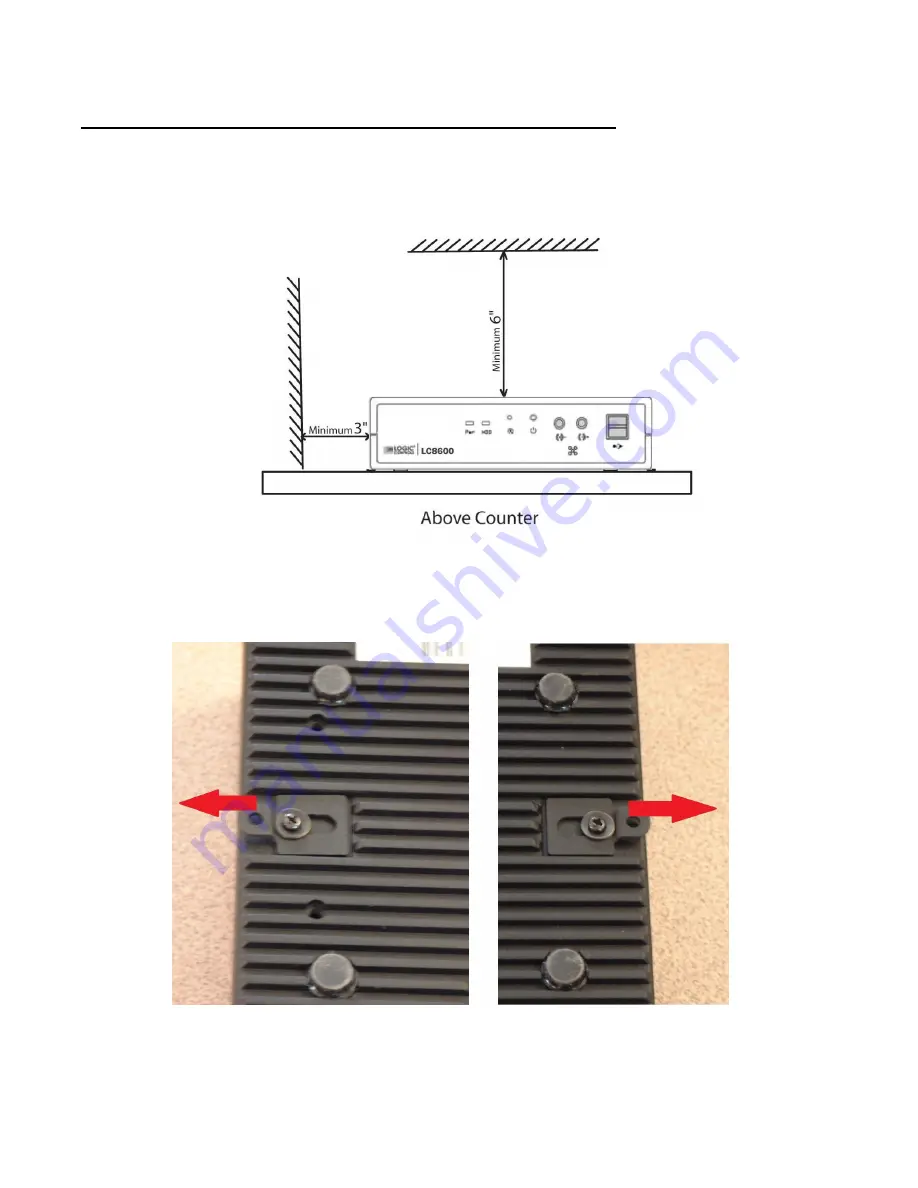
Mount the LC8710 horizontally with the mounting brackets


Allow at least 6 inches of space from the top of the unit and 3 inches from the sides to 
allow proper ventilation. See the picture below: 


Picture 6 

1.


push two mounting brackets out, and tighten the screws 


Picture 7 

Содержание LC8710

Страница 1: ...LC8710 RETAIL HARDENED COMPUTER USER MANUAL...

Страница 2: ...cument is subject to change without notice and does not represent a commitment on the part of the manufacturer FCC NOTICE This device complies with Part 15 of FCC Rules Operations are subject to the f...

Страница 3: ...CT FEATURES 3 INSTALLATION INSTRUCTIONS 4 SAFETY TIPS 4 COMPONENT PLACEMENT 6 MOUNTING INSTRUCTIONS 6 1 TOOLS MATERIALS REQUIRED 6 2 PARTS 6 3 DEVICE LOCATION 7 4 ELECTRICAL INSTALLATION REQUIREMENTS...

Страница 4: ...only 2 H x 8 W x 6 L Two mounting brackets enable these units to be mounted almost anywhere on a wall ceiling table top or under a counter The LC8710 uses dual core Intel Baytrail processors so it ca...

Страница 5: ...etergent Do not immerse unit in water Put the cleaner on the rag and wipe the LC8710 Never apply the cleaner directly on theLC8710 Avoid getting liquids inside the LC8710 If liquid does get inside hav...

Страница 6: ...ngle PC board for high reliability o Large number of available I O ports 5x USB 2 0 1x USB 3 0 3x serial 1x parallel 1x VGA 1x DVI I 1x DisplayPort 1x Ethernet 1x PS 2 keyboard and mouse front back sp...

Страница 7: ...nce with all applicable codes standards including fire rated construction Don t attach power supply cable to the building surface or through walls ceilings floors and similar openings Do not allow any...

Страница 8: ...e rating Also make sure that the total rating of all products plugged into the wall outlet does not exceed the fuse rating Unplug this product from the wall outlet and refer servicing to qualified ser...

Страница 9: ...grill counter level out of the way of possible spills Leave enough spaces around the unit for ventilation MOUNTING INSTRUCTIONS 1 TOOLS MATERIALS REQUIRED Wood screws 2 pieces 1 8 x 1 1 2 Concrete wal...

Страница 10: ...e maintenance Advisably the floor should not be wooden in order to avoid electrostatic shocks on the equipment Install the equipment in a stable place with no vibrations Do not install the equipment o...

Страница 11: ...trical provision Electrical network power supply 100 240 VAC 1 5A 50 60 Hz Before mounting the device please make sure that Mounting brackets are provided to facilitate mounting the LC8710 to a wall V...

Страница 12: ...icture 2 1 Drill the mounting stand on the counter top This step is OPTIONAL only for those who want the unit to be vertically fixed on a horizontal surface The stand is designed to provide stable bal...

Страница 13: ...LC8710 User Manual V1 0 10 2 remove one mounting bracket from the LC8710 Picture 4 3 tighten the screws to mount the LC8710 on the vertical mounting stand Picture 5...

Страница 14: ...zontally with the mounting brackets Allow at least 6 inches of space from the top of the unit and 3 inches from the sides to allow proper ventilation See the picture below Picture 6 1 push two mountin...

Страница 15: ...LC8710 User Manual V1 0 12 Picture 8 2 mount the LC8710 on the counter top with screws Picture 9...

Страница 16: ...16 x 3 8 if it is a concrete wall The LC8710 is a fanless and ventless unit Heat is dissipated through the metal case So allow at least 6 inches of space from the top of the unit and 3 inches from the...

Страница 17: ...power socket will result in damage to the connector When unplugging power adapter from LC8710 do not pull the cable The connector has a locking function that is released by holding the plug and pulli...

Страница 18: ...6 Build Date and Time 04 08 2014 09 24 38 System Date Wed 05 07 2014 System Time 17 11 06 Access Level Administrator Select Screen Select Item Enter Select Change Opt F1 General Help F2 Previous Value...

Страница 19: ...ctor provides both analog VGA and Digital video output For connection to VGA displays a DVI to VGA converter or DVI to VGA cable can be used To select between analog VGA video output and digital video...

Страница 20: ...ck the system information on the screen during boot up 2 If unit reboots correctly try running application again If same problem occurs try reinstalling the application software 3 If unit cannot reboo...

Страница 21: ...he test passes replace the serial device If the test fails go to step 5 5 Attach a wrap plug to the RS232 port of the LC8710 and rerun the RS232 loop test If the test passes replace the RS232 cable If...

Страница 22: ...60mm x 51mm Housing Die cast I O PORTS Video 1920x1080 pixels max VGA DVI I and DisplayPort Network Interface 10 100 1000 Mbits Ethernet Network boot capable Keyboard Mouse PS 2 mini DIN6 connectors U...

Отзывы: