Assembly Instructions
NOTE:
TWO PEOPLE ARE RECOMMENDED TO ASSEMBLE THIS TABLE.
A.
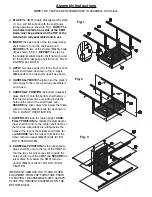
PLACE
the CMS
®
(Cable Management System)
(1) on a soft flat surface with the shelf posts
facing upwards as shown in Fig 1.
NOTE: The
two holes located on one side of the CMS
®
frame must be positioned at the TOP of the
stand when fully assembled and in use.
B.
INSERT
the open ends of the top (least deep)
shelf frame (2) onto the shelf posts and
SECURE
with two of the shorter (M6x15) bolts
(8) as shown in Fig. 1.
REPEAT
this step for
the middle (medium depth) shelf frame (3) and
for the bottom (deepest) shelf frame (4). FULLY
TIGHTEN ALL BOLTS.
C.
APPLY
two glass pads (10) to the front of each
lower shelf frame as shown in Fig. 2. Apply
three
pads to the top shelf support as shown.
D.
CAREFULLY MOVE
the table near the place it
will occupy in the room when fully assembled
and in use.
E.
CAREFULLY POSITION
the bottom (deepest)
glass shelf (7) onto the bottom shelf frame so
that the two silver discs are sitting inside the
holes at the rear of the shelf frame and
SECURE
the silver discs from below the frame
with two longer (M6x25) bolts (9) as shown in
Fig. 2. DO NOT OVERTIGHTEN.
F.
CAREFULLY
stand the table upright.
CARE-
FULLY POSITION
the middle (medium depth)
glass shelf (6) onto to the center shelf frame so
that the two silver discs are sitting inside the
holes at the rear of the middle shelf frame (3)
and
SECURE
the silver discs from below the
frame with two longer (M6x25) bolts (9). DO
NOT OVERTIGHTEN.
G.
CAREFULLY POSITION
the top (least deep)
glass shelf (5) onto to the top of the CMS
®
so
that the two silver discs are sitting inside the
holes at the top of the CMS
®
and
SECURE
the
silver discs from below the CMS
®
with two
shorter (M6x15) bolts (8). DO NOT OVER-
TIGHTEN.
IMPORTANT: REMOVE THE TV AND OTHER
EQUIPMENT FROM THE FURNITURE PRIOR
TO MOVING THE ASSEMBLED UNIT. ALWAYS
PLACE THE HEAVIEST EQUIPMENT ON THE
BOTTOM SHELF.
Fig. 1
Fig. 2
Fig. 3


