Belkin OmniView F1DC108B Скачать руководство пользователя страница 5

INSTALLATION

OVERVIEW

Pre-Configuration

The enclosure of the Switch is designed for rack-mount configuration in a standard
19-inch server rack. Rack-mount hardware is included for a sturdy rack installation.
Consider the following when deciding where to place the Switch:

• The location of your computers in relation to where you would like to install

your Switch; and

• The lengths of the cables you use to connect your computers to the Switch.

Cable Distance Recommendations

For PS/2 Computers

We recommend that PS/2 cable length be limited to 25 feet for best video
performance. Beyond that length, the probability of video degradation increases.

For USB Computers

We recommend that USB cable length be limited to 12 feet for best performance.
Beyond 12 feet, the probability of signal failure is likely, and this may cause the
device to fail.

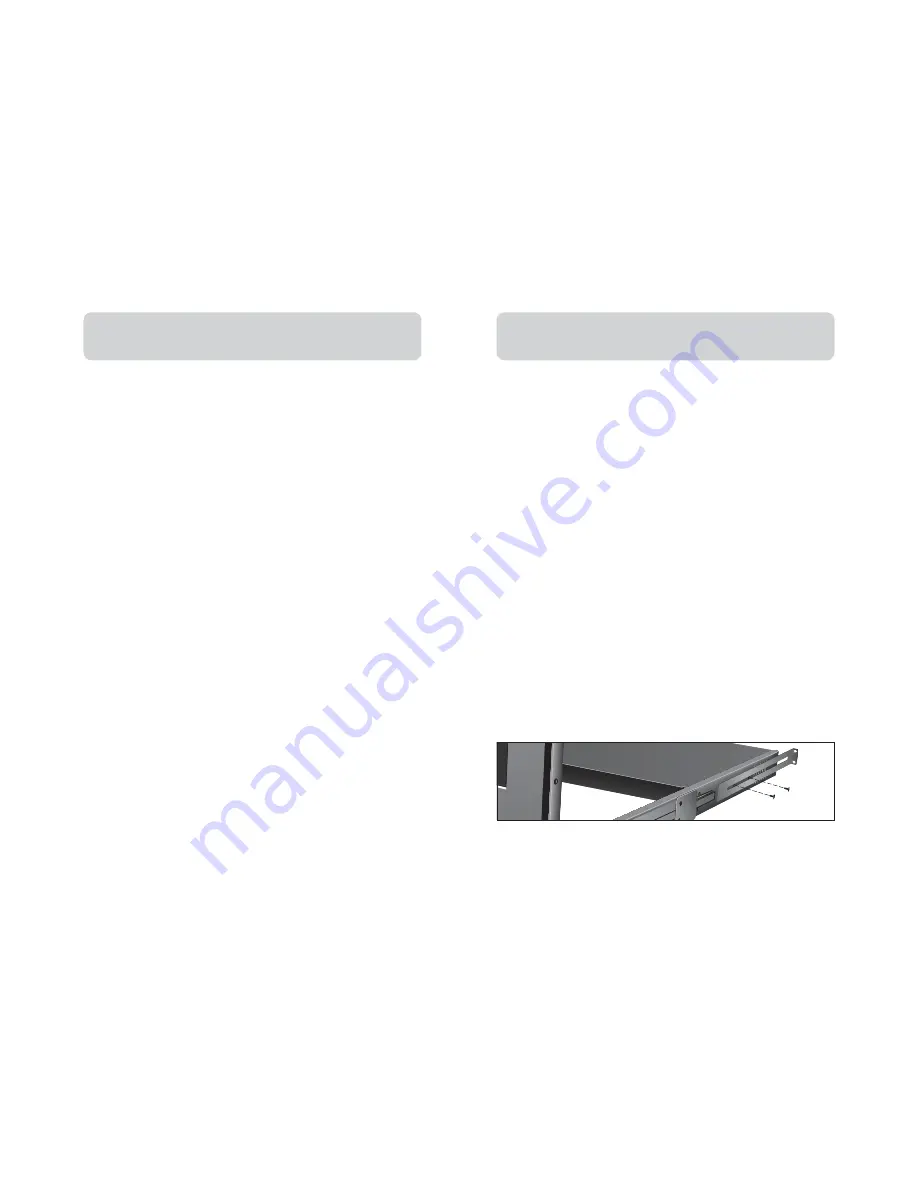
Installing the Switch into a Server Rack

The included mounting brackets feature adjustable positions that allow the Switch to
fit in virtually any four-post, 19-inch server rack.

1.

Remove the adjustable brackets from the box.

2.

Select a bracket-hole scheme based upon your server rack’s dept.

3.

Attach the bracket to the side of your Switch with the Phillips screws provided.

4.

Mount the Switch to the rack rail assemblies.

Note: If this Switch will be daisy-chained to another KVM Switch, set the BANK address
prior to installing on a rack. Refer to the section in this User Manual labeled “Multiple
KVM Switch—Installation (Daisy-Chaining)”.

*** Cautions and Warnings ***

Before attempting to connect anything to the Switch or your computer(s), please
ensure that everything is powered off. Belkin Corporation is not responsible for damage
caused by these actions.

Glossary of Terms

The following definitions are used throughout the User Manual:

AutoScan

A mode of operation where the KVM Switch sequentially monitors all

attached servers.

BANK

The address of a KVM Switch when used in a daisy-chain configuration (BANK

numbers range from 0 to 15); typically set by adjusting the DIP Switch to the
appropriate setting.

Console

The keyboard, video monitor, and mouse.

Console Ports

The connectors on the back of the KVM Switch for connection of 

the console.

Control

In terms of switching between ports, “control” means that the console is

capable of sending input to the computer; requires that the console also has “focus”
on the port, and is “viewing” it.

Daisy-Chaining

The process of connecting multiple KVM Switches together in a

sequence with cables. Daisy-chaining allows the KVM Switches to interact with each
other to expand control over servers.

Human Interface Device (HID)

A USB device class that includes keyboards and mice.

IntelliView Graphical On-Screen Display (OSD)

A graphical user interface that can

be used to control and configure the KVM Switch.

KVM or KVM Switch

A keyboard, video, and mouse switch.

Port

Receptacle in the KVM Switch for plugging in a computer or input device.

Primary Switch

A KVM Switch with a console attached to it and set to BANK 

address 0–3.

Secondary Switch

Switches not assigned as “Primary Switch” that are connected in a

daisy-chained KVM configuration. These are set to BANK addresses 4–15 and do not
have a console connected directly to them.

Select Mode

The mode of operation a daisy-chained KVM Switch enters when it

receives the first button press from the front panel, in Static mode. Select mode
allows the user to select BANKs, hosts, etc. with the next button press.

Standalone

A single KVM Switch configured to function independently of other KVM

Switches.

Static Mode

The KVM Switch’s predominant mode of operation, into which it enters

whenever it has not received a button press for at least five seconds.

View

In terms of switching between ports, “viewing” means that the console is

receiving video from the computer. Viewing requires that the console also has
“focus” on the port.

6

7

Содержание OmniView F1DC108B

Страница 1: ...ERPRISE Quad Bus Series F1DC108B Expandable to control up to 256 servers from four consoles OmniView 1U Rack Mount Console with 8 Port KVM Switch Control up to eight servers from one integrated console and KVM Switch ...

Страница 2: ... switch on the market The Rack Mount Console is engineered to work with the most advanced server room and laboratory environments offering Dual rail system allowing the LCD panel to be displayed by itself Video resolution support of up to 1024x768 PS 2 and USB mix and match support for input and output devices Multi console support IntelliView Graphical On Screen Display OSD Computer and group nam...

Страница 3: ...t KVM Switches or as many as 256 when using the 16 Port KVM Switches IntelliView Graphical On Screen Display OSD with Mouse Support The IntelliView Graphical OSD feature simplifies server management by allowing you to assign individual names to each connected server throughout the system Groups of computers can also be created allowing you to efficiently organize your enterprise IntelliView also p...

Страница 4: ...4 to 140 F 20 60 C Humidity 0 80 RH non condensing Maximum Altitude 10 000 feet Console Specifications Max LCD Resolution 1024x768 Keyboard Type 105 key PS 2 compatible Mouse Type PS 2 compatible touch pad Enclosure Metal enclosure Dimensions 19 W x 1 75 H x 29 L in 482 6 x 44 5 x 736 6mm Weight 29 2 lbs 13240g Warranty 2 Year Limited Warranty Note Specifications are subject to change without noti...

Страница 5: ... sequentially monitors all attached servers BANK The address of a KVM Switch when used in a daisy chain configuration BANK numbers range from 0 to 15 typically set by adjusting the DIP Switch to the appropriate setting Console The keyboard video monitor and mouse Console Ports The connectors on the back of the KVM Switch for connection of the console Control In terms of switching between ports con...

Страница 6: ... the port for the first two computers for best results screw the connectors into the Switch and the computer when possible 2 Connect the USB connector of your KVM cable to the computer If your computer is running Windows Me or later skip to step 6 Otherwise continue with step 3 3 Boot up the computer you wish to connect via USB as you would normally with the keyboard mouse and monitor connected di...

Страница 7: ...tch is used for proper identification of the KVM Switch either in a standalone or multiunit configuration For a single unit configuration set the BANK DIP Switch on the KVM Switch to the Standalone BANK address 00 setting This is the factory default setting For multiunit configuration the BANK DIP Switch on the Primary Switches must be set to BANK address 00 to 03 Secondary Switches must be set to...

Страница 8: ...notes their respective BANK addresses Note If the Switches still do not enumerate correctly check that all Switches have the correct BANK address assigned to them and that all daisy chain cables are connected properly Enabling Daisy Chain Mode on BANK 00 8 Primary BANK 00 must be configured to daisy chain mode by the administrator This is only to be set on BANK 00 a Open IntelliView and enter Setu...

Страница 9: ... approximately two seconds after the beep to complete each hot key sequence For hot keys e g up and down arrows and AutoScan the order of progression from one computer to the next is dictated by the order of the computers in the list box in the main view of IntelliView Note Alternatively the control keys can be used to enter commands usage is identical to the Scroll Lock key this provides compatib...

Страница 10: ...ar will activate IntelliView s control in focus same as clicking on the control If the list box is in focus then pressing the space bar will give the console control of the highlighted computer USING YOUR SWITCH Pressing Enter will activate the control in focus if the control is on a button or inside an edit box However if the focus is on another type of control e g the list box the Enter key will...

Страница 11: ...es simultaneously the second administrator will be presented with an error message USING YOUR SWITCH Login Button Click on the Login button or press Alt L on the keyboard to display the login dialog box which lets the user switch to a different account see the Login Dialog section Logout Button Click on the Logout button or press Alt T on the keyboard to return to Guest level access If the adminis...

Страница 12: ...isplays the name of each connected computer The computer list can be sorted on this field by clicking on the column header User Columns 1 2 3 G These columns allow administrators to set the access rights to each computer for each of the User groups 1 2 3 and Guest To restrict a user from a particular computer click in the corresponding cell in the list box The padlock indicates that the user colum...

Страница 13: ...NK 00 Display Version Numbers This screen displays product information including the model number and the firmware revisions Restore Factory Defaults Clicking on this button will restore all user configurable settings to their default values The user is presented with a confirmation screen before this action is applied Error Messages and Dialogs From time to time it will be necessary to display me...

Страница 14: ...de capability you can update your Switch at any time through a simple parallel connection Internet upgrade capability ensures that your Switch is always the most current version on the market with the latest features and enhancements Does the Switch support Microsoft IntelliMouse The Switch supports mice from Microsoft Logitech Kensington and Belkin Please contact Belkin Technical Support for comp...

Страница 15: ...is Class B digital apparatus complies with Canadian ICES 003 Cet appareil numérique de la classe B est conforme á la norme NMB 003 du Canada Belkin Corporation Limited Five Year Product Warranty Belkin Corporation warrants this product against defects in materials and workmanship for its warranty period If a defect is discovered Belkin will at its option repair or replace the product at no charge ...

Отзывы: