background image

39

Software Internet Connection Sharing with Multiple PCs

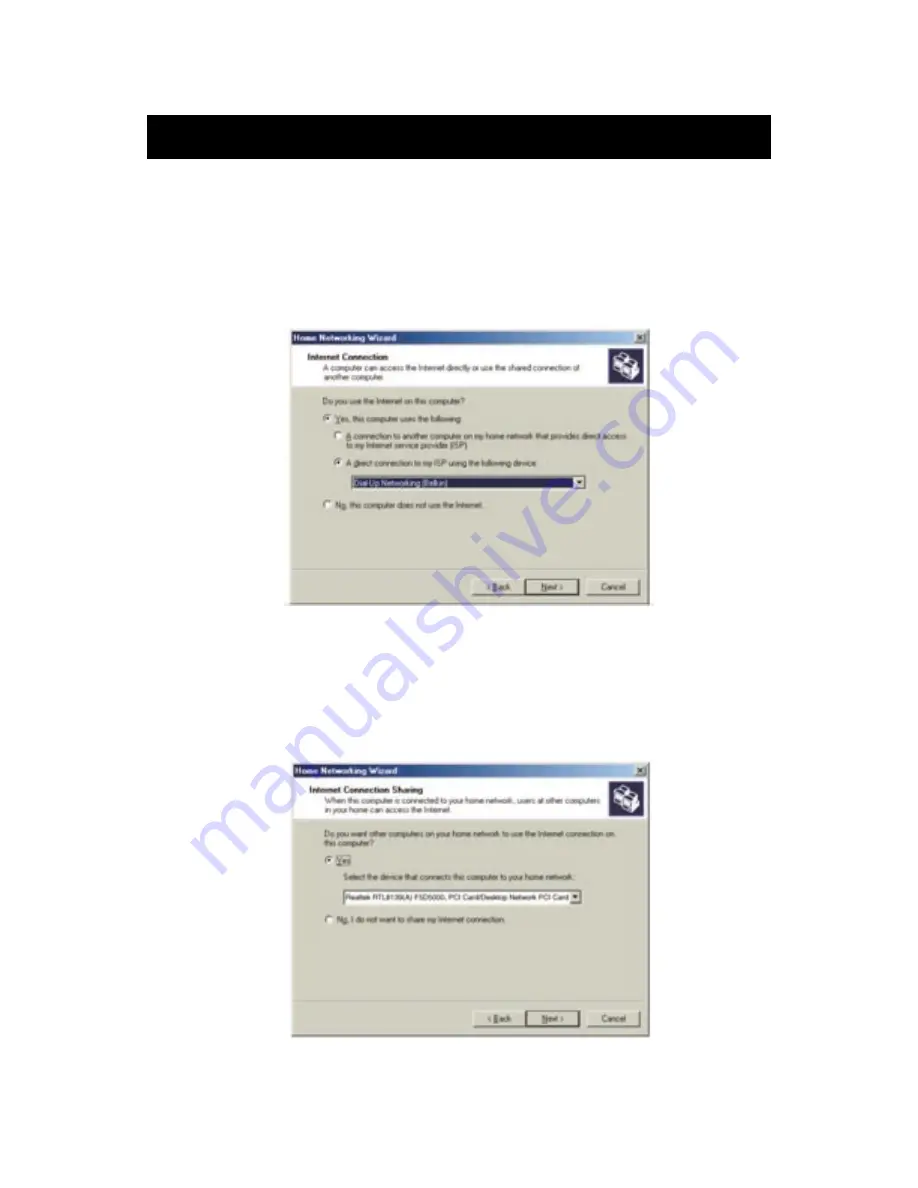
3. The following screen will appear. Select Yes, if you use the Internet

on this computer and select, "A direct connection to my ISP using
the following device:" and select the device that you use to sign
on to the Internet.

4. You will now be asked if, "you want other computers on your

home network to use the Internet connection on this computer."
Select yes and the device that connects the host computer to your
home network if you want to enable Internet Connection Sharing.
Click Next.

Содержание F5D5130

Страница 1: ...Share your files and Internet connection 5 and 8 Port 10 100 network F5D5130 5 F5D5130 8 Network Switch ...

Страница 2: ...ng Software to All PCs on Your Network 11 Configuring Your Computer Using Belkin NetSetup 12 16 Configuring Additional Computers Using Belkin NetSetup Software 17 19 Sharing Files and Peripherals 20 24 Accessing Resources on Other Computers 25 26 Software Internet Connection Sharing with Multiple PCs 27 44 Product Specifications 45 Warranty FCC CE Statements 46 ...

Страница 3: ...e the Belkin 5 and 8 Port 10 100Mbps Network Switch Features Conforms to the Ethernet IEEE 802 3 and 802 3u standards Provides LED indicators for monitoring network traffic Provides 5 or 8 10 100Mbps auto sensing RJ45 ports for easy migration from 10Base T to 100Base T networks Shared RJ45 uplink port allows you to easily add computers to your network at any time Dedicated bandwidth provided for e...

Страница 4: ... information about the network Power Light Indicates the power is on or off LAN Ports Connect your PCs to these ports DC Power Jack Connect the included power supply to this jack Front Panel F5D5130 5 5 Port 10 100 Network Switch Product Description Rear Panel ...

Страница 5: ...T link between the 5 Port Switch and the computer connected to that port Flashing A flashing port status either amber or green indicates that data is flowing between the Belkin 5 Port Network Switch and the computer connected to that port Rear Panel Power Input Jack Connect 6V DC power supply LAN Ports Numbered 1 5 Connect the network cable from your PC s network interface card adapter to these po...

Страница 6: ...y Status Lights Provide information about the network Power Light Indicates the power is on or off Uplink Button Allows you to easily add additional ports to your network LAN Ports Connect your PCs to these ports DC Power Jack Connect the included power supply to this jack Front Panel Rear Panel ...

Страница 7: ...rt Flashing a flashing port status light either amber or green indicates that data is flowing between the Belkin 8 Port Network Switch and the computer connected to that port Rear Panel Power Input Jack Connect 6V DC power supply LAN Ports Numbered 1 8 Connect the network cable from your PCs network interface card adapter to these ports It is not important which LAN ports you use For example in tw...

Страница 8: ...to be mounted to the wall The adapter is available at belkin com To install the wall mount follow these steps 1 Use the wall mount as a template and mark the screw holes on your wall with a pencil 2 Drill holes in the wall and insert screw anchors not included into the wall 3 Insert screws into the anchors and turn them in just far enough that when the wall mount is placed on the screws it will be...

Страница 9: ...riginally set up the network for instruction on how to connect additional computers to the network Connecting three or more computers To connect your network you will need a network switch or hub with enough ports for the number of computers you intend to connect immediately or in the near future The F5D5130 5 provides five ports and the F5D5130 8 provides eight ports Although hubs and switches pe...

Страница 10: ...ch PC skip this step if this is already done 3 Connect each computer s installed Network Card to the Network Switch port using a straight through unshielded twisted pair UTP Ethernet Cat5e patch cable A3L850 XX S or for higher performance use Belkin Cat6 patch cables A3L980 XX S 4 Plug one end of the power supply adapter into the power socket found at the rear of the switch and the other end into ...

Страница 11: ...9 Connecting a Simple Network ...

Страница 12: ... will automatically detect that a new device has been installed 2 The Add New Hardware Wizard will start Click Next Note In Windows 2000 and Me Windows will automatically detect drivers and will not prompt you for Belkin drivers Skip to page 11 3 When asked What do you want Windows to do select the first option Search for the best driver for your device Recommended and click Next 4 Select the CD R...

Страница 13: ...are to configure your computers 1 Insert the SOHO Networking Software that came with your Belkin Network Switch into your CD ROM 2 From your desktop double click on My Computer then double click on the D drive D is usually the default drive letter for the CD ROM 3 Double click on the Install exe icon and Windows will begin to install the program onto your PC After the program is installed Windows ...

Страница 14: ...nfiguring Your Computer Using Belkin NetSetup 1 Once your computer has restarted click Start click Programs highlight Belkin SOHO Networking and select Belkin NetSetup to launch this easy to use computer configurator The following screen will appear 12 ...

Страница 15: ...nfiguring Your Computer Using Belkin NetSetup 2 Select I am setting up my own network and click Next The following screen will appear 3 Select I am setting up the first computer in my network and click Next ...

Страница 16: ...computer that belongs to the same network workgroup 6 In the Workgroup field type a workgroup name such as My Network The workgroup name must be same for each network or workgroup 7 Use description field to further identify the computer Type in a description such as Windows 98 This can be anything you want and does not have to be different from or the same as the Configuring Your Computer Using Be...

Страница 17: ...r computer on the network You may also leave this field blank Click Next and the following screen will appear 8 If you want to share files and printers on this computer select I want to share files and printers on my computer and click Finish The following screen will appear ...

Страница 18: ...g to set up any more computers click No and skip to page 17 10 If you clicked Yes you will be prompted to insert a floppy disk into the PC s floppy disk drive Label a floppy disk Belkin Networking and insert it into the floppy disk drive Click OK 11 After the client setup disk has been created you will be prompted to restart your computer Remove the floppy from the floppy disk drive and allow your...

Страница 19: ...omputer has been configured we are ready to configure the other PCs on your network 1 You should now be working with the next computer Click Start Programs Belkin SOHO Networking and then Belkin NetSetup to launch the easy to use computer configurator the following screen will appear 2 Select I am adding this computer to my network Click Next ...

Страница 20: ...ntered on the previous computer Do not change this setting 6 Type in a description such as Windows 98 This can be anything you want and does not have to be different from or the same as the description of any other computer on the network You may also leave this field blank 3 Windows will now prompt you to insert the newly created client setup disk into the PC s floppy drive Insert the disk you la...

Страница 21: ... printers on my computer and click Finish If not select I do not want to share files and printers on my computer and click Finish 9 The computer will now need to be restarted 10 Your PC is now configured Repeat these steps for the rest of the computers on your network 7 When finished filling in the fields click Next The following screen will appear ...

Страница 22: ...M drives you must set sharing settings for each PC in the network Belkin has simplified the sharing of files peripherals and internet connections by providing you with the Belkin NetShare Utility to set up your sharing options 1 From the Start menu click Programs and select Belkin NetShare Utility to set up your sharing options The following screen will appear ...

Страница 23: ...ws you to change the name of the computer and the workgroup by clicking on the change buttons Verify that the computer name and workgroup match what you entered in the Belkin NetSetup Software 3 If you press the File Sharing tab the following screen will appear ...

Страница 24: ...r network highlight the drive in the left hand column and select Share 5 To stop sharing highlight the drive in the right hand column and click Stop Sharing The drive s will appear in the left hand column 6 For advanced sharing options highlight the shared drive you d like to set sharing options to and click on the Properties button and the following screen will appear ...

Страница 25: ... On this screen you can share files on your computer as Read Only or Read Write files In addition you can set passwords so only authorized users can change these settings 8 Click on the Printers tab and the following screen will appear ...

Страница 26: ...to locate shared printers on your network Once you have located the printer you want to share over the network NetShare will automatically install printers from the host computer 9 This screen will list all printers connected to your PC Highlighting the printer you would like to share or not share and select the Sharing button the following screen will appear ...

Страница 27: ...Other Computers 25 Accessing Resources on Other Computers 1 From the Start menu go to Programs and select Belkin NetShare Utility The following screen will appear 2 Select Browse Your Network The following screen will appear ...

Страница 28: ...ck on your workgroup and all resources available to you will be listed OR 1 To access resources available on other computers click on the Network Neighborhood or My Network Places icon on your desktop 2 Double click on the computer that you wish to access 3 You can now access all network files that are available to you ...

Страница 29: ...ing Internet connection you can share that connection with your entire network Software Internet sharing is appropriate for dial up normal phone line Internet connections as well as for modems that connect to the computer s USB port Software Internet sharing can be done through the Windows operating system if the computer that has the Internet connection is running Windows 98 SE Me or 2000 If the ...

Страница 30: ...g capabilities of your operating system On the computer which has the Internet connection follow these steps Windows 98 SE host configuration 1 Open the My Computer window 2 Double click on the Control Panel and then double click on Add Remove Programs and press the Windows Setup tab and the following window will appear 3 Double click on Internet Tools 4 Select the check box on the Internet Connec...

Страница 31: ...29 Software Internet Connection Sharing with Multiple PCs 5 Click Next and the following screen will appear 6 Click Next and the following screen will appear 7 Click Next again ...

Страница 32: ...f connection do you use to access the Internet select the first option Dial Up Connection and click Next 9 Internet Connection Sharing will now create a Client Configuration Disk to configure the browsers on the other computers on your home network to use Internet Connection Sharing ...

Страница 33: ...etwork Windows 98 SE host configuration check 1 From the Start Menu go to setting and select Control Panel 2 Double click on Network and the following screen will appear Note There are now a lot more entries in the Network configuration 3 Change the Primary Network Logon to Windows Logon 4 The Internet Connection Sharing setup made a modification to the binding of the TCP IP protocol the IP addres...

Страница 34: ...n Obtain an IP address automatically and click OK Configuring client computers Now that you have successfully configured the host computer we can set up other computers on your network to access a remote modem 1 Insert the Client Configuration disk into the A drive of the client computer 2 From the Start menu go to Run and enter A icsclset exe and click OK ...

Страница 35: ...Software Internet Connection Sharing with Multiple PCs 3 The Browser Setup Wizard screen will appear Click Next 4 The Wizard will now check the browser settings Click Next ...

Страница 36: ...Computer ensure that the TCP IP settings for your network adapter are set correctly by carrying out the following steps 1 In the Control Panel double click on the Network icon 2 In the list of network components click TCP IP associated with the network adapter and then click Properties Software Internet Connection Sharing with Multiple PCs ...

Страница 37: ...nection Sharing with Multiple PCs 3 The following screen will appear Select the Obtain an IP address automatically check box 4 Click the WINS Configuration tab and then select the check box next to Use DHCP for WINS resolution ...

Страница 38: ...nection Sharing with Multiple PCs 5 The following screen will appear Select the Obtain an IP address automatically check box 6 Click the WINS Configuration tab and then select the check box next to Use DHCP for WINS resolution ...

Страница 39: ...nstalled gateways if any are listed 8 Click the DNS Configuration tab and then select the check box next to Disable DNS 9 Click OK to accept the new TCP IP settings 10 Click OK again to update your new network configuration 11 Any changes to the network configuration will require a restart of the system ...

Страница 40: ...aring with Multiple PCs Windows Me host configuration 1 From the desktop double click on My Network Places and the following screen will appear 2 Double click on the Home Networking Wizard and the following screen will appear Click Next ...

Страница 41: ...nnection to my ISP using the following device and select the device that you use to sign on to the Internet 4 You will now be asked if you want other computers on your home network to use the Internet connection on this computer Select yes and the device that connects the host computer to your home network if you want to enable Internet Connection Sharing Click Next ...

Страница 42: ...lowing screen will appear Select the check boxes if you want to share your files and printers with other computers on the network Click Next Note To allow access to other resources on the computer that cannot be found in the screen above double click on My Computer Right click on the resources that you want shared and select sharing from the menu that appears ...

Страница 43: ...p disk to enable the use of Home Networking in Windows 98 and Windows 95 operating systems To create a setup disk select the first option and click Next 8 Insert a disk in the floppy drive and click Next 9 This completed the Home Networking Wizard click Finish to have the Wizard make any of the changes ...

Страница 44: ...Insert the Setup disk in the floppy drive of the client computer From the Start menu go to Run and type A setup exe and click OK The screen will look something like this 2 This will bring you to the Welcome screen of the Home Networking Wizard Click Next and the following window will appear ...

Страница 45: ... this computer and select A connection to another computer on my home network that provides direct access to my Internet Service Provider and click Next The following screen will appear 4 Be sure to change the Computer Name but use the same Workgroup Name Click Next The following screen will appear ...

Страница 46: ...omputer that cannot be found in the screen above double click on My Computer Right click on the resources that you want shared and select sharing from the menu that appears and set the level of access that you want to allow and click OK 6 The following screen will appear 7 Select No because we have already created a Home Networking Setup disk on the host computer Click Next and this completes the ...

Страница 47: ...Base T Auto sensing RJ45 ports and an auto uplink RJ45 port s F5D5130 5 and a shared uplink RJ45 port F5D5130 8 MAC Address 1024 Unicast MAC Addresses Limits Unlimited Multicast MAC Addresses Max Frame Size 1522 Bytes F5D5130 5 1536 Bytes F5D5130 8 Buffer Memory 1Mb Speed Per Port 10 or 100 Mbps in Half Duplex 20 or 200 Mbps in Full Duplex LEDs Link Activity Per port 10 100Mbps Per port and power ...

Страница 48: ...ler from whom you purchased the product Proof of purchase may be required This warranty does not apply if the product has been damaged by accident abuse misuse or misapplication if the product has been modified without the written permission of Belkin or if any Belkin serial number has been removed or defaced THE WARRANTY AND REMEDIES SET FORTH ABOVE ARE EXCLUSIVE IN LIEU OF ALL OTHERS WHETHER ORA...

Страница 49: ...47 ...

Страница 50: ...NN3 8RX United Kingdom Tel 44 0 1604678300 Fax 44 0 1604678330 Belkin Components 501 West Walnut Street Compton CA 90220 USA Tel 310 898 1100 Fax 310 898 1111 2001 Belkin Components All rights reserved All trade names are registered trademarks of respective manufacturers listed Belkin Components Ltd 7 Bowen Crescent West Gosford NSW 2250 Australia Tel 61 2 43254666 Fax 61 2 43254277 P73793 ...

Отзывы: