Belkin F1UP002 Скачать руководство пользователя страница 53

53

53

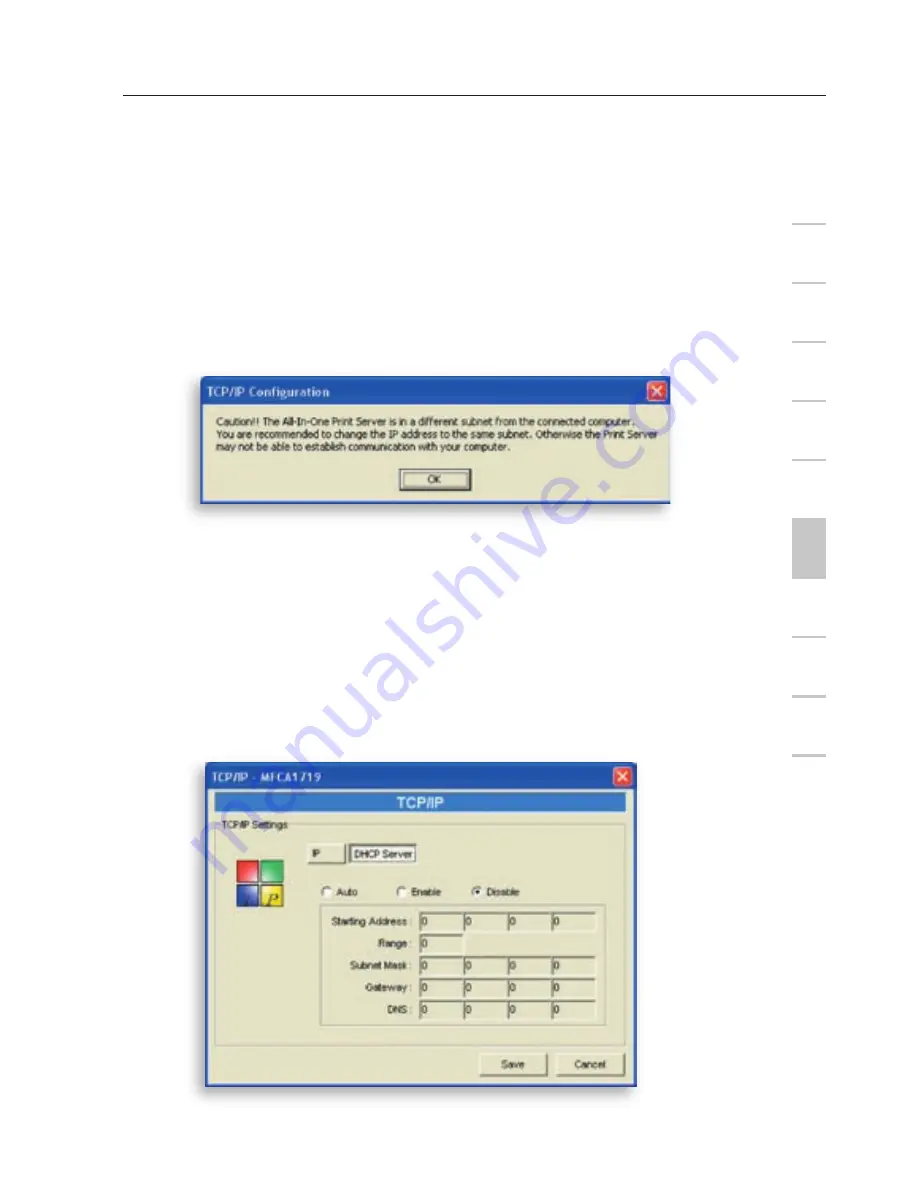
The Print Server will check if the manually configured IP address is in 
the same subnet as the network or connected computer. If the TCP/
IP-address settings configured manually are in a different IP subnet 
than that of the connected networking devices, the user will be 
prompted by the alert message shown below. Click “OK” to go back 
and configure the correct IP-address settings for the Print Server.

Print Server Manager

1

2

3

4

5

6

7

8

9

10

11

se

ct

io

n

Internal DHCP Server

Click the “DHCP Server” button to enter into the internal DHCP 
server’s setting page. You can enable/disable the DHCP server and 
assign a range of IP addresses here. By default, the DHCP server is 
disabled (recommended). When it comes to assigning an IP address 
to the Print Server, the internal DHCP server takes lower precedence 
to either getting an IP address from an external DHCP server or using 
the configured static IP address. Both options are described in the 
“IP Settings” section above.

Содержание F1UP002

Страница 1: ...Wireless G All In One Print Server F1UP002 User Manual...

Страница 2: ...to your Print Server X Step 2 Installing Software X Step 3 Configuring Wireless Settings X Step 4 Installing MFP Drivers Utilities X Adding New Client Computers to Print Server Setup X 5 Operating Pri...

Страница 3: ...reless X Setup TCP IP X Utilities X Home Help Logout X 9 LPR Printing X 10 RAW Printing X 11 IPP Printing Introduction X System Setup X 12 Print Server Installation in Windows 98SE Me NT X Software In...

Страница 4: ...rs scanning utilities This product can also be used as a traditional print server It supports Transmission Control Protocol Internet Protocol TCP IP Line Printer Remote LPR technology Read After Write...

Страница 5: ...for sharing print scan card reader and fax functions If the Print Server is connected to a standard printer but not to an MFP users still can share the printing function through the operation mode In...

Страница 6: ...tions refer to the following chapters LPR Printing RAW Printing IPP Printing All In One Print Server Installation in Windows 98SE Me NT UNIX System Network All In One Print Server Installation in Mac...

Страница 7: ...AP or station Off The wireless mode of the Print Server is disabled b Print Server and Printer Status LED Solid Blue Firmware is being upgraded to the Print Server If the Print Server upgrade fails th...

Страница 8: ...nt Server is rebooting the Wireless Connection and Print Server and Printer Status LEDs will briefly turn ON and then OFF Reset to factory default Press the Reset button with a pencil tip for longer t...

Страница 9: ...an area that allows for proper ventilation 2 Place on a flat surface Mounting on a Printer 1 Attach the self adhesive double sided mounting kit to the back of the Print Server Make sure not to stick t...

Страница 10: ...er 1 Unpack the Print Server package and verify that all the items listed are provided 2 Connect the Print Server to your network by attaching one end of the network cable to the Print Server s networ...

Страница 11: ...o the computer Some printers also require users to connect the printer to the computer during installation Step 2 Installing Software Before you start verify your computer s operating system This prog...

Страница 12: ...stallShield Wizard appears Click Next 1 2 3 4 5 6 7 8 9 10 11 sec tion 4 Click Next to install the Print Server utilities in the default folder recommended or click Change to specify the destination f...

Страница 13: ...If you do not want to configure the Print Server at this point select No please skip this setup Then click Next to complete the installation when adding a new client computer to share a preexisting pr...

Страница 14: ...nt Server configuration upon choosing Yes I would like to configure my All In One Print Server 7 The Print Server List will search for Print Servers on the network Select the Wireless G All In One Pri...

Страница 15: ...selected to log in The default user name is admin the default password is 1234 9 Set the alias name and description of the Print Server here Click Next Note You can define the printer s location or ot...

Страница 16: ...l try to get an IP address from the connected Belkin Router running the Dynamic Host Configuration Protocol DHCP server and the following screen will appear The newly assigned TCP IP settings will be...

Страница 17: ...DHCP server on the network Select Yes to configure the TCP IP settings in the Manual IP section The default TCP IP address information in the Manual IP mode will be what is shown below IP Address 192...

Страница 18: ...a different IP subnet than that of the connected computer the user will be prompted by the alert message shown below Click OK to go back and configure the correct IP address settings for the Print Ser...

Страница 19: ...to stay plugged in for the required wireless configurations in this section For more detailed information about wireless settings refer to the Wireless Configuration section 2 The Wireless Network Se...

Страница 20: ...d enter the security settings of your wireless network You can select one of several security settings None WEP or WPA with cipher mode TKIP or AES 4 The configurations are now finished Click Finish t...

Страница 21: ...opened for computers in your own local IP network and will not jeopardize safety of your system 6 Indicate whether or not you want to run the Belkin All In One Print Manager utility automatically when...

Страница 22: ...utilities and a text file in the Print Server s Program folder All In One Print Manager Allows you to manage the connection between the printer and your computer for sharing the printer s various func...

Страница 23: ...our computer s printer installation status Printer drivers utilities have not been installed on your computer refer to section 4 1 Printer drivers utilities have been already installed on your compute...

Страница 24: ...h the Print Server just like you have directly connected the printer to your computer through the USB cable you can follow the steps below 1 Select the printer that you want to install in the Print Se...

Страница 25: ...When the system stops prompting the drivers are all installed If the system cannot find the printer drivers insert the printer s installation CD to find the drivers 3 After you have completed the pri...

Страница 26: ...ick the Connect button 1 2 3 4 5 6 7 8 9 10 11 sec tion 2 Windows will detect the new hardware and prompt to install the Print Server drivers and then the printer drivers When the system stops prompti...

Страница 27: ...uration of your computer duplicate system tray icons or desktop shortcuts for scanners or camera card readers may also appear Use the copies of the icons and shortcuts as your defaults for use in conj...

Страница 28: ...7 8 9 10 11 sec tion Enabling Auto Timeout Settings After the printer driver installation is complete check the Auto release when idle time is over option in the Belkin All In One Print Manager screen...

Страница 29: ...omputers to Print Server Setup When adding a new client computer to share the print scan copy fax and card reader functionality in a preexisting Print Server network only follow Step 2 from items 1 to...

Страница 30: ...elease your connection to the printer after a period of idle time that you have assigned This allows the printer to not be occupied too long and other users to share the printer frequently Refer to th...

Страница 31: ...third party scanning utilities such as Photoshop PhotoImpact Paint Shop Pro etc An example HP 1600 Series Utilities Operating Print Server Using the MFPs 1 2 3 4 5 6 7 8 9 10 11 sec tion Tip If you ha...

Страница 32: ...f your printer has built in media card readers you can read the files from the plugged card reader through the Print Server Windows XP Scanning Utility Operating Print Server Using the MFPs 1 2 3 4 5...

Страница 33: ...nters and Faxes in Windows When you have connected to the printer by clicking Connect in the Belkin All In One Print Manager you can fax a file through the Print Server to the fax device Procedures to...

Страница 34: ...34 3 The Send Fax screen appears Configure the file and enter the fax number and then click Send Fax to fax the file Operating Print Server Using the MFPs 1 2 3 4 5 6 7 8 9 10 11 sec tion...

Страница 35: ...don t want to use the printer click Disconnect so that other users can use the device Or you can enable the Idle Timeout setting so that the Print Server will release your connection after a period o...

Страница 36: ...om here each user can know his her idle timeout setting To avoid occupying the printer overtime each user can set the Idle Timeout from Option General Setting It is used to disconnect the connection a...

Страница 37: ...er Add to My Favorite list Adds the Print Servers that you frequently use to the My Favorite list Auto Release when idle time is over xx minutes 5 255 To avoid occupying the printer for too long you c...

Страница 38: ...orite list The Print Server in the list will be added to the quick link list when you right click the Print Server icon in the system tray Refer to the Quick Setup section to know more about the quick...

Страница 39: ...is over xx minutes 5 255 To avoid occupying the printer for too long you can set up an idle timeout setting It is used to disconnect the current connection after the printer is idle for a specified pe...

Страница 40: ...the steps below 1 Click Add from the Auto Connect List All In One Print Manager 1 2 3 4 5 6 7 8 9 10 11 sec tion 2 The Print Servers within the network will be displayed in the following screen Selec...

Страница 41: ...ot be printed because the printer is already disconnected It will cause unformatted messages to be printed out Keep connecting for 30 second s after printing has been finished 5 60 is enabled by defau...

Страница 42: ...e system tray so you can see the Print Servers that you have designated to the My Favorite list You can directly connect or disconnect the printer and check the printer information from there easily A...

Страница 43: ...inter is free to use the Connect button will be available to click for occupying the printer Otherwise it will be grayed out Disconnect Disconnects the selected printer The Disconnect button will be a...

Страница 44: ...refresh interval for device status update By default it is disabled Your Contract Information Enter your contact information here When you connect to the printer your contact information will be displ...

Страница 45: ...status Setup Shows configuration settings for the Print Server General Configuration Configure general settings about the Print Server such as server name password etc TCP IP Configuration IP address...

Страница 46: ...y for several seconds because the utility is using the system s available network protocols to search for all Print Servers on the network All available Print Servers will be listed under Server Group...

Страница 47: ...selected Print Server on the right side of the window The Print Server information displayed includes the MAC ID model type firmware version port status IP address subnet mask default gateway and sup...

Страница 48: ...Server s setup items on the right side of the window Double click one of the icons to set up the selected Print Server A screen pops up to verify the Print Server s user name and password The default...

Страница 49: ...figure the server name user name and Password here Server Name the name of the Print Server You can use this name to identify the Print Server when you are searching for it with the Server Manger util...

Страница 50: ...click the TCP IP icon and the TCP IP configuration window opens You can configure the Print Server to automatically get an IP address from a DHCP server enabled by default or manually specify static I...

Страница 51: ...ge By default Auto IP is selected to enable the Print Server to automatically get an IP address from a DHCP server Print Server Manager 1 2 3 4 5 6 7 8 9 10 11 sec tion The window will show the IP add...

Страница 52: ...Manager 1 2 3 4 5 6 7 8 9 10 11 sec tion You can select Static IP to manually assign the IP address subnet mask and gateway for the Print Server The default TCP IP address information in the Static I...

Страница 53: ...for the Print Server Print Server Manager 1 2 3 4 5 6 7 8 9 10 11 sec tion Internal DHCP Server Click the DHCP Server button to enter into the internal DHCP server s setting page You can enable disab...

Страница 54: ...lled Auto for the internal DHCP server Auto means that the Print Server will first search for and detect DHCP servers within the network automatically If a DHCP server exists on the network the intern...

Страница 55: ...rmware You can use this Upgrade Firmware tool to update the newest firmware of the Print Server Click the button and select the correct firmware in your computer After selecting the firmware file clic...

Страница 56: ...mode If the Print Server is not connected to an active network by Ethernet cable when starting up the Print Server will run in wireless LAN mode The Print Server s default is in Auto mode Domain Count...

Страница 57: ...icon and the Wireless configuration window pops up If you use an access point to build up your wireless network you have to select Infrastructure Mode If you do not have an access point and want to us...

Страница 58: ...ess point automatically or you can manually assign the SSID of the access point you want to use The table will list the available access points near the Print Server Select an access point from the li...

Страница 59: ...annel that is the same as the wireless station with which you want to connect or you can manually assign a channel Ad Hoc Mode If you select to allow the Print Server to scan for an active wireless st...

Страница 60: ...go through the following procedure This Print Server supports Wired Equivalent Privacy WEP and Wi Fi Protected Access Pre Shared Key WPA PSK security modes If you want to use WEP encryption to protec...

Страница 61: ...ect WPA shared key or WPA None specified for Ad Hoc mode The wireless security setting should be the same as the other wireless devices in the same network WPA currently supports cipher modes Temporal...

Страница 62: ...62...

Страница 63: ...63 63...

Страница 64: ...om 44 0 1933 35 2000 44 0 1933 31 2000 fax Belkin B V Boeing Avenue 333 1119 PH Schiphol Rijk Netherlands 31 0 20 654 7300 31 0 20 654 7349 fax Belkin Sweden Knarrarn sgatan 7 164 40 Kista Sweden 46 0...

Отзывы: