background image

ENGLISH


 Belinea 10 19 35 - Operating Instructions - 

4

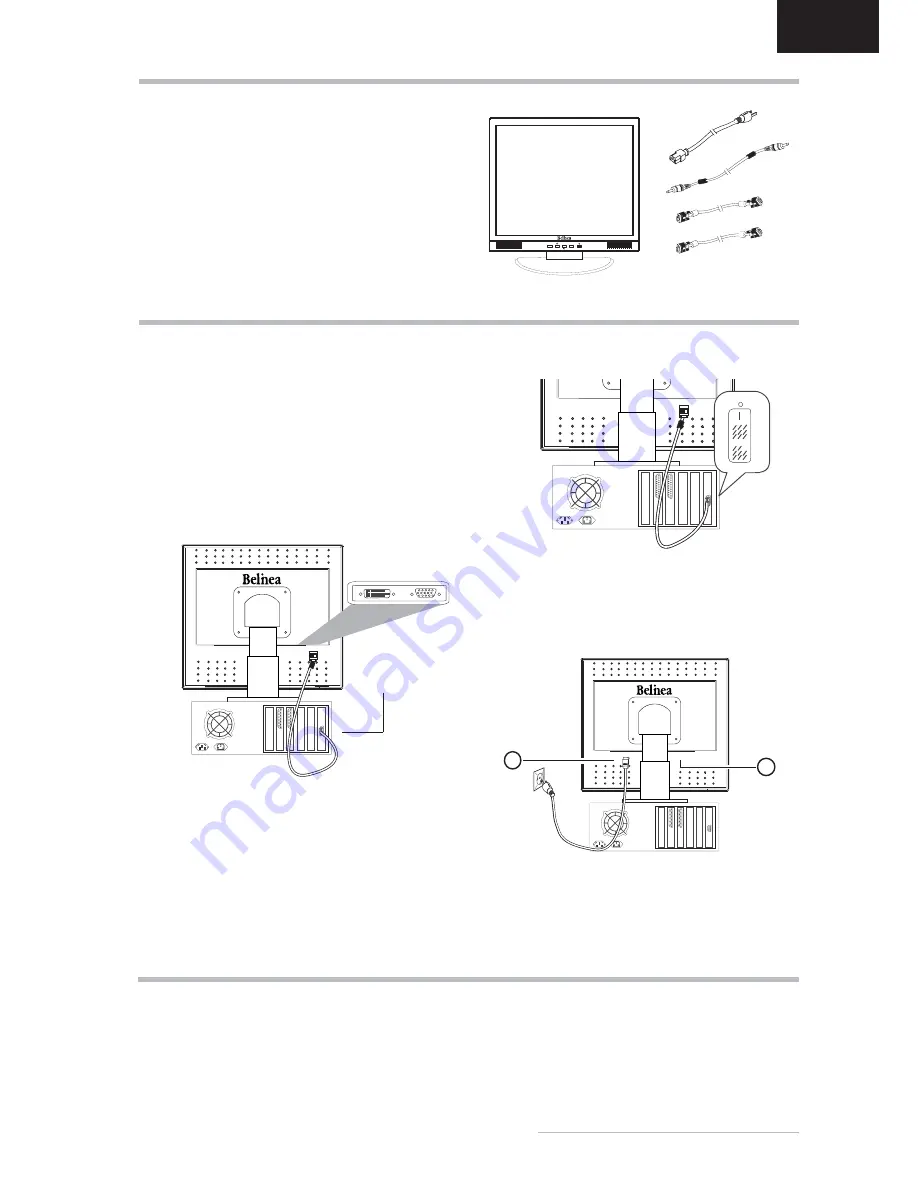
Carefully lift the monitor out of the packaging and make 
sure that all components are included (see fi g. 1).

Save the original box and packing material in case you 
have to ship or transport the monitor.

To set up the device, you must fi t the monitor base 
together. You can adjust the height of the base. When the 
base of the monitor is extended, you can tilt the monitor 
90

°

 (Pivot function). 

UNPACKING 

Figure 1. 

LCD Monitor

Power cord

Audio cable

VGA cable

DVI-D cable

(optional)

STARTUP 

1. 

First start your PC and then turn on your Belinea 
monitor using the power switch (

 in fi g. 4). The 

status indicator (

 in fi g. 4) should light up green.

2.

  Adjust the image to meet your requirements (see the 

following sections “Basic Setup” and “Image settings 
using the OSD menu”). 

3.

  If there is no image displayed on the monitor, consult 

the section “Troubleshooting”.

AC-IN

D-SUB

DVI

AUDIO

2

1

AC-IN

D-SUB

DVI

AUDIO

±

 To connect the monitor to your PC ........................

1.

  Make sure that the PC and monitor are unplugged. 

2.

  Connect the 15-pin signal cable to the monitor and 

the PC (see fi g. 2a).

3.

  If you have a graphic card with a digital DVI-D con-

nector (24-pin socket), then connect one end of the 
DVI-D cable (optional) to the DVI-D connector of 
your monitor (see fi g. 2b), the other end to the com-
puter. 

CONNECTING 

±

 Connecting the audio cable  ...................................

If your computer is equipped with an audio output port, 
then connect one end of the sound cable to the audio 
input connector of the monitor (

 in fi g. 3) and the other 

end to the Line-Out connector of the computer. 

±

 To connect the monitor to the power source ........

Connect the separate power cable (

 in fi g. 3) to the 

monitor and a grounded outlet.

Figure 3.

 Connecting the monitor to the power source

Figure 2a.

 Connecting the monitor to the PC

Signal cable

Figure 2b.

 Connection via the DVI-D interface

AC-IN

D-SUB

DVI

AUDIO

MENU

AUTO

+

-

Содержание 101935

Страница 1: ... USER MANUAL LCD Monitor Belinea 10 19 35 ...

Страница 2: ...e série et d article à portée de main English Deutsch Français Country Phone number Additional swap out service Land Telefonnummer Zusätzlicher Austausch Service Pays Numéro de téléphone Service supplémentaire d échange sur site Belgie Belgique 0900 10630 0 45 min 3 year on site warranty swap out Deutschland 02365 952 1010 3 Jahre Garantie Austausch Service Česká republika 420383369146 Záruka 3 ro...

Страница 3: ... MENU 5 OSD MENU FUNCTIONS 6 TROUBLESHOOTING 7 TECHNICAL SPECIFICATIONS 7 DEFINITION OF THE MAXDATA WARRANTY 8 Guide to symbols The symbols below are used in this manual to indicate where there is risk of injury or damaging devices or to indicate especially useful information DANGER Indicates risk of injury When not fol lowing instructions severe injury or death may result ATTENTION Indicates poss...

Страница 4: ...on power connection Only use the power cord designated for use in your country The wall outlet should be within easy reach Pull ing the power plug is the only way to disconnect the monitor from the power source This monitor is ENERGY STAR compatible MAXDATA is an ENERGY STAR partner and guarantees that this device complies with the ENERGY STAR guidelines for optimizing power consumption Safety ins...

Страница 5: ...layed on the monitor consult the section Troubleshooting AC IN D SUB DVI AUDIO 2 1 AC IN D SUB DVI AUDIO To connect the monitor to your PC 1 Make sure that the PC and monitor are unplugged 2 Connect the 15 pin signal cable to the monitor and the PC see fig 2a 3 If you have a graphic card with a digital DVI D con nector 24 pin socket then connect one end of the DVI D cable optional to the DVI D conn...

Страница 6: ...OSD menu is not displayed Select the input signal INPUT SELECT Use the key in figure 4 to select the input signal The monitor offers the following connection options analogue graphics card via the 15 pin Mini D SUB port see figure 2a digital graphics card via the DVI D port see figure 2b IMAGE SETTINGS USING THE OSD MENU 2 There are a total of 6 OSD submenus divided by categories Select the desired s...

Страница 7: ...es factory display set tings OSD Time Out Determines how long in sec onds the OSD menu waits before closing auto matically after no action has been performed OSD Left Right Controls the OSD menu s hori zontal position OSD Down Up Controls the OSD menu s verti cal position Brightness Controls the picture brightness Contrast Controls the picture contrast Auto Contrast Use the OSD keys or for the con...

Страница 8: ...ter OSD Menu Functions sections Brightness and Con trast Check the sharpness setting see Fine function in the OSD Menu Functions section Color problems If the colors are off e g white is not really displayed as white etc you should adjust the color temperature see Color Temperature function in section OSD Menu Functions LCD panel 19 inch diagonal size 48 3 cm visible low radiation according to TCO...

Страница 9: ...at losses missing EMC electro magnetic compatibility cabling or similar reasons Accidents storms lightening fire water other liquids other natural catastrophes theft riots plundering the effects of war or other instances of acts of god The use of third party components Non authorised system changes BIOS versions firmware updates programmes to remove defects of all kinds e g service packs bug fixes ho...

Страница 10: ...er has the right to provide evidence for the existence of lower damages MAXDATA restriction to liability MAXDATA expressly excludes customer claims that go beyond the warranty conditions if there is no obligation of liability imposed on MAXDATA by the laws of the country where the device was bought This also applies in particular with regard to claims for damages as a result of default damages for...

Страница 11: ...dered from TCO Development SE 114 94 Stockholm Sweden Fax 46 8 782 92 07 Email Internet development tco se Current information regarding TCO 99 approved and labelled products may also be obtained via the Internet using the address http www tco info com Environmental requirements Flame retardants Flame retardants are present in printed circuit boards cables wires casings and housings Their purpose ...

Страница 12: ...ISSES Italy MAXDATA Italia S r l Strada 1 Palazzo F1 I 20090 Milanofiori Assago MI Poland MAXDATA Sp z o o Ursynów Business Park Ul Puławska 303 PL 02 785 Warszawa Spain Portugal MAXDATA Iberia C Collado mediano s n Edificio Prisma Portal 1 Pta 1a B E 28230 Las ROZAS Madrid Switzerland MAXDATA Computer AG Haldenstrasse 5 CH 6340 Baar United Kingdom MAXDATA UK Limited The MAXDATA Centre Downmill Road...

Отзывы: