9
Kula AV
Installation Manual
Connecting the Control Surface to the MAV-AUD-FADER Module
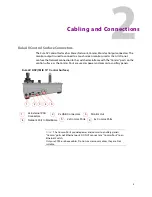
Below is a diagram showing how to connect a Kula AV control surface to the MAV-AUD-
FADER.
Note:
Notice that there is an Input and Output
socket. Use the input socket only.
The loop-through cannot be used!
Connect the Ethernet cable to the
Comms port on the control surface
Connect the Ethernet cable
to the “Input” port
MAV-AUD-FADER (under side)
MAV-AUD-FADER
Kula AV Control Surface
Supplied Ethernet Cable
Sticker on underside
of the MAV-AUD-FADER
Содержание grass valley KULA AV
Страница 1: ...Installation Manual 13 06512 020 2020 07 13 KULA AV PRODUCTION SWITCHER ...
Страница 20: ...4 Introduction Overview ...
Страница 34: ...18 Cabling and Connections Mainframe Connections ...
Страница 44: ...28 Environment and Location Ancillary Panels ...
Страница 48: ...32 Dimensions Control Surface Dimensions Desk Cutout Dimensions for K5P 1M E 19 Control Surface ...
Страница 54: ...38 Dimensions Ancillary Panels ...


