3
INSTALLATION INSTRUCTION
Manufacturer
Bel Fuse Inc.
206 Van Vorst St.
Jersey City
NJ 07302, USA
Asia-Pacific
+86 755 2988 5888
Europe, Middle East
+353 61 225 977
North America
+1
408
785 5200
© 2021 Bel Power Solutions & Protection
BCM.00405_AD
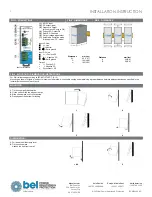
FIG.1 - CONNECTIONS
FIG.2 - DIMENSIONS
FIG.3 - DISTANCES
Just for reference
(1)
AC/DC input
(2)
DC output (load)
(3)
Diagnostic Output
(dry contact, NC output OK)
(4)
Green LED: Output OK
(5)
Red LED: Overload
(6)
Output voltage adjustment
(7)
Selectable limitation mode
(Hiccup mode, C.C. mode)
Input AC Line:
▪
L = Line
▪
N = Neutral
▪
= Earth ground
Input DC Line:
▪
L = + Positive DC
▪
N = - Negative DC
▪
= Earth ground
Output:
▪
+ = Positive DC
▪
- = Negative DC
▪
Dry contact = NC
Dimension
W
D
H
mm (inc)
35 (1.37)
104 (4.09)
103 (4.05)
Distance
A
B
mm (inc)
20 (0.8)
50 (2.0)
FIG.4 - MOUNTING / DISMOUNTING INSTRUCTIONS
For DIN rail fastening according to IEC 60715 TH35-7.5(-15)
Mounting as shown in figure, with input terminals on lower side, with suitable cooling and maintaining a proper distance between adjacent devices as specified in the
Installation Instruction of each family.
MOUNTING:
1.
Tilt the unit slightly backwards.
2.
Fit the unit over the top edge of the rail.
3.
Slide it downward until it hits the stop.
4.
Press against the bottom for locking.
1
2
3
4
DISMOUNTING:
1.
Pull down the slide clamp lever
2.
Tilt the unit upward
3.
Unhook the unit from the rail
1 & 2
3


