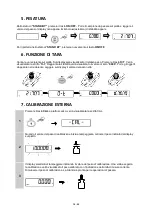
BEL i-Thermo L Series Скачать руководство пользователя страница 7


 7 / 25 


5.


WEIGHING 

 
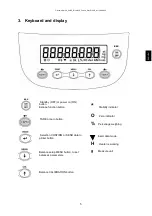
In “STAND BY”  mode press the ON/OFF button.  Place goods to be weighed on the pan, wait the stability 
symbol 

ж

 (asterisk) to appear and then read the weight value 


Press again ON/OFF button to return to “STAND BY” mode


6.


TARING 


Place the container on the pan and press O/T button. “O-t”is displayed. As soon as the stability is reached 
the value of zero “0.000” will be displayed (weight of container is internally stored). Place the goods to be 
weighed in the container, the net weight will now be displayed 


7.


EXTERNAL CALIBRATION  


Press the CAL button when no object is on the weighing pan; “CAL” will be dispalyed. 


Wait until the value of required calibration weigh appears flashing, then put the required calibration 
weight carefully in the center of the weighing pan. 


The display will stop flashing. After calibration is performed, the value of calibrated weight is 
displayed. Remove the calibration weight. Balance automatically returns to weighing mode and it is 
ready for weighing operations. 


NOTE: if there is any interference during calibrationo process, an error message will be 
visualized.


Содержание i-Thermo L Series

Страница 1: ...éclaration de conformité Nous déclarons avec cela responsabilité que le produit auquel se rapporte la présente déclaration est conforme aux normes citées ci après I Dichiarazione di conformità Dichiariamo con ciò che il prodotto al quale la presente dichiarazione si riferisce è conforme alle norme di seguito citate E Declarção de conformidade Manifestamos en la presente que el product al que se re...

Страница 2: ...sure anymore the safety of the product 1 INSTALLATION INSTRUCTIONS Remove the balance the calibration weight if included and the accessories from the package and check if any visible damage of the instrument Do not install the balance in places with air flows heavy thermal changes and vibrations Place the support pan and weighing pan on the balance Level the balances using the levelling feet and l...

Страница 3: ...y existing in your country This instrument must be used only by qualified personell who knows the features and characheristics of the sample under test Before starting to work with the instrument for the first time please check that voltage is the same of your electric mains To get the instrument free from tension remove the power supply cable Place straight the power supply cable so that to avoid...

Страница 4: ... pan for the sample 1 Connect the heater to the balance via cable 15 pin M F insert the cable into the two connectors on the rear of the instrument as shown in the figure 2 Insert the VDE cable in the power connector on the back of the instrument N B Verify that the power supply indicated on the instrument nameplate matches the one in use in the country where you are installing 3 Then connect the ...

Страница 5: ...icator O Zero indicator Percenage weighing Insert data mode H Heater is working g Measure unit Standby OFF or power on ON button Escape function button TARE or zero button Selection CONFIRM or SEND data to printer button Balance setup MENU button to set balance s parameters Balance CALIBRATION button ESC ESC ...

Страница 6: ...nnect heater to balance 3 CONNECTOR 3 Connect balance to heater 4 CONNECTOR 4 9 pin RS232 Interface for PC and printer 5 ADJUSTABLE FEET 6 N 2 closing screws of the balance 7 N 2 closing screws of the balance first remove the screws remove adjustabel rear feet 8 and fixed rear feet 9 8 Adjustable rear feet 9 Fixed rear feet 7 6 9 8 1 4 2 5 3 ...

Страница 7: ...weighed in the container the net weight will now be displayed 7 EXTERNAL CALIBRATION 1 Press the CAL button when no object is on the weighing pan CAL will be dispalyed 2 Wait until the value of required calibration weigh appears flashing then put the required calibration weight carefully in the center of the weighing pan 3 The display will stop flashing After calibration is performed the value of ...

Страница 8: ... set menu scroll backward the menu scroll forward the menu confirm the choice selected you exit from balance parameters set menu Parameters Description BAUD RT set velocity of serial communication AUTO 0 auto zero setting FILTER filters level STABIL stability level BLT backlight mode CONTR display contrast For a complete description of functions it is warmly suggested to read the user manual of th...

Страница 9: ... Enter Test begins On Off Escape Prg 2 Prg 3 Prg 4 Prg 5 Measure Prg time Set time Set temperature Load sample Enter inizioprova On Off Escape Prg Auto Set min moistu re loss Set temperature Load sample Enter Test begins On Off Escape Therm Prg Set Prg 1 Prg 2 Prg Time Set time Set temperature Save no Enter confirm Menù Prg 3 Save yes Prg 4 Prg 5 Prg Auto Set min moistur e loss Set temperatur Save...

Страница 10: ...on garantisce più la sicurezza del prodotto 10 ISTRUZIONI PER L INSTALLAZIONE Togliere la bilancia ed il relativo peso di calibrazione ove previsto dall imballo e verificare eventuali danni visibili dello strumento Non installare la bilancia in ambienti in cui vi siano correnti d aria forti sbalzi termici e vibrazioni Porre sulla bilancia il sottopiatto ed il piatto Mettere in bolla la bilancia re...

Страница 11: ...sca le proprietà caratteristiche del campione utilizzato Prima di mettere in funzione per la prima volta l apparecchio controllare se il voltaggio di alimentazione corrisponde alla tensione di rete Per disconnettere l apparecchio dalla tensione di rete staccare il cavo di alimentazione Stendere il cavo di alimentazione in modo tale da evitare il contatto con superfici molto calde dell apparecchio ...

Страница 12: ...ttere il riscaldatore alla bilancia tramite cavo 15 poli M F Inserire il cavo nei due connettori posti sul retro dello strumento come indicato in figura 2 Inserire il cavo VDE in dotazione nel connettore di alimentazione posto sul retro dello strumento N B Verificare che l alimentazione indicata sull etichetta di targa dello strumento corrisponda a quella in uso nel paese in cui si sta effettuando...

Страница 13: ...serimento dati H Riscaldatore in funzione g Unità di misura Tasto di standby OFF o di esercizio ON Tasto funzione uscita menù ESC Tasto di TARA e azzeramento Tasto di CONFERMA selezione o di INVIO dati alla stampante Tasto di accesso al MENU di settaggio dei parametri della bilancia Tasto di CALIBRAZIONE bilancia ESC ESC ...

Страница 14: ...mento riscaldatore bilancia 3 CONNETTORE 3 Connettore collegamento bilancia riscaldatore 4 CONNETTORE 4 9 pin RS232 Interfaccia Uscita per PC e stampante 5 PIEDINI REGOLABILI 6 N 2 viti chiusura bilancia 7 N 2 viti chiusura bilancia per accedere rimuovere il piedino fisso 9 e quello regolabile 8 8 Piedino posteriore regolabile 9 Piedino posteriore fisso 6 4 5 1 4 2 5 3 7 6 9 8 ...

Страница 15: ...la stabilità verrà visualizzato il valore di zero 0 000 Porre gli oggetti da pesare nel recipiente Leggere sul display il valore del peso netto 7 CALIBRAZIONE ESTERNA 1 Premere il tasto CAL a piatto scarico verrà visualizzata la scritta CAL 2 Quando il valore del peso di calibrazione inizia a lampeggiare caricare il peso indicato dal display sul piatto 3 Il display smetterà di lampeggiare indicand...

Страница 16: ...TO si entra nel menu settaggio parametri bilancia navigazione indietro nel menu navigazione avanti nel menu conferma della selezione scelta uscita dal menu settaggio parametri bilancia Parametri Descrizione BAUD RT impostazione velocità comunicazione seriale AUTO 0 settaggi auto zero FILTER livello di filtraggio STABIL livello di stabilità BLT modalità retroilluminazione CONTR contrasto display Pe...

Страница 17: ...ita Prg 2 Prg 3 Prg 4 Prg 5 Measure Prg time Impostare Tempo Impostare Temperatura Caricare campione Enter inizioprova On Off Uscita Prg Auto Impostare Perdità min umidità Impostare Temperatura Caricare campione Enter inizio prova On Off Uscita Therm Prg Set Prg 1 Prg 2 Prg Time Impostare Tempo Impostare Temperatura Save no Enter conferma Menù Prg 3 Save yes Prg 4 Prg 5 Prg Auto Impostare Perdita ...

Страница 18: ...a balança e seu peso de calibração se houver da embalagem e verifique se há qualquer dano visível no instrumento Nos modelos com calibração interna com a mão retire o parafuso do lado inferior esquerdo da balança ver pag 3 1 ATENÇÃO Não instale a balança em ambientes onde há correntes de ar choque térmico alta e vibração Coloque em nível a bolha na base ajustando o equilíbrio da balança Warm up da...

Страница 19: ... apenas por pessoal qualificado que estejam familiarizados com as propriedades características da amostra utilizada Antes da colocação em funcionamento pela primeira vez verificar se a tensão de alimentação corresponde à tensão de rede Para desligar o aparelho da rede desconecte seu cabo de alimentação O cabo de alimentação deve ser instalado de forma a evitar o contacto com as superfícies quentes...

Страница 20: ...dor para o equilíbrio através de um cabo de 15 pinos M F insira o cabo nas duas conectores na parte traseira do instrumento conforme mostrado na figura 2 Insira o cabo VDE no conector de alimentação na parte de trás do instrumento N B Verifique se a fonte de alimentação indicada na placa de identificação instrumento corresponde a um em uso no país onde está a instalar 3 Em seguida conecte o cabo V...

Страница 21: ...ro Indicação Porcentagem Método de entrada de dados H Aquecedor em operação g Unidades de pesagem Tecla de standby OFF ou operação ON Tecla de saida do menu ESC Tecla TARA e Zeramento Tecla de confirmação selecione ou envio dados à impressora Tecla MENU para acessar a configuração da balança Tecla CAL de calibração da balança ESC ...

Страница 22: ...ector de ligação balança aquecedor 3 CONECTOR 3 Conector de ligação balança aquecedor 4 CONECTOR 4 9 pinos Interface RS232 para PC e impressora 5 PéS AJUSTáVEIS 6 N 2 parafusos fechamento balança 7 N 2 parafusos fechamento balança Para acessar remover o pé fixo 9 e o ajustável 8 8 Pé traseiro ajustável 9 Pé traseiro fixo 1 4 2 5 3 7 6 9 8 ...

Страница 23: ... verá a palavra O t Estáveis você verá o valor de zero 0000 Coloque os objetos a serem pesados no recipiente Leia o valor de exibição do peso líquido 8 CALIBRAZIONE ESTERNA 1 Pressione a tecla CAL com o prato descarregado deve aparecer no display a escrita CAL 2 Quando o valor do peso de calibração começa a piscar carregar o prato com o peso indicado no display 3 O display estabiliza indicando o v...

Страница 24: ... DO MENU NAVEGAR PARA FRENTE ATRAVES DO MENU CONFIRMA SELEÇÃO ACEITA SAIR DO MENU DE CONFIGURAÇÃO DA BALANÇA Parametro Descrição UNITS Seleção de unidade de misura PC PRINT Seleção de modo de impressão BAUD RT Definição de velocidade AUTO 0 Configuração auto zero FILTER Nivel de filtros STABIL Nível de estabilidade BLT Modo de retroiluminação TIME OFF Desligamento automatico CONTR Contraste do dis...

Страница 25: ...pare de tocar Para uma descrição detalhada do balanço de programas consulte o manual do usuário da balança Smlp 10 Smlp 25 Smlp 50 Auto tara Load Pcs saida Smpl 100 Count Manual 99 saida Add t 0 Load D solido Pesagem no ar Pesagem no liquido Densidade solido D solid dl 1 0000 saida Dens Menu D liquid ds 3 0000 Pesata in aria Pesata nel liquido Densità liquido D liquido saida H o L Soglia L Soglia ...

Отзывы: