background image

7

8

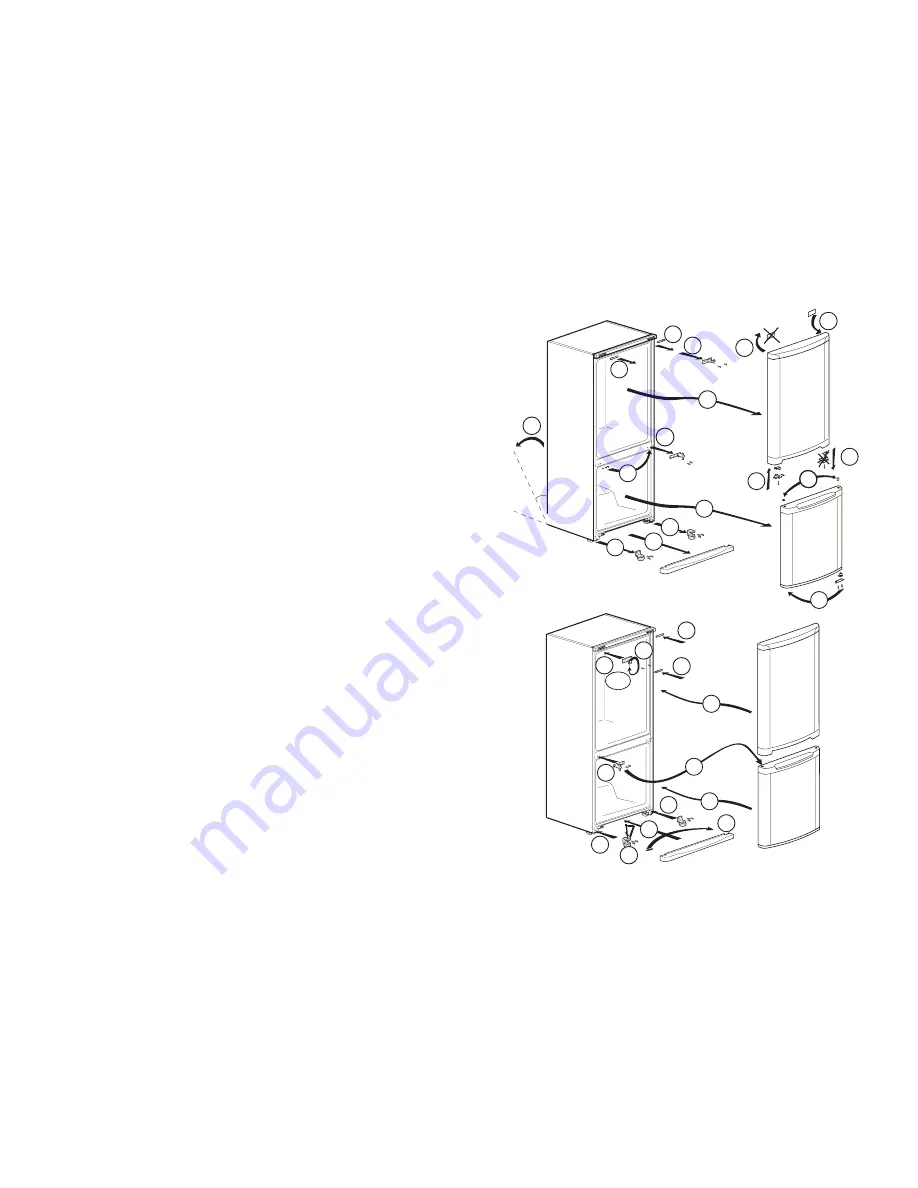
REVERSING THE DOORS 

(You may need somebody to help you.)

1-

Switch off the appliance at the socket outlet and pull out the mains plug.

2-

Remove all loose items and fittings and food, if any, from inside the appliance and   
door racks

.

3-

Unscrew the bolts and remove the middle hinge while holding doors. 

(1)

4-

Remove the fridge door from the top hinge. 

(2)

5-

Remove the freezer door. 

(3)

6-

Remove the plastic covers on the front top trim. 

(4)

7-

Unscrew the bolts of the top hinge and remove top hinge. 

(5)

8-

Reposition plugs on the opposite side. 

(6)

9-

Remove the kick plate. 

(7)

10-

Carefully tilt the appliance on its back. 

(8)

(You may need somebody to help you.)

11-

Unscrew and remove the left hand side front feet. 

(9)

12-

Unscrew and remove the bottom hinge. 

(10)

13-

Remove the plastic cover and fit the tap which is in the plastic bag to the
other side. 

(11)

14-

Unscrew and remove the middle hinge bushing from fridge door. 

(12)

15-

Screw and fix the new middle hinge bushing which is supplied in plastic bag to the
other side. 

(13)

16-

Reposition the hinge bushing and the tap on the freezer door. 

(14)

17-

Unscrew and reposition the bottom hinge bushing. 

(15)

18-

Unscrew bolt of the pin on the bottom hinge. Fit the pin to the other hole on
the hinge and tighten the bolt on the new position. 

(16)

19-

Fit the bottom hinge and other feet, and tighten the screws. 

(17)

20-

Remove the plastic tap to the opposite side on the front bottom trim. 

(18)

21-

Fit the front bottom trim to the bottom hinge and other feet. 

(19)

22-

Rotate the top hinge 180°. Unscrew the hinge pin and re-tighten it to the
opposite side. 

(20)

23-

Fit the top hinge and tighten the bolts. 

(21)

24-

Fit the plastic cover on the front top trim. 

(22)

25-

Locate the freezer door to the bottom hinge and attach to the cabinet. 

(23)

26-

Locate the middle hinge on the freezer door 

(24)

and put the freezer door

between the top and middle hinge carefully. 

(25)

27-

Fit the middle hinge. Adjust the doors and tighten the bolts. 

(26)

28-

Carefully stand your appliance (you may need somebody to help you) adjust
the front feet.

29-

Put back all, loose items and fittings.

30-

Wait for at least 4 hours to allow the system to settle before switching on.

31-

Once the correct storage temperatures have been reached in the appliance, put back
all the food.

12

13

11

11

14

15

25

24

1

6

3

17

18

7

9

10

23

22

22

2

4

5

4

26

45 °

8

21

19

16

180°

20

19

Содержание B-760CDA650

Страница 1: ......

Страница 2: ...on of our environment is an ongoing commitment This appliance which is among the latest range introduced is particularly environment friendly Your appliance contains non CFC HFC natural substances in the cooling system Called R600a and in the insulation Called cyclopentane which are potentially flammable if exposed to fire Therefore take care not to damage the cooling circuit pipes of the applianc...

Страница 3: ...STRUCTIONS 1 The appliance should be transported only in a vertical upright position The packing as supplied must be intact during transportation 2 If during the course of transport the appliance has to be transported horizontally it must only be laid on its right hand side when standing in the front of the appliance After bringing it to upright position it must not be operated for at least 4 hour...

Страница 4: ...A special receptacle is supplied to store the mains plug during transit The receptacle is fixed at the back of the cabinet on the side of the compressor See diagram Gently remove the plug from the receptacle Never pull the mains cord you may damage the appliance In the case of transportation ensure you locate the plug in the receptacle provided to avoid transit damage 6 Refer to cleaning and care ...

Страница 5: ... door 14 17 Unscrew and reposition the bottom hinge bushing 15 18 Unscrew bolt of the pin on the bottom hinge Fit the pin to the other hole on the hinge and tighten the bolt on the new position 16 19 Fit the bottom hinge and other feet and tighten the screws 17 20 Remove the plastic tap to the opposite side on the front bottom trim 18 21 Fit the front bottom trim to the bottom hinge and other feet...

Страница 6: ...degrees F Once the ice build up disappears and the appliance starts auto defrosting again as normal then you may increase the thermostat setting if required 10 9 The following guidelines and recommendations are suggested to obtain the best results and storage hygiene 1 The fridge compartment is for the short term storage of fresh food and drinks 2 The freezer compartment is rated and suitable for ...

Страница 7: ... the plug into the wall socket and switch on the electricity supply When the door is open the fridge interior light will come on 5 You will hear a noise as the compressor starts up The liquid and gases sealed within the refrigeration system may also give rise to noise whether the compressor is running or not which is quite normal 6 Set the thermostat knob half way between 1 and 5 7 Front edges of ...

Страница 8: ...socket and switch on the electricity supply CLEANING AND CARE We recommend that you switch off the appliance at the socket outlet and pull out the mains plug before cleaning Never use any sharp abrasive instrument soap household cleaner detergent and wax polish for cleaning Use luke warm water to clean the cabinet of the appliance and wipe it dry Use a damp cloth wrung out in a solution of one tea...

Страница 9: ...ons given on the packets that you buy Do Always choose high quality fresh food and be sure it is thoroughly clean before you freeze it Do Prepare fresh food for freezing in small portions to ensure rapid freezing Do Wrap all food in aluminium foil or freezer quality polythene bags and make sure any air is excluded Do Wrap frozen food when you buy it and put it in to the freezer as soon as possible...

Страница 10: ...epairs necessary as a result of faulty materials defective components or manufacturing defect The cost of functional replacement parts but excluding consumable items The labour costs of a Beko approved repairer to carry out the repair What is not covered Transit delivery or accidental damage or misuse and abuse Cabinet or appearance parts including knobs flaps handles or container lids Accessories...

Страница 11: ...0 241 1320 Gas Dual Fuel Cookers 0870 241 1321 Washing Machines 0870 241 0357 Dishwashers Republic of Ireland All Refrigeration All Cookers 01 862 3411 Washing Machines Dishwashers Before requesting service please check the trouble shooting guide in the Operating Instructions as a charge may be levied where no fault is found even though your product may still be under guarantee Service once the ma...

Отзывы: