7
TUBE ULTRA-Q T1951
Be sure that there is enough space around the unit for cooling and please do not place the TUBE ULTRA-Q on
high temperature devices such as power amplifiers etc. to avoid overheating.
+
Before you connect your TUBE ULTRA-Q to the mains, please make sure that your local
voltage matches the voltage required by the unit!
The mains connection of the TUBE ULTRA-Q is made by using a mains cable and a standard IEC receptacle.
It meets all of the international safety certification requirements. Please make sure that all units have a proper
ground connection.
+
Please ensure that only qualified persons install and operate the TUBE ULTRA-Q. During
installation and operation the user must have sufficient electrical contact to earth. Electro-
static charges might affect the operation of the TUBE ULTRA-Q!
For additional information please refer to chapter 5 INSTALLATION.
As a standard, the audio inputs and outputs on the TUBE ULTRA-Q are fully balanced. If possible, connect the
unit to other devices in a balanced configuration to allow for maximum interference immunity. The automatic
servo function detects unbalanced connections and compensates the level difference automatically (6 dB
correction).
1.3 Control elements
The BEHRINGER TUBE ULTRA-Q has four parametric filters organized in 4 different frequency bands. A
backlit VU meter shows the input or output level. Each channels comes with a Warmth control, and a tube
window.
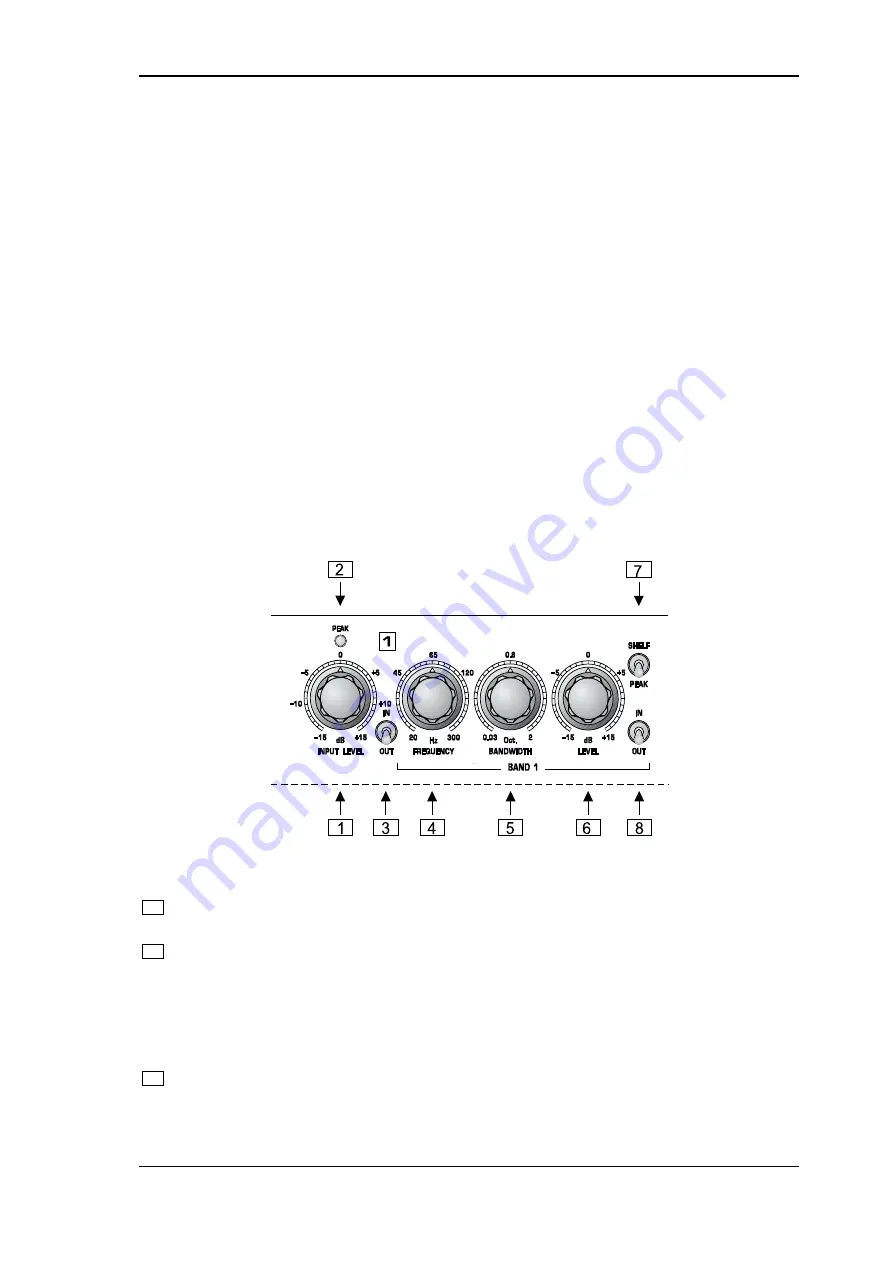
Fig. 1.1: Control elements on the front panel
1
The
INPUT
control determines the input level applied to the device and can be set within a range from
-15 to +15 dB.
2
When the
PEAK
LED above the INPUT control lights up, it means that a level of at least 18 dBu is
present after the input stage. Adjust the INPUT control so that the PEAK LED lights up only with signal
peaks, make sure that it never lights up all the time. When the PEAK LED is on, there is still some 5 dB
of headroom left.
+
Please note that extreme boost settings in combination with a high input level can overload
the unit. In such a case, the input level must be reduced with the INPUT control.
3
The
IN/OUT
switch is used to enable/disable the entire equalizer section in the audio path. The switch
uses a relay-controlled hard bypass function, i.e. as long as it is not active or if the unit is switched off,
the inputs are directly connected to the outputs. The IN/OUT switch allows for A/B comparisons
between processed and unprocessed signals.
1. INTRODUCTION
All manuals and user guides at all-guides.com


