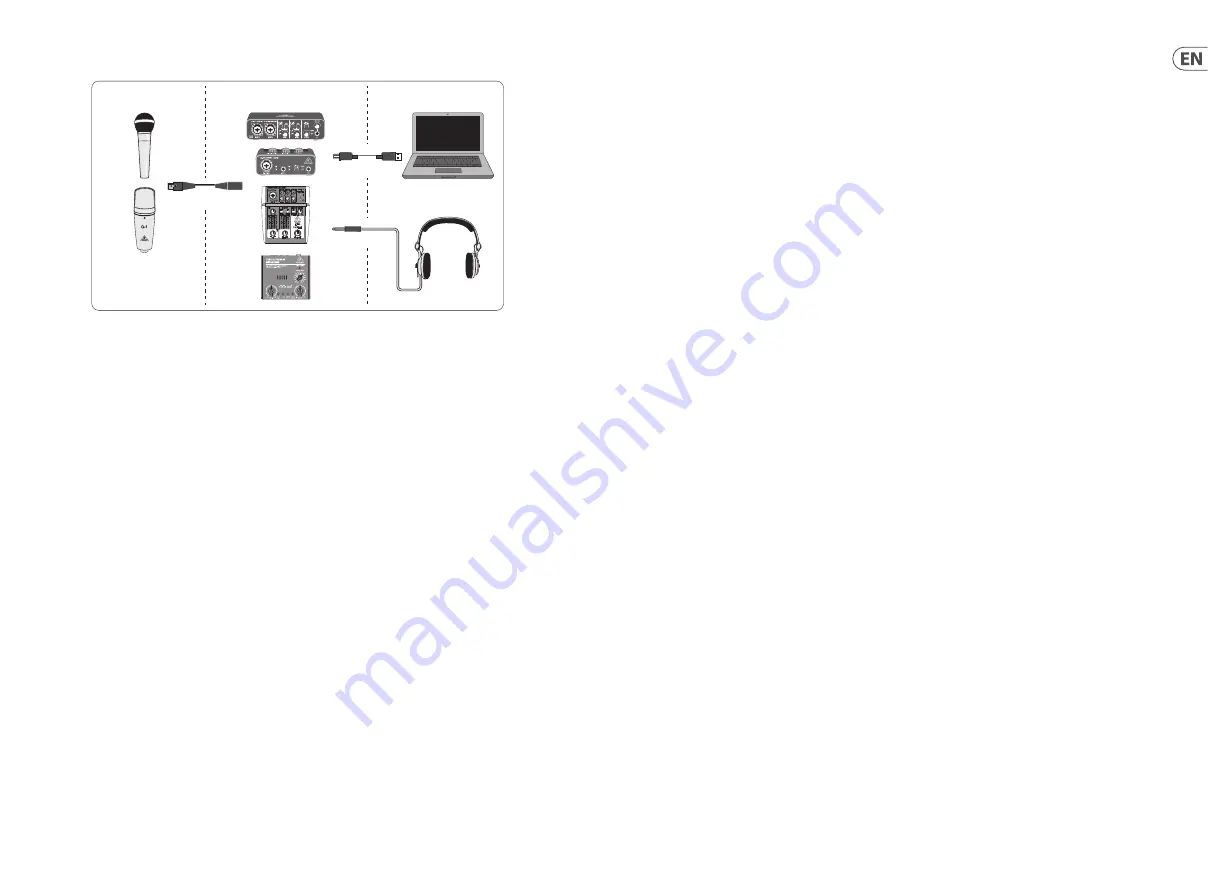
Installation Guide – USB mixer/interface
Note: The Voice Studio package does not include a pair of headphones
Basic Equipment:
Microphone, USB mixer/interface, headphones, computer
Now that you have a basic understanding of what podcasting is and have the
necessary gear, it’s time to set up the equipment, install the software and get started.
1. Install any necessary drivers before connecting your USB interface. They can be
downloaded from the download area of the product page, or from the support
section at www.musictribe.com/brand/behringer/home.
2. Once the drivers are installed, you may connect the interface to your computer
with the included USB cable.
3. Connect your microphone to the input of your mixer or audio interface using
the included XLR cable.
4. Connect a monitoring device. You may connect the outputs of the mixer/
interface to a pair of powered speakers, or connect a set of headphones.
5. Be sure to read the manuals for the individual components of your podcast/
recording system to ensure proper hookup and operation.
6. If using a Windows operating system, it is important to install the necessary
ASIO driver. This is not a factor on Mac systems. Visit the download area of the
USB interface’s product page, or go to the Support > Download Center at www.
musictribe.com/brand/c/behringer/downloads?active=downloads to download
the required driver.
Microphone
Mixer/Interface
Computer
USB cable
Headphones
XLR cable
Software
Before you can start, you will need some software to produce, release, and consume
your podcast. In the following steps you will find some free or low-cost examples
which are mostly cross-platform programs. Choose the option that matches your
needs and operating system. Some research online should help you identify which
program has your ideal functionality and workflow.
Step 1 – Producing
First, you will need a music program that allows you to record audio and export MP3
files. There are many DAWs (Digital Audio Workstation) which offer such functionality
on Mac and PC, such as Reaper, Tracktion, Logic, Garage Band, Cubase. One of the
most popular cross-platform freeware is Audacity, which is available for Mac OS X,
Windows, and even Linux.
Step 2 – Exporting
In case of using Audacity, make sure to get the free “LAME MP3 Encoder”. This is a
freeware plug-in which needs to be installed additionally to Audacity to enable your
audio file to be exported into MP3 format.
Step 3 – Uploading
To upload your newly created MP3 podcast, you will need an upload/distribution
software, often called Podcast Studio or Podcast Producer. This software allows you
to fine-tune your podcast, create RSS content, and finally upload your podcast on a
server. An old Windows classical is Podifier, but newer tools can be found at Ultraschall.
fm (based on a specific version of the DAW Reaper), Spreaker.com or Buzzsprout.com,
to name just some few examples.
2
3
Quick Start Guide
Computer Audio
Содержание PODCASTUDIO 2 USB
Страница 15: ...We Hear You...


