


49
860
76
D
B
-en/
03
35
5.0
00
32
English
⋅
en
In this welding operation the seam dips along its
entire length in the gap due to the physical
processes during melting and rehardening. The
subsequent smoothing at a low energy level should
not be carried out until the seam appears flawless
without any cracks after a thorough check.
Otherwise it is recommended that it be ground and
welded with filler metal.
Alternative: For example, ready-made connecting
elements. Since their geometry is defined and
always the same, the welding parameters can be
saved and used again once they have been deter-
mined.
Butt welding
Completing bridges and connecting crowns
a) Precious metal to precious metal
As described in Welding secondary crowns to partial
dentures prepare the contact point already in the
wax-up phase or by grinding the crowns such that a
circumferential single-V butt joint can result when
the object is put together on the model. The beam
angle should be around 45°. First fix the two crowns
with a few spots crosswise. After that take the
workpiece off the model and build up the welding
wire spot by spot in opposite layers until the entire
seam is filled.
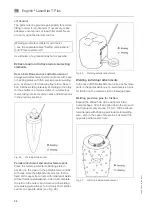
If joining is to be carried out subsequently and
adequate space is not available for a single-V butt
joint, a gap can be filled by inserting a thin plate -
which is cast or a wire beaten flat can be used - and
welded homogeneously all around with spot welds
that overlap by approx. two thirds in each case (Fig.
43). This method does not result in full-surface
welding, but "circular deep penetration welding".
Fig. 43
Connecting crowns
b) Precious metal to non-precious metal
Prepare the two parts of the joint similar to a), tack
on the model and weld together on the model layer
by layer with intermediate checks after raising. Prior
to tacking the entire welding surface of the non-
precious side can be coated with the specified
welding wire spot by spot with around two thirds
overlapping in thin layers next to each other.
Welding bars to or between crowns
When joining bars, weld the spots to form a double-
V butt joint (Fig. 44). Welding of the various combi-
nations is carried out as described in Case
examples. To fix, place the abutment crowns on the
model and position the bar in contact in the paralle-
lometer using adhesive wax. After that fix the bar
with a few spots opposite each other at the deepest
points of the seam and complete the weld for fitting
accuracy layer by layer with intermediate checks
after raising.
Important: Completely finish one bar-crown joint
after the other.
Fig. 44
Connecting bars
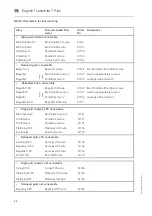
Welding parameters (basis for own tests):
- see the separate tables "Setting combinations"
and "Preset parameters".
Содержание LaserStar T Plus
Страница 1: ...Gerätedokumentation Miteinander zum Erfolg ...
Страница 2: ...LaserStar T Plus DOC 86076 en 03 English 355 00032 en ...
Страница 3: ...86076 DB en 03 355 00032 ...
Страница 4: ...Translation of the original instructions LASERSTAR T PLUS English 355 00032 en ...
Страница 74: ......
Страница 75: ......


