926000463
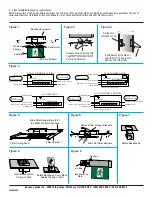
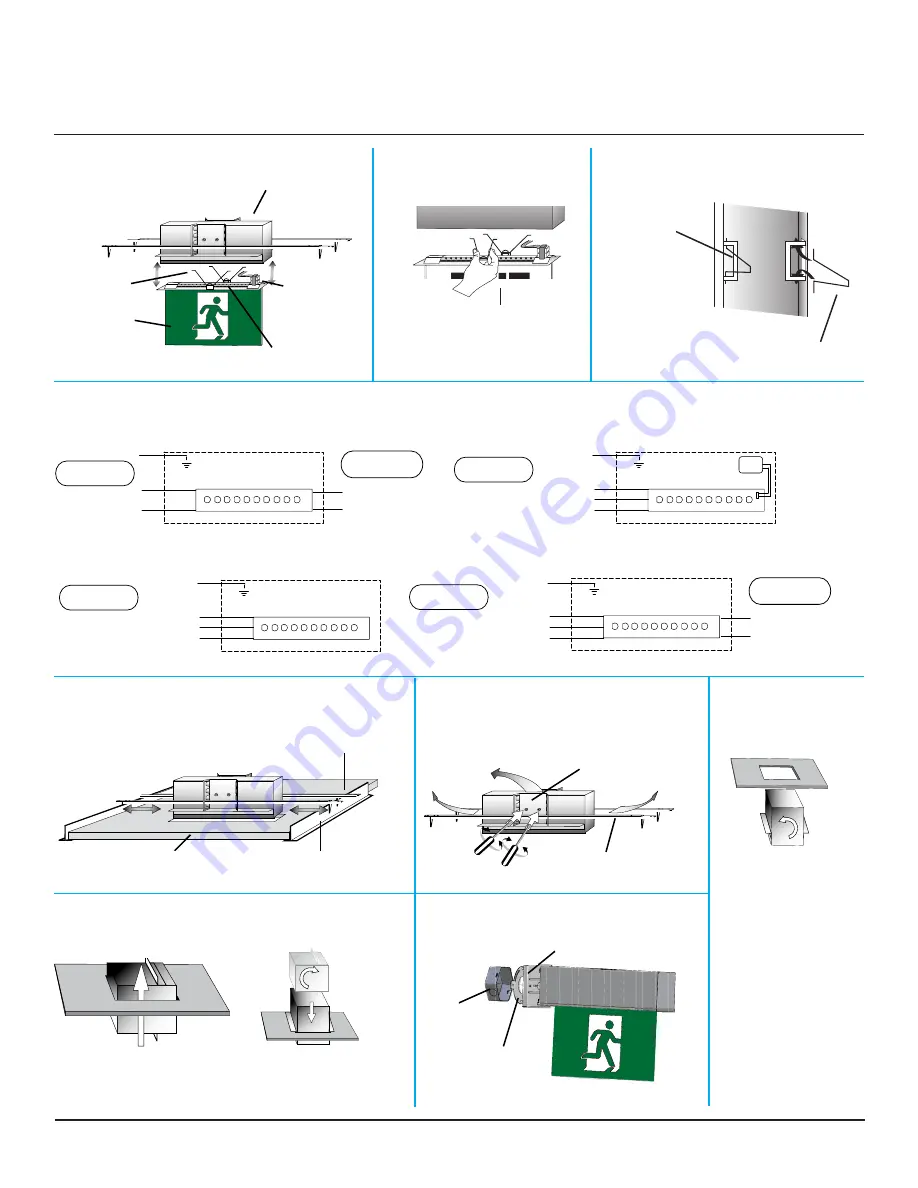
Figure 2
Figure 1
Figure 3
Squeeze Tension Spring Clip
Together To Remove/Install
Cover Exit Assembly
Spring Clip
Installed In Tab
Insert/Remove One Side of
Clip Under Tab Then Insert/
Remove The Other Side
Figure 4
Chassis GND
LED Board
AC ONLY SIGN
Chassis GND
GREEN Ground
BLACK 120VAC
RED 347VAC or ORANGE 277VAC
WHITE Neutral
LED Board
AC & UNIVERSAL DC SIGN
YELLOW Positive 6 to 24VDC
PURPLE Negative
Emergency Supply
FROM Battery Pack
SELF-POWERED SIGN
Chassis GND
24 hours
Unswitched Supply
GREEN Ground
BLACK 105 to 360VAC
WHITE Neutral
LED Board
DUAL UNIVERSAL AC SIGN
From Generator OR
Emergency Supply
BROWN 105 to 360VAC
BLUE Neutral
NOTE: Cap unused AC Wire!
NOTE: Cap unused AC Wire!
24 hours
Unswitched Supply
GREEN Ground
BLACK 120VAC
RED 347VAC or ORANGE 277VAC
WHITE Neutral
24 hours
Unswitched Supply
Chassis GND
LED Board
NOTE: Cap unused AC Wire!
GREEN Ground
BLACK 120VAC
RED 347VAC or ORANGE 277VAC
WHITE Neutral
24 hours
Unswitched Supply
Ni-Cd
Battery
Figure 8
Insert Backbox Into
Ceiling or Wall
Rotate Backbox 90° and Place
Against Ceiling or Wall
Figure 9
Octagon Box
Canopy
Adjust Mounting
Plate
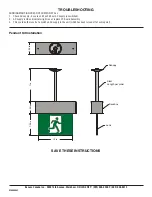
Figure 1
Backbox Enclosure
LED Circuit Board
Transformer
Faceplate
Tension
Springs
3. Clean faceplates/lenses on a regular basis.
NOTE: Always turn off AC power before servicing. The servicing of any parts should be performed by qualified service personnel. The use of
replacement parts not furnished by BeLuce Canada Inc., may cause equipment failure and will void the warranty.
BeLuce Canada Inc., 3900 14th Avenue, Markham, ON L3R 4R3 P: (905) 948-9500 F: (905) 948-8673
Figure 5
Slide T-Bar Hanger Bars to Fit
the Width of T-Bar Channels
T-Bar Channel
T-Bar Ceiling Panel
Figure 6
Remove T-Bar Hanger Brackets
Slide Out T-Bar Hangers
Figure 7
Rotate Backbox 90°
Figure 8
Insert Backbox Into
Ceiling or Wall
Rotate Backbox 90° and Place
Against Ceiling or Wall
Figure 5
Figure 8
Figure 6
Figure 9
Figure 7

