GUIDA RM (GD-RM)
926000463
INSTRUCTIONS
IMPORTANT SAFEGUARDS
When using electrical equipment, basic safety precautions should always be followed including the following:
1. READ AND FOLLOW ALL SAFETY INSTRUCTIONS
2. Disconnect power before performing work on electrical equipment.
3. Do not use outdoors.
4. Do not let power cords touch hot surfaces and do not mount near gas or electric heaters.
5. Use caution when servicing batteries. Battery acid can cause burns to skin and eyes. If acid is spilled on skin or eyes, flush with fresh
water and contact a physician immediately.
6. Equipment should be mounted in locations and at heights where unauthorized personnel will not readily subject it to tampering.
7. The use of accessory equipment not recommended by BeLuce Canada Inc., may cause an unsafe condition, and will void the unit’s
warranty.
8. Do not use this equipment for other than its intended purpose.
9. Servicing of this equipment should be performed by qualified service personnel.
10. SAVE THESE INSTRUCTIONS!
MAINTENANCE
1. Code requires that the equipment be tested every 30 days for 30 seconds, and that written records be maintained. Further, the
equipment is to be tested once a year for the required time duration. The the equipment is to be repaired whenever the equipment
fails to operate as intended during the duration test. Written records of test results and any repairs made must be maintained. BeLuce
Canada Inc. strongly recommends compliance with these code requirements.
2. The lamps listed herein when used according to the instructions with this unit are in accordance with the requirements of CSA Standard
C22.2, No. 141 – Unit Equipment for Emergency Lighting.
INSTALLATION
1. Extend 24 hour AC supply of rated voltage (see product label) to an electrical box. Leave at least eight (8) inches of slack wire. The circuit
should not be energized at this time - do not energize the AC supply until indicated.
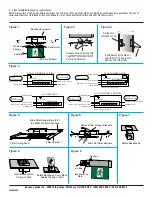
2. Remove the cover/exit assembly by grasping the backbox and pulling the cover away to expose the two (2) tension springs (Figure 1).
Unhook the springs from the tabs inside the backbox to remove the cover/exit assembly (Figure 2 & 3).
3. The sign may be either recessed wall or surface ceiling mounted. Remove the appropriate wire pass-thru hole from the back, top or end of
the backbox enclosure. NOTE: Wall mounted fixtures have an exit faceplate with a 90 degree bend.
4. Use backbox the mark mounting position on wall or ceiling and cut hole for backbox.
5. Either attach the electrical box directly to the backbox or extend the AC supply to the backbox enclosure.
a) Direct Attachment: If attaching the electrical box directly, knockout the appropriate holes in the backbox, pass thru all wiring and then
attached electrical box with appropriate screws (supplied by others).
b) Extend Wiring: If connecting the AC supply to a nearby electrical box, extend the wiring to the backbox and feed the supply circuit
wiring through the wire pass hole. Use an approved connector to fasten the AC supply to the enclosure backbox.
6. Place the backbox enclosure into the final mounting position.
a) T-Bar Ceilings: Slide the hanger bars to match the width of the T-Bar channels (Figure 5).
b) Plaster/Drywall Ceilings & Walls: Remove all of the T-Bar mounting hardware (Figure 6). Rotate the backbox 90° and place into ceiling
or wall (Figure 7). Rotate the backbox back 90° and place plaster flanges against ceiling or wall (Figure 8). Refer to Figure 9 for end
mounting applications.
7. Secure the backbox into place.
8. Hold the cover/exit assembly up to the installed backbox and hook one of the tension springs into one of the internal tabs (Figure 2 & 3).
9. Connect AC supply per diagram provided (Figure 4). Insulate unused wire!
CAUTION!
- Failure to insulate unused wire may result in a
shock hazard or unsafe condition as well as equipment failure.
10. Hook the other tension spring into the remaining tab and push the assembly back up into the housing until secure.
11. Energize power to fixture. The LEDs board inside will light and the pictogram faceplate will now be illuminated.
SELF-POWERED:
1. For models GDE-SP, plug the battery into the circuit board per (Figure 4) self-powered sign.
BeLuce Canada Inc., 3900 14th Avenue, Markham, ON L3R 4R3 P: (905) 948-9500 F: (905) 948-8673


