background image


  12 

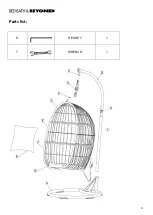
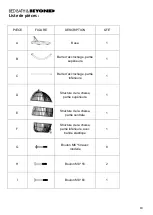
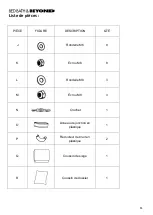
Liste de pièces : 


Clé hexagonale 


Clé à fourches 


Содержание BEE & WILLOW home

Страница 1: ... Power tools can overtighten screws and strip threads For each screw 1 Tighten each screw until you meet resistance 2 Tighten one additional full rotation DO NOT OVERTIGHTEN This chair is not intended for use during inclement weather Weather related damage or damage as a result of the chair not being stored properly when not in use is not the responsibility of the manufacturer During extended peri...

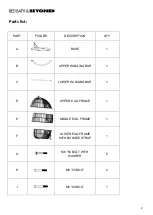
Страница 2: ...ART FIGURE DESCRIPTION QTY A BASE 1 B UPPER HANGING BAR 1 C LOWER HANGING BAR 1 D UPPER EGG FRAME 1 E MIDDLE EGG FRAME 1 F LOWER EGG FRAME WITH BUNGEE STRAP 1 G M6 50 BOLT WITH WASHER 8 H M8 55 BOLT 2 I M8 60 BOLT 1 ...

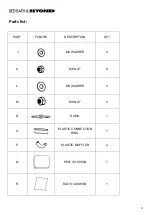
Страница 3: ...3 Parts list PART FIGURE DESCRIPTION QTY J M6 WASHER 8 K M6 NUT 8 L M8 WASHER 3 M M8 NUT 3 N HOOK 1 O PLASTIC CONNECTION RING 1 P PLASTIC MUFFLER 2 Q SEAT CUSHION 1 R BACK CUSHION 1 ...

Страница 4: ...4 Parts list S HEX KEY 1 T WRENCH 1 ...

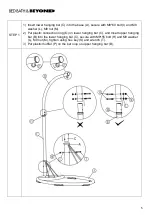
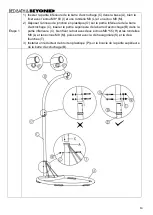
Страница 5: ...M8 washer L M8 nut M 2 Put plastic connection ring O on lower hanging bar C and Insert upper hanging bar B into the lower hanging bar C secure with M8 55 bolt H and M8 washer L M8 nut M tighten using hex key S and wrench T 3 Put plastic muffler P on the bar loop on upper hanging bar B ...

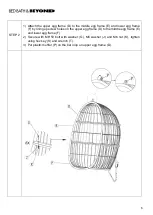
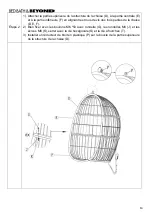
Страница 6: ...er egg frame F by lining up screw holes on the upper egg frame D to the middle egg frame E and lower egg frame F 2 Secure with M6 50 bolt with washer G M6 washer J and M6 nut K tighten using hex key S and wrench T 3 Put plastic muffler P on the bar loop on upper egg frame D ...

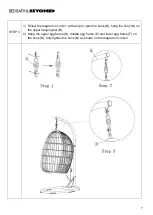
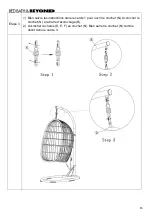
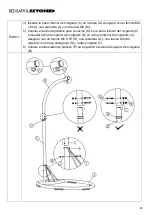
Страница 7: ... in circle 1 at the top to open the hook N hang the hook N on the upper hanging bar B 2 Hang the upper egg frame D middle egg frame E and lower egg frame F on the hook N fully tighten the hook N as shown on the diagram in circle 3 ...

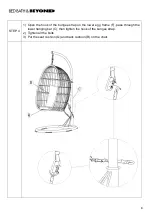
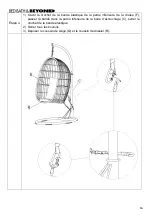
Страница 8: ...n the hook of the bungee strap on the lower egg frame F pass through the lower hanging bar C then tighten the hook of the bungee strap 2 Tighten all the bolts 3 Put the seat cushion Q and back cushion R on the chair ...

Страница 9: ...S Les outils motorisés peuvent trop serrer les vis et user les filets Pour chaque vis 1 Serrer chaque vis jusqu à la résistance 2 Serrer une autre rotation complète NE PAS TROP SERRER Cette chaise n est pas conçue pour être utilisée lors de mauvais temps Tous dommages causés par des intempéries ou parce que la chaise n a pas été correctement rangée alors qu elle n était pas utilisée sont exclus de...

Страница 10: ...partie supérieure 1 C Barre d accrochage partie inférieure 1 D Structure de la chaise partie supérieure 1 E Structure de la chaise partie centrale 1 F Structure de la chaise partie inférieure avec bande élastique 1 G Boulon M6 50 avec rondelle 8 H Boulon M8 55 2 I Boulon M8 60 1 ...

Страница 11: ...es PIÈCE FIGURE DESCRIPTION QTÉ J Rondelle M6 8 K Écrou M6 8 L Rondelle M8 3 M Écrou M8 3 N Crochet 1 O Anneau de jonction en plastique 1 P Réducteur de bruit en plastique 2 Q Coussin de siège 1 R Coussin de dossier 1 ...

Страница 12: ...12 Liste de pièces S Cléhexagonale 1 T Cléàfourches 1 ...

Страница 13: ...que O sur la partie inférieure de la barre d accrochage C insérer la partie supérieure de la barre d accrochage B dans la partie inférieure C bien fixer le tout avec deux écrous M8 55 H et les rondelles M8 L et les écrous M8 M puis serrer avec la cléhexagonale S et la cléà fourches T 3 Installer un réducteur de bruit en plastique P sur la boucle de la partie supérieure de la barre d accrochage B ...

Страница 14: ...en alignant les trous de vis des trois parties de la chaise D E F 2 Bien fixer avec les boulons M6 50 avec rondelle G les rondelles M6 J et les écrous M6 K serrer avec la cléhexagonale S et la cléàfourches T 3 Installer un réducteur de bruit en plastique P sur la boucle de la partie supérieure de la structure de la chaise D ...

Страница 15: ...Bien suivre les instructions dans le cercle 1 pour ouvrir le crochet N Accrocher le crochet N à la barre d accrochage B 2 Accrocher la chaise D E F au crochet N Bien serrer le crochet N comme décrit dans le cercle 3 ...

Страница 16: ... élastique de la partie inférieure de la chaise F passer la bande dans la partie inférieure de la barre d accrochage C serrer le crochet de la bande élastique 2 Serrer tous les boulons 3 Déposer le coussin de siège Q et le coussin de dossier R ...

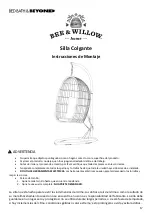
Страница 17: ...ELÉCTRICAS Las herramientas eléctricas pueden apretar demasiado los tornillos y raspar las roscas Para cada tornillo 1 Apriete cada tornillo hasta que encuentre resistencia 2 Apriete una vuelta completa NO APRIETE DEMASIADO La silla no está hecha para resistir las inclemencias del clima Los daños a raí z del clima o como resultado de su mal almacenamiento cuando no se encuentra en uso no es respon...

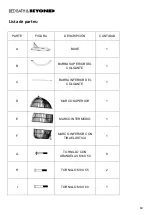
Страница 18: ...CIÓN CANTIDAD A BASE 1 B BARRA SUPERIOR DEL COLGANTE 1 C BARRA INFERIOR DEL COLGANTE 1 D MARCO SUPERIOR 1 E MARCO INTERMEDIO 1 F MARCO INFERIOR CON TIRA ELÁSTICA 1 G TORNILLO CON ARANDELAS M6 X 50 8 H TORNILLO M8 X 55 2 I TORNILLO M8 X 60 1 ...

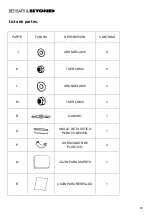
Страница 19: ... PARTE FIGURA DESCRIPCIÓN CANTIDAD J ARANDELA M6 8 K TUERCA M6 8 L ARANDELA M8 3 M TUERCA M8 3 N GANCHO 1 O ANILLO DE PLÁSTICO PARA CONEXIÓN 1 P SILENCIADOR DE PLÁSTICO 2 Q COJÍ N PARA ASIENTO 1 R COJÍ N PARA RESPALDO 1 ...

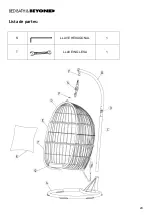
Страница 20: ...20 Lista de partes S LLAVE HEXAGONAL 1 T LLAVE INGLESA 1 ...

Страница 21: ... de plá stico para conexión O en la barra inferior del colgante C e insertar la barra superior del colgante B en la barra inferior del colgante C Asegurar con un tornillo M8 X 55 H una arandela L y una tuerca M8 M Apretar con la llave hexagonal S y la llave inglesa T 6 Colocar el silenciador de plástico P en el gancho de la barra superior del colgante B ...

Страница 22: ...arco superior D el marco intermedio E y el marco inferior F 5 Asegurar con el tornillo con arandela M6 X 50 G una arandela M6 J y una tuerca M6 K Apretar con la llave hexagonal S y la llave inglesa T 6 Colocar el silenciador de plástico P en la barra en el gancho del marco superior D ...

Страница 23: ...de la parte superior para abrir el gancho N Colgar el gancho N en la barra superior del colgante B 4 Colgar el marco superior D intermedio E e inferior F en el gancho N Apretar completamente el gancho N como se muestra en el diagrama del cí rculo 3 ...

Страница 24: ...gancho de la tira elástica del marco inferior F Pasar por la barra inferior del colgante C Apretar el gancho de la tira elástica 5 Apretar todos los tornillos 6 Colocar el cojí n para asiento Q y para respaldo R en la silla ...

Отзывы: