background image

Using the Editors While Creating Methods

3-17

Biomek® 3000 Laboratory Automation Workstation Quick-Start Guide

3.8

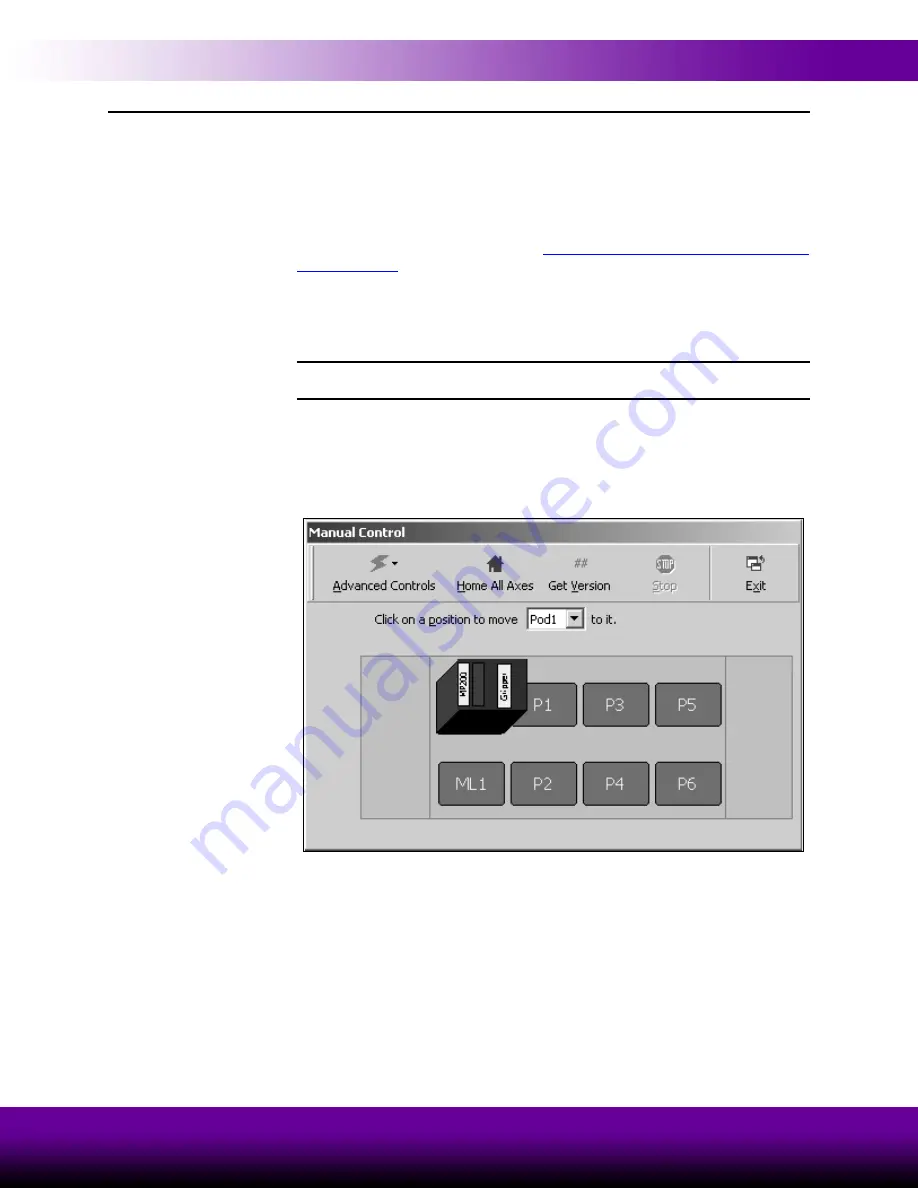
Manually Controlling the Pod

If you need to control the Biomek 3000 instrument outside of a method, including 
moving the bridge and head assembly outside of a method, you will use 

Manual


Control

Manual


Control

 is also used to control the pod when framing the gripper 

tool and when recovering from errors. Some devices can also be controlled outside a 
method using 

Manual


Control

. Refer to the 

Biomek® 3000 Laboratory Automation 

Workstation User’s Manual, 

Chapter 14, 

Manually Controlling the Biomek® 3000 in 

Biomek Software

for additional information.

Using the following instructions, you will use 

Manual


Control

 to move the pod to a 

different position on the deck. You’ll move the pod to the Z-max height first to make 

sure you don’t hit anything on the deck and then you’ll move the pod to a selected 
position.

Note:  

If you launch the simulator, you can watch the pod move as you complete the 

following steps.

To move the pod using 

Manual


Control

:

To home all axes and move the head assembly using 

Manual


Control

:

1. Choose 

Instrument>Manual Control

Manual Control 

appears (Figure 3-

19). Here is where you can choose to which position you want to move a pod.

Figure 3-19.  Manual Control

Содержание Biomek 3000

Страница 1: ...c 4300 N Harbor Boulevard Fullerton CA 92834 3100 Copyright 2004 Beckman Coulter Inc Printed in U S A Biomek 3000 Laboratory Automation Workstation Quick Start Guide Beckman Coulter PN 987837 Revision...

Страница 2: ...of this system and related documentation or the procedures specified in this manual regardless of foreseeability or the form of action whether in contract tort including negligence breach of warranty...

Страница 3: ...product claimed to be defective must if required by the Company be returned to the factory transportation charges prepaid and will be returned to Purchaser with transportation charges collect unless t...

Страница 4: ......

Страница 5: ...tioners 1 4 1 2 5 Tool Racks 1 4 1 2 6 Optional Devices 1 5 1 3 Biomek Software 1 6 1 4 Starting the Biomek 3000 1 7 1 4 1 Turning On the Biomek 3000 1 7 1 4 2 Launching the Software 1 7 1 4 3 Homing...

Страница 6: ...Creating Methods 3 1 Overview 3 1 3 2 General Description of Editors 3 2 3 2 1 Project Menu 3 3 3 2 2 Instrument Menu 3 3 3 3 Creating New Labware in the Labware Type Editor 3 5 3 4 Creating a New Pa...

Страница 7: ...his chapter a general hardware overview on the Biomek 3000 Automated Laboratory Workstation and introduction to the Biomek Software Learning to Create Methods for the Biomek 3000 Chapter 2 an introduc...

Страница 8: ...en instructions on creating a small method refer to Chapter 2 Learning to Create Methods for the Biomek 3000 and utilizing the editors refer to Chapter 3 Using the Editors While Creating Methods Some...

Страница 9: ...ate washing operations and moving labware around the deck The modular design of the Biomek 3000 allows expansion of the instrument capabilities to include additional operations such as filtration plat...

Страница 10: ...Biomek 3000 deck refer to the Biomek 3000 Laboratory Automation Workstation User s Manual Chapter 3 Gripper Tool wash system the wash system includes single channel and eight channel tools used to pe...

Страница 11: ...to the Biomek 3000 Laboratory Automation Workstation User s Manual Chapter 9 Thermal Exchange Unit Filtration System includes a vacuum valve unit that is connected to the Biomek 3000 workstation via...

Страница 12: ...er to Chapter 2 Learning to Create Methods for the Biomek 3000 When a step in the Method View is highlighted the corresponding configuration options appear in the Step Configuration Area refer to Chap...

Страница 13: ...g into Biomek Software for the first time you must enter a new password Remember your new password you will need to enter it each time you access Biomek Software Figure 1 2 Biomek Software main editor...

Страница 14: ...ed To home all axes 1 From the Instrument menu choose Home All Axes A Warning appears 2 Make sure that all warnings are addressed and choose OK The pod is homed and the instrument is now ready for use...

Страница 15: ...this chapter and complete the tutorial steps provided After you have completed the instructions or if you need additional information along the way use the links provided to access the suite of user...

Страница 16: ...to tell Biomek Software where you have physically placed labware on your deck Before proceeding with this quick start method make sure that an MP200 Multi Tip Pipette Tool and Gripper Tool are added...

Страница 17: ...tep in a method provides options to clear the Biomek 3000 deck clear the devices on the deck unload tips from the pod and clear all global variables Refer to the Biomek Software User s Manual Chapter...

Страница 18: ...software what labware and devices are on the deck for obstacle avoidance see sidebar You ll learn more about the Deck Editor in the next chapter refer to Section 3 7 Creating a New Deck Figure 2 2 Ins...

Страница 19: ...Make sure that the latch is securely holding the tip rack in position a Reservoir to P3 a BCFlat96 to P4 Your screen should look similar to Figure 2 3 Note To remove unwanted labware from the Deck La...

Страница 20: ...the right side depending on your instrument configuration 4 Drag the Gripper tool to the gripper tool position on the tool rack the larger position on the right 5 Drag the MP200 tool to either of the...

Страница 21: ...e default settings in Labware Properties will be used for the tip box however you can refer to the Biomek Software User s Manual Chapter 15 2 5 1 Configuring Labware Properties for Tips to learn more...

Страница 22: ...Figure 2 6 Note To learn more about the Instrument Setup step refer to the Biomek Software User s Manual Chapter 15 2 Instrument Setup Step Figure 2 6 Instrument Setup step with labware named Next you...

Страница 23: ...d drop a Transfer step from the Step Palette into the Method View just below the Instrument Setup step Notice that the Current Deck Display shows the current position of all labware on the deck Figure...

Страница 24: ...liquid transfer so click the up arrow next to Tip Handling to collapse the configuration This allows more room for the step configuration Figure 2 8 The text displayed reflects your tip handling confi...

Страница 25: ...urns into a hand hold the left mouse button down to move the hand up and down until the depth is as close to 2 00 mm from bottom as you can get Then adjust the height precisely to 2 00 mm using the fo...

Страница 26: ...ured in microliters L automatically and indicates the amount of liquid that will be dispensed 100 L into each of the 96 wells so in this case you re dispensing a total of 9600 L into the 96 well micro...

Страница 27: ...ith Destination configured Note The method view changes to reflect the amount transferred when the next step is configured The Transfer step configuration is now complete In the next section you will...

Страница 28: ...Software User s Manual Chapter 15 4 Move Labware Step To configure the Move Labware step to move your Dest1 labware at position P6 to another deck position 1 Insert a Move Labware step into the Metho...

Страница 29: ...onfiguring the Finish Step for information on configuring the Finish step 2 6 1 Handling Configuration Errors If there is a step configuration error in your method when you click on the Finish or any...

Страница 30: ...your saved Quick Start method Methods and Project Files Methods are saved as elements of a project file not as separate method files Saving a method only saves the current status of the method It does...

Страница 31: ...to watch the method on your screen without actually running the method on an instrument To run your saved method 1 If you do not see the Simulation Display button on the toolbar Figure 2 15 from the...

Страница 32: ...ed and the step configuration area is replaced with a three dimensional model of your Biomek 3000 Figure 2 16 The deck confirmation prompt Figure 2 17 appears on top of the main editor Figure 2 16 Bio...

Страница 33: ...so be followed in the Method View as steps are highlighted in green as they are executed Note If you are running this method on your instrument instead of the simulator make sure that the physical dec...

Страница 34: ......

Страница 35: ...thod to be customized to your special requirements You can go beyond the predefined project items and instrument configurations manually control the pod restore instrument settings and project files a...

Страница 36: ...o the referenced chapter for more information You will work with four of the more commonly used editors and Manual Control in this quick start guide If using Accounts Permissions You must have Develop...

Страница 37: ...niques for your specific needs and save them for use in future methods refer to the Biomek Software User s Manual Chapter 9 Understanding and Creating Techniques Liquid Type Editor allows you to creat...

Страница 38: ...ation Workstation User s Manual Chapter 14 Manually Controlling the Biomek 3000 in Biomek Software Note Refer to Section 3 8 Manually Controlling the Pod in this quick start guide to learn how to manu...

Страница 39: ...anual Chapter 7 Creating and Modifying Tip and Labware Types for further information on using the Labware Type Editor Note Do not run a method outside of the simulator using the labware you create her...

Страница 40: ...Biomek Software it is important to copy and then edit the copy of the labware type rather than just editing the predefined labware to meet the new labware specifications 3 Enter NewLabwareQuickStart...

Страница 41: ...LabwareQuickStart appears Figure 3 5 Figure 3 5 NewLabwareQuickStart Note Each piece of labware in Labware Types has its own mini editor similar to Figure 3 5 to allow specifications to be revised and...

Страница 42: ...terns that may be used or copied to create new patterns The patterns created and stored in Well Patterns are accessible in the Transfer and Combine steps Assume that you want to create a new well patt...

Страница 43: ...9 Biomek 3000 Laboratory Automation Workstation Quick Start Guide 2 Choose New New Pattern appears Figure 3 7 Figure 3 7 New Pattern 3 Highlight NewLabwareQuickStart and choose OK Figure 3 8 appears F...

Страница 44: ...lter Inc 4 While holding down the Shift key select the wells for the new pattern so it looks like Figure 3 9 Figure 3 9 Wells chosen for the new pattern 5 Choose Rename to rename the new pattern Renam...

Страница 45: ...ick Start Guide 6 Enter LabwareQuickStart and choose OK Figure 3 11 appears Figure 3 11 New pattern renamed 7 Choose Save to save LabwareQuickStart in Well Patterns Note Refer to the Biomek Software U...

Страница 46: ...cking in methods Enter a reason and your password to check in the method and project refer to the Biomek Software User s Manual Chapter 12 10 Checking In a Method Note If using Accounts Permissions me...

Страница 47: ...configure Hardware Setup if you have a new tool that you want to use with your Biomek 3000 instrument You will add a P200L Single Tip Pipette Tool to the list of tools available Adding a tool in Hard...

Страница 48: ...he serial number printed on the tool label in Tool Serial Number Note The other fields may be used to modify the performance of the tool However Tool Conversion Slope and Capacity should only be chang...

Страница 49: ...trument Deck Editor Deck Editor appears Figure 3 15 Figure 3 15 Deck Editor 2 Select New Deck Choose a name for this deck appears Figure 3 16 Figure 3 16 Choose a name for this deck 3 Enter TwoToolRac...

Страница 50: ...eck This deck is now the default deck and is available in the Instrument Setup step Figure 3 17 TwoToolRacks deck with second tool rack added 6 Select Open Deck Select a Deck appears Figure 3 18 Figur...

Страница 51: ...kstation User s Manual Chapter 14 Manually Controlling the Biomek 3000 in Biomek Software for additional information Using the following instructions you will use Manual Control to move the pod to a d...

Страница 52: ...configured height 4 Select Close Advanced Manual Control Pod1 closes 5 From Manual Control click on P5 The head assembly moves to position P5 on the deck 6 You can click on additional positions to mov...

Страница 53: ...this quick start guide You ve completed a small method steps using the editors steps creating some new project items steps to manually control the Biomek 3000 If you ve used the links to other manual...

Страница 54: ......

Отзывы: