background image

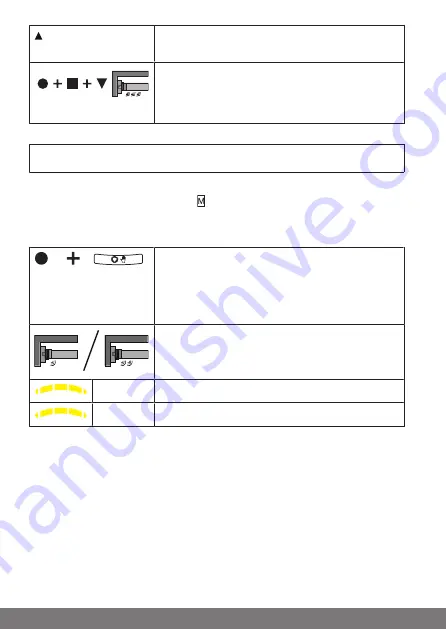
Open the shading solution to the upper limit posi-
tion.

Then press the teaching button and also the STOP
and UP buttons for approximately 5 seconds.

The receiver confirms.

Activating/deactivating repeater mode

Put the transmitter into master mode.

Select the receiver by pressing the   button until the desired receiver con-
firms.
All the following settings will then only be executed for this device.

Press the programming button, and then the
changeover button as well, keeping them
pressed. The current repeater mode is displayed.
Continue holding the buttons down for 5 seconds
to change over.

The receiver confirms.

1x

Repeater mode activated

2x

Repeater mode deactivated

28

Содержание B-Tronic EasyControl EC5401B

Страница 1: ...smitter 1 channel bidirectional Important information for Fitters Electricians Users Please forward accordingly These instructions must be kept safe for future reference Becker Antriebe GmbH Friedrich...

Страница 2: ...point 19 Upper point to lower stop 19 Deleting the limit positions of B Tronic tubular drives 20 Performing the programming run on B Tronic radio receivers 21 Deleting the programming run on B Tronic...

Страница 3: ...found in the relevant instruc tions for the receiver Warranty Structural modifications and incorrect installation which are not in accordance with these and our other instructions can result in seriou...

Страница 4: ...units Observe all pertinent country specific regulations Dispose of exhausted batteries properly Only replace batteries with the identical type see Technical data Caution Keep people out of the syste...

Страница 5: ...iver would not pose any risk to persons animals or property or which contain safety devices to eliminate such risks The operator is not protected from interference from other telecommu nications syste...

Страница 6: ...s 2 4 5 1 11 10 9 8 7 6 3 1 Wall bracket receptacle 2 Master button 3 Type plate 4 Batteries 5 Battery compartment cover 6 Programming button behind the logo 7 Changeover switch 8 DOWN button 9 STOP b...

Страница 7: ...ode UP Touch mode DOWN ON OFF Intermediate position I 1 Intermediate position II 1 Tilt position I 1 Tilt position II 1 STOP STEP 2 Roller shutter 1s 1s Screen 1s 1s Blind 1s 1s Roof window 1s 1s ON O...

Страница 8: ...This flashing will continue as long as you remain in master mode By pressing the master button again the programmed receiver is selected or the programmed receivers are selected in sequence The selec...

Страница 9: ...n or the radio switch of the receiver The receiver is now in programming mode for 3 minutes Programming transmitters Please make sure that only one receiver is in programming mode at any time It is no...

Страница 10: ...the receiver e g roller shutter blind dimmer switch Roller shutter venetian blind is the factory setting Briefly press the programming button and then the changeover button for 1 second Flashes yello...

Страница 11: ...r 5 seconds Flashes yellow once Receiver mode roller shutter Flashes yellow twice Receiver mode dimmer Flashes yellow three times Receiver mode switch Flashes yellow four times Receiver mode venetian...

Страница 12: ...receivers at the same time Putting the B Tronic receiver into programming mode with a pro grammed B Tronic transmitter Put the transmitter into master mode Select the receiver by pressing the button...

Страница 13: ...ming mode for 3 minutes When the receiver is in programming mode proceed as follows Now press the programming button of the new transmitter The receiver confirms The programming process is now complet...

Страница 14: ...ster mode the sym bols on the changeover button flash green once per second Now press the programming button until the status LED changes from green to yellow and the receiver confirms Changes from gr...

Страница 15: ...this device While the transmitter is in master mode the sym bols on the changeover button flash green once per second Now press the programming button until the status LED changes from green to yellow...

Страница 16: ...move in the correct direction when the UP or DOWN buttons are pressed If this is not the case please carry out the following steps to change the direc tion of rotation No limit positions must be progr...

Страница 17: ...r drive by pressing the button until the tubular drive con firms All the following settings will then only be executed for this device Open to the permanent upper stop The tubular drive switches off a...

Страница 18: ...solution length adjustment with this limit position setting Open to the desired upper limit position Press the programming button and within 1 second also press the UP button and hold the two buttons...

Страница 19: ...the DOWN button and hold the two buttons down The receiver confirms The limit positions are now set Upper point to lower stop Put the transmitter into master mode Select the tubular drive by pressing...

Страница 20: ...limit position status indicator Deleting individual limit positions Put the transmitter into master mode Select the tubular drive by pressing the button until the tubular drive con firms All the foll...

Страница 21: ...nfirms The limit positions are now deleted Performing the programming run on B Tronic radio receivers Feedback is disabled and it is not possible to program the in termediate positions until the progr...

Страница 22: ...nto master mode Select the receiver by pressing the button until the required receiver con firms All the following settings will then only be executed for this device Open close the shading solution t...

Страница 23: ...thout deleting the previous position Setting the desired intermediate position Open close the shading solution to the desired in termediate position Press the STOP button and within 3 seconds also pre...

Страница 24: ...uccessful with at least one receiver red Deleting the desired intermediate position tilt position Press the travel button for the desired intermedi ate position tilt position twice within one second T...

Страница 25: ...rating mode must take place via the device on which the automatic command was programmed If automatic commands have been programmed by several devices independently they have to be changed to separate...

Страница 26: ...upper stop The distance from the upper stop is automat ically cyclically checked and if necessary corrected The upper anti freeze mechanism is deactivated on delivery Both limit positions must be set...

Страница 27: ...bstacle detection is activated after a revolution of the barrel of approx 140 from the upper limit position If the roller shutter curtain meets an opened fly screen door the drive stops and returns to...

Страница 28: ...aster mode Select the receiver by pressing the button until the desired receiver con firms All the following settings will then only be executed for this device Press the programming button and then t...

Страница 29: ...pen the cover of the battery compartment Take out the batteries Then reinsert the batteries in the correct orientation and then within one second press the master button for at least five seconds unti...

Страница 30: ...succession B Tronic products that were temporarily unreachable during the process should be reprogrammed Select the desired channel Put the transmitter into master mode 1 second Press the programming...

Страница 31: ...while the button is being pressed the batteries are al most empty and must be exchanged as soon as possible If the status LED no longer lights up when a button is pressed the batteries are empty 1 Op...

Страница 32: ...y before mounting in the desired position 2 Fasten the bracket to the wall using the two enclosed screws 3 Now push the screw covers into the screw holes 1 2 3 Cleaning Only clean the device with a su...

Страница 33: ...p to 25 m and up to 350 m in the open What to do if Problem Remedy Receiver is not re sponding Receiver is not re sponding to the master button Insert new batteries Insert batteries correctly Reduce d...

Страница 34: ...eck the batteries Check the power supply at the receiver Function cannot be set Check the functionality in the receiver Simplified EU declaration of conformity Becker Antriebe GmbH hereby declares tha...

Страница 35: ...35...

Страница 36: ......

Отзывы: