background image

42

>>>

NAVIGATION MODE

A list of the available destinations will be
displayed.
Using the 

 buttons or the scroll

wheel, it is possible to scroll through the
list.

>

Select the desired destination.

Route guidance to the selected
destination will be initiated.

Editing Personal destinations

>

In  the  list  of  your  own  destinations,
press the 

 button in front of the

destination that you wish to edit.

Select 

Delete entry

 if you wish to delete

the destination from the list. Select

Delete all entries

 if you wish to delete the

entire list.
Select 

Show details

 if you wish to display

details about the destination.

Press the 

Start

 button to begin route

guidance to the destination straight
away.
You can also display your chosen
destination on the map (

On map

), store it

in  fast  access  mode  (

Save

), display the

route to the destination (

Show route

) or

call the number if a telephone is
connected and a phone number is
available by pressing the button with the

 symbol.

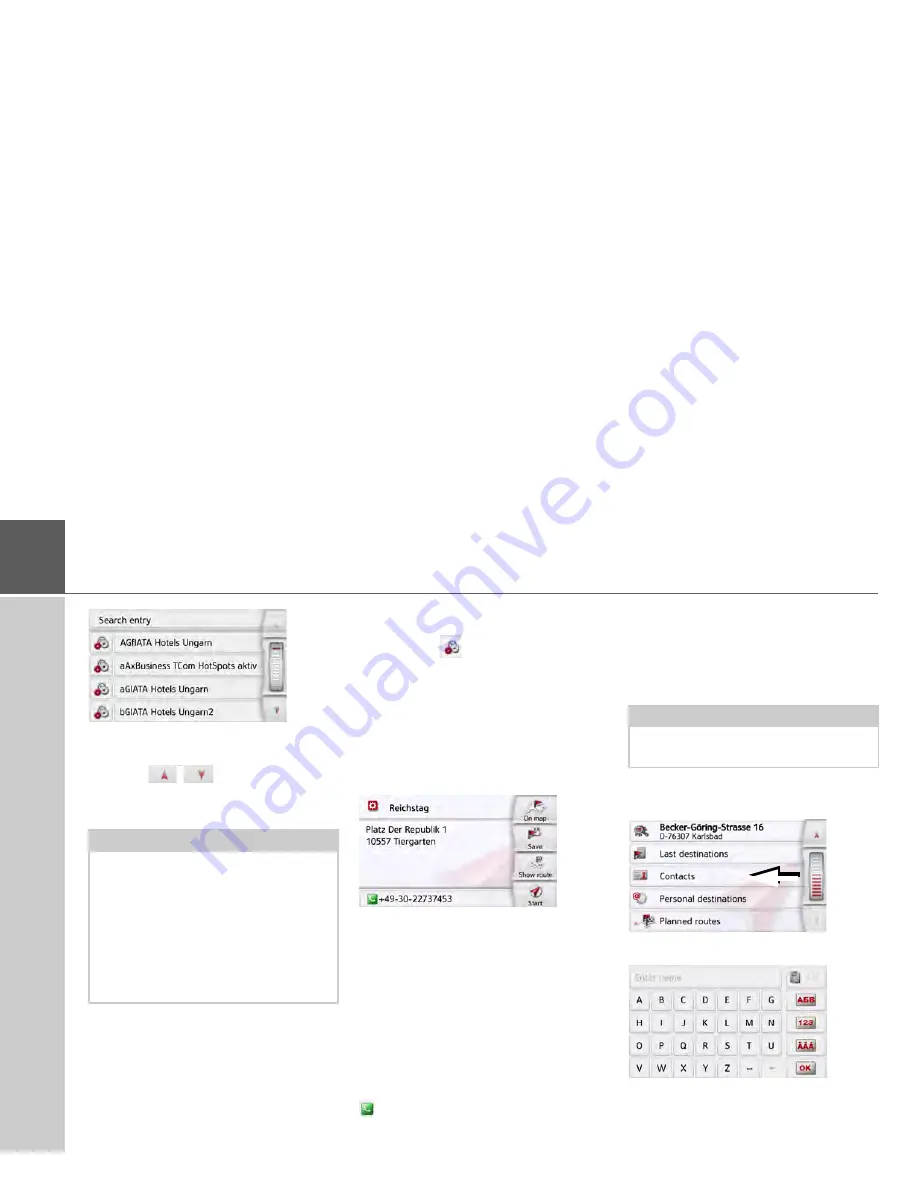
Selecting a destination from Contacts

You can call up Microsoft

®

 Outlook

®

contacts that have been imported into
the Navigation device and start route
guidance to one.

>

In the main menu, press the button 

My

destinations

.

>

Press the 

Contacts

 button.

An input menu appears if there are more
than 10 contacts. If there are fewer than

Note:

If the list contains numerous entries, it
may be a good idea to search for the
desired destination by selecting 

Search

entry

 and using the input menu.

A maximum of 1000 destinations can be
imported.
Newly imported destinations are filed at
the start of the list.

Note: 

The Microsoft

®

 Outlook

®

 contacts are

imported via the Content Manager.

Содержание active.5 LMU BE B00

Страница 1: ...OPERATING GUIDE...

Страница 2: ...arette lighter 21 Connection to the mains outlet 22 Connecting to power supply 22 TMC antenna depending on the model 22 GPS antenna 22 Unit antenna 22 Cable for vehicle integration depending on model...

Страница 3: ...54 Point of interest near to destination 55 POI on route 55 Entering a point of interest directly 55 Calling special destination phone number depending on the model 56 Additional point of interest in...

Страница 4: ...idance 99 Entering deleting a stopover 100 Blocking route temporarily 100 Setting day night display 101 Displaying current position Where am I 101 Entering the destination 103 Skipping a destination 1...

Страница 5: ...een animations 134 Driver profiles depending on model 135 Renaming driver profile 135 Deleting driver profile 136 Driver profile Pro model dependent 136 Service information 137 Factory settings 137 Ca...

Страница 6: ...the buyer immediately after defects are discovered and must be accompanied by the initial buyer s purchase contract The warranty expires after 24 months battery 6 months neither warranty claims nor fu...

Страница 7: ...ns or deviations in data Therefore you must always observe the actual road signs and traffic regulations In particular the navigation system must not be used as an orientation aid at times of poor vis...

Страница 8: ...ions of the product are permitted any such modification leads to the loss of the operating permission Only use original BECKER accessories This way it is ensured that all relevant provisions will be m...

Страница 9: ...in vehicles Protect the product and the accessories from moisture and dirt Navigation The use of the GPS Global Positioning system eliminates the tedious process of looking in street maps The receiver...

Страница 10: ...ress book or phonebook of the cell phone and to read any received short messages Unpacking the Navigation device Checking the contents Before you start using the Navigation device the scope and condit...

Страница 11: ...ofessional 6 LMU BE B50 transit 6 LMU BE B50 ready 5 BE B60 TMC Becker Speech Dialogue System Becker OneShot speech control Speed camera warning Driver warnings Telephone Trip computer Environmental z...

Страница 12: ...Dialogue System Becker OneShot speech control Speed camera warning Driver warnings Telephone Trip computer Environmental zones Truck Camper Navigation Pro Display height profile Move route ADAC Campin...

Страница 13: ...packaging Handling the packaging Keep the original packaging in a dry place at least for the warranty period Description of the device The navigation device consists of the basic unit and the accessor...

Страница 14: ...24 V socket in a vehicle or via the optional mains power supply unit to the 230 V mains USB connection cable With the USB connection cable provided it is possible to connect the Navigation device to a...

Страница 15: ...ovide a brief introduction to operating your Navigation device The most important basic functions of the Navigation device are explained in the Quick Start Guide Operating instructions A comprehensive...

Страница 16: ...evice 2 USB connection cable 3 Unit holder with carrier plate the design depending on the model 4 Cable for power supply via the vehicle cigarette lighter 12 24 Volt with integrated TMC antenna depend...

Страница 17: ...on the left bottom side of the screen or in the left top corner of the housing Press Back function in most applications Press and hold Open the main menu 2 Touch screen showing the main menu selected...

Страница 18: ...ly 4 Connection for reversing camera 5 Connection for vehicle integration 1 2 3 4 5 Model dependent the arrangement of the connections can differ on the bottom side of the device Top of the unit 1 Sta...

Страница 19: ...amage the rechargeable batteries and cause certain plastics to warp or melt Do not store your mobile navigation system in cold environments During operation when the unit warms up to operating tempera...

Страница 20: ...s pixels may be visible on the display Some pixels may also appear brighter or darker However such instances do not represent a product flaw Start up Once the Navigation device has been unpacked and c...

Страница 21: ...dle on the underside of the supporting plate Model dependent this step is not required on navigation devices with magnetic holders Insert the adapter into the cigarette lighter Note Note that if the b...

Страница 22: ...emove the cable of the TMC antenna from the cable for the cigarette lighter Model dependent the cable cannot be disconnected on navigation devices with magnetic holders GPS antenna Unit antenna The GP...

Страница 23: ...r view camera to your navigation device using a 4 pin 2 5mm AV cable Insert the cable into the socket provided on the back of the basic unit also see page 18 You can make the necessary settings in the...

Страница 24: ...d and place it in the packaging while ensuring not to touch contact bar Unit bracket The Navigation device can be attached directly to the windscreen with the unit holder Fitting the unit bracket Note...

Страница 25: ...plate onto the four retaining lugs of the unit holder Select a suitable spot to attach Loosen the fastening screw slightly Press the base with its suction surface against the windscreen Turn the unit...

Страница 26: ...f the carrier plate This unlocks the Navigation device which can be removed from the carrier plate Devices with magnetic holders The unlocking button is not present First place the navigation device w...

Страница 27: ...ent is given Confirm your selection by pressing the OK button The following prompt appears shortly afterwards If you agree to the request contained in this prompt press the OK button Switching off dep...

Страница 28: ...ction is started from the menu see also page 137 Note We recommend that you place the Navigation device in sleep mode in the event of short interruptions to operation of up to a week This significantl...

Страница 29: ...ains further information and operating options You can tell whether a telephone is already connected by the symbol on the Phone button Telephone connected Telephone not connected A satellite symbol at...

Страница 30: ...the process is concluded by pressing the key and the entry passed on to the Navigation device for processing When a navigation destination is entered the Navigation device compares the data with the s...

Страница 31: ...d UE if necessary If for example you are looking for the location W rzburg then simply press WUERZBURG or WURZBURG Special characters can be useful when naming destinations and routes In order to swit...

Страница 32: ...ton marked with an arrow Switching between upper and lower case During free text entry it is possible to switch between upper lower case and the automatic function Press repeatedly on the button in th...

Страница 33: ...The main menu is displayed by pressing and holding the button Content Manager The Content Manager is a PC based application containing a number of important functions to help you manage the content o...

Страница 34: ...wse and define another folder Click on Install to start the copying procedure Click on Details to see the details during copying The Content Manager is automatically started immediately after installa...

Страница 35: ...al update the Exit button will be shown instead of the No button You must install the new version otherwise you have to exit the application If you have not yet made a backup of the navigation unit th...

Страница 36: ...vice using the On Off switch If the messages reappear or the unit doesnot function correctly for any other reason please contact your local dealer You can also try to find a solution to your problem i...

Страница 37: ...ove sea level can be calculated if signals are received from four or more satellites The Navigation device determines the direction and distance from the destination using a navigation computer and a...

Страница 38: ...tination as described under The New destination menu on page 43 If you have already entered your home address you can start route guidance to your home address in the first line A home address once en...

Страница 39: ...up using the fast access function The destination list The destination list displays line by line all destinations available for fast dialling Each line of the destination list is divided into two fie...

Страница 40: ...button to the left of the desired destination A selection menu appears Icon Meaning Thisdestinationisastandard destination with no special features This destination is protected If the destination mem...

Страница 41: ...vice and start route guid ance to one In the main menu press the button My destinations Press the Personal destinations button Remove protection The protection is re moved from the desti nation This f...

Страница 42: ...chosen destination on the map On map store it in fast access mode Save display the route to the destination Show route or call the number if a telephone is connected and a phone number is available by...

Страница 43: ...e address shown for the contact on the map On map store itin fast access mode Save display the route to the destination Show route or call the number displayed if a phone number is provided button wit...

Страница 44: ...here See Travel Guide model dependent on page 56 Select on map With the button Select on map you can select a destination directly on the map and start route guidance See Selecting a destination from...

Страница 45: ...tion address in the address input menu The following settings can be made in the address input menu Town Zip code or postal code Street and house number Junctions as an orientation aid It is also poss...

Страница 46: ...hen sufficient letters have been entered it will automatically switch to a list from which you can select the town However you can switch to the list before this by pressing the button Using the town...

Страница 47: ...Once a few letters of the desired street have been entered you can display a list of all the streets with the relevant letter combinations or this list will be displayed automatically Press the butto...

Страница 48: ...Start button The other options on this screen are described under Displaying the whole route on page 97 Storing a destination In the address input menu the Save button opens a menu where a name can b...

Страница 49: ...red you will be asked whether the new destination should replace the old destination or the waypoint Select Replace stopover or Replace old destination Note The symbols above the progress bar refer to...

Страница 50: ...route or store the address as described on page 48 Notes Only one address can be entered using the voice entry function Lists for more precise selection cannot be operated using speech The destination...

Страница 51: ...isplayed after a short time with your entry filled in You can then start route guidance display the route or store the address as described on page 48 Speech Dialogue System selected models The Speech...

Страница 52: ...ou useful information about speech entry For example it lists all phrases which can be used as soon as the speech dialogue is started As well as these global commands you will also find help for enter...

Страница 53: ...t displayed Select one of the available categories For some categories e g petrol stations a further selection menu is displayed in which you can narrow down the choice further e g by brand Note You c...

Страница 54: ...layed on the map On map saved in fast access mode Save used for displaying a route to the POI Show route if a telephone is connected and a phone number is available by pressing the button with the sym...

Страница 55: ...y on page 53 POI on route Press the POI on route button The available Point of Interest categories available on the whole route will be displayed Select the desired point of interest on the route as d...

Страница 56: ...e bottom of the point of interest information screen The call will be initiated Additional point of interest information Any additional information that is provided for a point of interest can also be...

Страница 57: ...hosen point using the POI nearby button However you can also store your chosen point in fast access mode Save or display the route to the point of interest Show route You can select a new destination...

Страница 58: ...Press the button Where possible an address matching the coordinates will be displayed You can view the destination on the map store it display the route to the destination or start the route guidance...

Страница 59: ...allow you to delete the route from the stored routes Selecting and starting a route Press a route to select it The route is loaded and displayed in the stage menu Press the top button Select the start...

Страница 60: ...ng die Taste Create new route You can now enter an intermediate des tination as described under The New destination menu on page 43 Enter ad dress Select from last destinations Se lect Point of Intere...

Страница 61: ...llowing options are available Option Meaning Show details The data relating to the intermediatedestination is displayed From this screen you can display the intermediate destination on the map Enterin...

Страница 62: ...yed Navigation settings The navigation settings contain all the settings that are relevant to the navigation functions In the main menu press the button PresstheNavigation settings button This will ta...

Страница 63: ...hould be displayed in 3D mode Further setting options are available to you in the extended settings Press the Map view button in the settings menu The Map view settings window appears Press the button...

Страница 64: ...u can select whether or not 3D buildings available in towns should be displayed in 3D mode or not This option is only available with the 3D view active Street names 2D Street names 3D You can select w...

Страница 65: ...t You can then switch the display of entire categories on or off After pressing the button beside a category you can switch subcategories in further menus on or off Confirm all your settings by pressi...

Страница 66: ...ute overview button With the options in this setup menu you can select the Points of Interest to be displayed and whether TMC reports are displayed in the map view when pressing the Route overview but...

Страница 67: ...s enabled a small arrow indicates which lane you should move into in the case of multi lane roads Signposts When this function is activated you receive additional important information at traffic junc...

Страница 68: ...bled you will automatically receive generally applicable traffic information for the relevant country when you cross a national border e g speed limits Lane Assistant Pro 3D If this function is acti v...

Страница 69: ...d mobile home profile General truck profile Car profile Motorcycle profile Bicycle profile Pedestrian profile After selecting the desired profile it is displayed You can now change the selected profil...

Страница 70: ...he car or truck profile menus displayed You do not have any further setting op tions for all other profiles For the car profile For the general truck profile or saved truck profiles depending on the m...

Страница 71: ...and name The window is displayed for select ing the maximum speed Setting size In the profile settings press the button for setting the size Press the button next to the dimension to be entered An en...

Страница 72: ...el category ADR In the profile settings press the button for setting the tunnel categories Select the required tunnel category If you do not select any of the available restrictions B to E all tunnels...

Страница 73: ...the route calculation provided this is available This provides a more accurately calculated arrival time and may even result in a different route being selected 2 Option Meaning Fast route With this...

Страница 74: ...utomatic search procedure presets the transmitter with the best reception The currently received TMC transmitter appears on the display The TMC announcements can be spoken by the voice if the navigati...

Страница 75: ...or switch off voice announcements completely Interior noise level With the Interior noise level button you can adjust the speed dependent volume control To do this select the interior volume level su...

Страница 76: ...lection by pressing the button Setting the Volume With the Volume settings window you can set the standard volume for voice announcements for each start of the Navigation device or switch off voice an...

Страница 77: ...whether speed limits are displayed in parallel to the navigation You can also receive an audible warning about exceeding the speed limit Speed camera warnings You can receive a warning about permanen...

Страница 78: ...s category includes other traffic regulations such as no passing zones General warnings This category includes all other warning signs such as steep gradients falling rocks Informatory road signs This...

Страница 79: ...vailable Note This information can only be displayed if it is contained in the map material Risk of accident The information in the map material may be incorrect as a result of short term changes road...

Страница 80: ...ek for the whole day You can now set whether or not the road should be blocked for each day of the week Press the buttons with the days on which the road should not be blocked Press the clock symbol u...

Страница 81: ...button This menu allows the calculation of an economic route by using the fuel consumption of the vehicle Press the Vehicle data button The Vehicle data window is displayed The following settings can...

Страница 82: ...imes and distances In the settings menu press the Format button The Format settings window appears Press the Time button to switch be tween the 12 hour clock and the 24 hour clock Press the Distance b...

Страница 83: ...ions via the TMC Traffic Message Channel in addition to the radio programme and are received and analysed by the navigation system Receiving traffic announcements is free of charge The Navigation devi...

Страница 84: ...WiFi Settings on page 138 we describe how to create a data connection Displaying TMC messages on the map Current TMC messages are displayed on the map graphically Sections of the route where there are...

Страница 85: ...ll through the list using the arrow keys or the scroll wheel on the right hand edge of the screen The following is displayed for each traffic announcement The type of problem and the street number mot...

Страница 86: ...ction to automatic manual or never in the menu in the navigation settings with the TMC option see The TMC button on page 74 Automatic recalculation If the traffic on your route is obstructed the Navig...

Страница 87: ...r current position and for example to receive warnings about exceeding the speed limit Calling up the map display The map display is called up automatically when you start route guidance Without route...

Страница 88: ...ptions Traffic lane recommendation only appears on some multi lane roads green arrows recommended lanes Vehicle position Current street or street to which the next driving maneuver leads Distance to t...

Страница 89: ...row with a distance indication underneath it If two driving manoeuvres are to be performed in succession within a short time another smaller arrow indicating the second driving manoeuvre is displayed...

Страница 90: ...model Speed limit of the street currently being driven on display is not available for all streets Next driving maneuver Traffic lane recommendation only appears on some multi lane roads green arrows...

Страница 91: ...the tunnel is displayed in the bottom on the right When you touch the display the tunnel view disappears If any maneuvres are performed in the tunnel or if the next maneuvre is performed outside the t...

Страница 92: ...ments can be adjusted Press the speaker symbol in the preview area while route guidance is active On the top edge of the image the Mute button is displayed with a speaker symbol A bar diagram and the...

Страница 93: ...ve it in the required direction The map is then moved accordingly You can also select a point as a destina tion as described under Selecting a des tination from the map on page 57 Map orientation When...

Страница 94: ...and if the TMC on route option is activated in the Navigation settings Route overview menu TMC events displayed on the selected route Press the button A list of POIs and traffic events are displayed...

Страница 95: ...ge is displayed with the question You are probably standing in a traffic jam Would you like to avoid the jam using a detour Now you can have the suggested detours displayed and select or reject them I...

Страница 96: ...or a toll road the assistant displays the appropriate POIs in the vicinity or calculates a detour that supports the driver in avoiding the given route section If the assistant has calculated a detour...

Страница 97: ...n the left hand side It takes just a short time for the function to be come available and the icon to change As soon as this icon is displayed and you select it the route displayed can be moved Press...

Страница 98: ...ing route sections roads You can block individual route sections roads The Navigation device then calcu lates a sensible diversion to avoid the blocked section Use the and buttons in the route directi...

Страница 99: ...lect the desired route by pressing the buttons on the right Change route options Only available when route guidance is active You can change the route options route selection etc during route guidance...

Страница 100: ...ered the desired stopover the route is recalculated The stopover is indicated on the map by a red flag Deleting a stopover Call up the options menu for the map display Press the Delete stopover button...

Страница 101: ...this position Furthermore you can display information regarding the current GPS reception and the current country Call up the options menu for the map display Press the Where Am button The current pos...

Страница 102: ...ity Also see chapter Points of interest on page 52 With the Petrol Station button you can change directly to the places of interest category Filling station in the current vi cinity Also see chapter P...

Страница 103: ...f the map display See Map display options on page 96 After a short time the map is displayed Each route is calculated after each other and displayed on the map The area on the right hand side shows th...

Страница 104: ...ess the Cancel button or to re turn to the last entry Press the Next button to start the naviga tion The following is displayed for each re striction A graphic for the restriction The distance from th...

Страница 105: ...is similar as described in the chapter Warning with planned route Furthermore the navigation system will display in which direction you can or can not drive at intersections provided that the informat...

Страница 106: ...file If you select a point by touching the pro file the corresponding height and dis tance from the starting point are dis played for it Press the button to go back to the route view Height profile fo...

Страница 107: ...ready connected to a cell phone the telephone menu is displayed If Bluetooth wireless technology is not activated upon calling up the telephone function the system will prompt you to switch Bluetooth...

Страница 108: ...from the phonebook to display the telephone book to call up the call list To search for Bluetooth telephones To disconnect the connection to a cell phone If Bluetooth is activated and the Navigation d...

Страница 109: ...ss the Dial button Press the Phone book button If there are more than 10 entries in the phonebook an input menu is displayed If there are less than 10 entries a list with the entries will be displayed...

Страница 110: ...phone number The Navigation device then attempts to establish a connection to the phone number selected You can find out how to continue operation in Telephone calls on page 116 Note For example if yo...

Страница 111: ...all list is divided into fields Each list field is designed as a button On the right button the number name is displayed and the features of the entry are displayed with the left icon Icons used The f...

Страница 112: ...ing the Missed Received and Dialled buttons Using the buttons you can scroll through the list in the corresponding direction of the arrow To initiate a call press the button with the entry you want Se...

Страница 113: ...already connected to the Navigation device Each line of the device list is divided into two fields Each list field is designed as a button On the right button the device is named and its features are...

Страница 114: ...st Press the Search Bluetooth phones button The search starts During the search any devices found are displayed and you may cancel the search by pressing the Stop search button After the search or aft...

Страница 115: ...necting a mobile phone You can also attempt to establish a connection to the Navigation device from the mobile phone If a request is received from a mobile phone that has not yet been connected you wi...

Страница 116: ...ing tone will sound Also the following is displayed If available the phone number and name of the caller are displayed For incoming calls you have several operating options If you have switched on the...

Страница 117: ...ty are displayed If route guidance is active then you will receive the navigation instructions with arrows on the call screen To call the options menu of the call screen press the Options button Volum...

Страница 118: ...Press the Hands free button to make and receive calls again via the Navigation device prior to ending the call Telephone settings The telephone settings include all the settings relevant for the telep...

Страница 119: ...With this function you can set whether or not or after which time an incoming call is accepted automatically In the settings menu press the Answer call automatically button Select whether incoming ca...

Страница 120: ...ress the Refresh button Be aware that it may take several minutes to load the phonebook Bluetooth name With this function you can assign a name for your Navigation device This assigned name will then...

Страница 121: ...Rear View camera Displaying Rear view camera depending on the model When a reversing camera is connec ted to your navigation system and the reversing camera setting is set to Ma nual see Rear view ca...

Страница 122: ...ining images Thumbnails of the images in the current folder View the previous page of images folders Go up one level in the directory hierarchy View the next page of images folders Selecting an image...

Страница 123: ...ge menu Press the Zoom button Move the control on the top of the screen to the desired level of magnifi cation The image can then be moved around Press the centre of the image to cancel the enlargemen...

Страница 124: ...transition effects for the images In Load pictures in high quality slower you can choose whether images should be loaded at high resolution or not Loading the images at high resolution makes the disp...

Страница 125: ...for numerous countries maximum permit ted speed alcohol limits etc Press the Country information button The list of countries is displayed Press the button for the desired country The country specifi...

Страница 126: ...d by touching the map The points will be marked by the letters A and B Define the direction of blockage for the road section from A to B or from B to A Additionally you can display a list of permanent...

Страница 127: ...utton to set a block for an entire day Press the Use setting for button to also use the block on other days Press again the back button to confirm the settings and to exit the menu Trip computer depen...

Страница 128: ...cord up to 300 laps in the same way Press the Stop button to stop the recording The time continues if you press the Start button again after stopping the recording Press the Reset button to delete all...

Страница 129: ...ettings menu You can select the various settings optionsfrom the system settings menu Operation Selection options Select the desired menu item by press ing the appropriate button The function ality of...

Страница 130: ...splay and shows the settings menu Automatic on off The Navigation device can switch automatically to sleep mode when the vehicle ignition is switched off Prerequisite for this The Navigation device mu...

Страница 131: ...ween day and night display de pending on the time the current position and the time of year With the following button you can call up the setting Press the Day Night button Select from Automatic Day a...

Страница 132: ...ng the day Confirm your selection by pressing the back button Design by night Two schemes with different contrasts are available to select for the map display at night Press the Design by night button...

Страница 133: ...tton is labelled with the language name and the associated national flag Scrolling Using the buttons or the scroll wheel it is possible to scroll through the list in the direction of the relevant arro...

Страница 134: ...tio nal on page23 you can display the image of the rear view camera on your navigation system Press the button rear view camera You can choose from the following options Screen animations You can swit...

Страница 135: ...be named in dividually This function can be useful for example if several drivers use the same navigation system Many settings and regular destinations are stored in the driver profiles The following...

Страница 136: ...st connected phone is not found your navi gation device checks whether another telephone is within reach that was se lected as a trigger for changing the pro file Press the Set Auto connect button A l...

Страница 137: ...reset your Navigation device to the factory settings The following updated data is deleted saved destinations saved routes the home address telephone data images videos etc saved on the internal memo...

Страница 138: ...d for your WiFi hotspot here If you have previously connected to a network you can select it from this list without having to enter a password again If you have previously connected with a WiFi hotspo...

Страница 139: ...to each satellite from the running time differences and thus evaluates its actual current position in terms of geographical length and width In order to determine the position signals from at least th...

Страница 140: ...as softly as possible i e without the danger of scratching the screen The stylus is more accurate than opera tion using the fingers since only the thin tip touches the screen In addition dirty marks o...

Страница 141: ...ation 68 125 Current position 101 D Destination from map 57 Destination input menu Start 44 Destination list 39 Destination memory changing 40 111 Scroll 40 Destinations Entering 44 Protected 40 Stand...

Страница 142: ...9 Update 120 Photo 121 Point of Interest on the route 55 Points of interest Call 56 entering directly 55 in the vicinity 53 near the destination 55 near to an address 54 Q Quick access Icons 111 R Res...

Страница 143: ...ngs 129 T Telephone menu 108 The main menu 29 Time of day format 82 Time zone 82 TMC 74 83 Displaying TMC messages on the map 84 Route recalculation 86 TMC antenna 22 Toll roads 74 Traffic information...

Страница 144: ...6 MB 256 MB 256 MB 256 MB 256 MB 256 MB 128 MB Li polymer battery 1250 mAh 1250 mAh 1250 mAh 1250 mAh 1550 mAh 1550 mAh 1300 mAh 1600 mAh 1600 mAh 1250 mAh TMC Holder for vehicle integration Bluetooth...

Страница 145: ...00 mAh 1500 mAh 1500 mAh 1500 mAh TMC Holder for vehicle integration Bluetooth hands free device Dimensions in mm W x H x D 184x115x15 184x115x15 184x115x15 184x115x15 Screen size 17 8 cm 17 8 cm 17 8...

Страница 146: ...ctronic devices as well as interfering influences on your unit from other electrical electronic devices are largely prevented EU Declaration of Conformity The United Navigation GmbH hereby declares th...

Страница 147: ...life Please bring this product to the appropriate collection sites for processing and recycling The units will be accepted there free of charge The proper disposal of this product serves the purpose o...

Страница 148: ...uipped for this purpose statutory obligation to return It is the duty of the retail and of manufacturers to take back these batteries free of charge and to correctly recycle them or to dispose of them...

Страница 149: ...er Lever off the rear of the housing using a flat blade screwdriver placed at the slits on the sides of the housing Remove the circuit board if necessary to do this you first have to remove the screws...

Страница 150: ...ng a flat headed screw driver placed between the display and display frame Remove the 5 screws You can now lever off the front of the device from the back panel using a flat headed screw driver Then r...

Страница 151: ...3LGRCB TGE RGML K J E LJ KL E JG Germany UUU KW CAICP AMK...

Отзывы: