background image

6

7

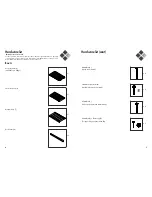
Assembly Contents

x 2

End panels  
(with wooden dowels pre-assembled)  
(1) + (2)
L x 1pc 
R x 1pc

x 2

Flat top rail (3)

x 2

Arched top rail (4)

Box B

x 2

Metal guide pin (F) 
(for lower side dropside panel assembly)

x 2

15mm Bolt (G) 
(For dropside pin hole assembly)

x 12

Nut (H) + 20mm bolt
(preassembled)

Hardware list (cont)

Screwdriver (not supplied)

x 1

Allen key (I)

x 1

Содержание 091234

Страница 1: ...OXFORD COT MODEL 091234 IMPORTANT RETAIN FOR FUTURE REFERENCE READ CAREFULLY ...

Страница 2: ...ur products the photographs and illustrations shown in this instruction manual are generic therefore product fabrics colour and design may vary from images shown CNP Brands reserves the right to alter product specifications without notice as a result of our ongoing policy of product improvement Assembly contents list Assembly instructions How to care for your bebe care cot Contents Congratulations...

Страница 3: ... mattress base x 8 22mm Bolt D Plastic ring E For upper dropside panel assembly x 2 x 8 60mm Bolt Barrel nut B for toddler bed mode assembly You have received 2 boxes Please check the contents of the boxes against the list below If anything is missing please contact Customer Service In Australia contact CNP Brands on 1300 667 137 in New Zealand contact Wainhouse Distribution on 0800 567 5000 Check...

Страница 4: ... 2 L x 1pc R x 1pc x 2 Flat top rail 3 x 2 Arched top rail 4 Box B x 2 Metal guide pin F for lower side dropside panel assembly x 2 15mm Bolt G For dropside pin hole assembly x 12 Nut H 20mm bolt preassembled Hardware list cont Screwdriver not supplied x 1 Allen key I x 1 ...

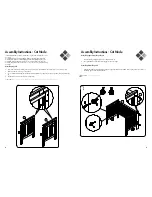
Страница 5: ... are involved in assembly children should be kept clear of the assembly area Dispose of all packaging material immediately after the cot is assembled Identify all parts and components Clear an area on the floor for assembly and place a sheet on the floor to ensure the cot is not scratched during assembly Attaching top rails 1 Select either the Flat top rails 3 or the Arch top rails 4 to be attache...

Страница 6: ...evel when inserting it otherside it will cause damage to the cot 3 Ensure the plastic ring in figure 1 lines up with the bottom opening in figure 2 Ensure the plastic ring is guided into the wide opening Locate the plastic ring to be guided into the opening 2 1 Assembly Instructions Cot Mode 4 5 5 Attaching mattress base 1 Attach each side of the mattress base 7 to one end panel using two 45mm C c...

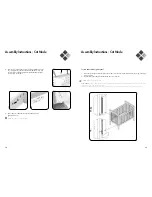
Страница 7: ...he drop side panel is in the upper most position as shown Please ensure that the fixed side panel also has the contour top rail of the fixed side panel in the upper most position D E F Assembly Instructions Cot Mode Assembly Instructions Cot Mode 5 Once the top of the dropside panel is in place and lined up with the slot slowly guide the panel downward whilst simultaneously prying the legs of the ...

Страница 8: ...ide track 9 Repeat previous steps 2 6 to attach the second bed rail 8 10 Tighten all bolts Do not over tighten 11 Remove four drop side guiding pins D E F to avoid a potential protrusion hazard 12 Toddler bed is now ready for use WARNING This cot is designed to be used as a toddler bed when it is assembled with the cot bed rails included The toddler bed is only designed for use when the child can ...

Страница 9: ...ovide to CNP Brands with an original proof of purchase For example an original retailer purchase receipt bill of sale invoice lay by docket credit card receipt or similar proof of purchase 1 8 If CNP Brands decide to repair a product this product may be replaced by refurbished products of the same type rather than being repaired Refurbished parts may be used to repair the product Replacement of th...

Страница 10: ...30 Customer Service 1300 667 137 W www cnpbrands com au E info cnpbrands com au Distributed in New Zealand by Wainhouse Distribution 2 6 Argyle St Morningside PO Box 41 014 St Lukes Auckland New Zealand Customer Service 0800 567 5000 E helpline wainhousedist co nz ...

Отзывы: