background image

14 

>

>

[ Use Manual ]

15

14 

>

>

• Bluetooth Pairing •


12


14

13


11


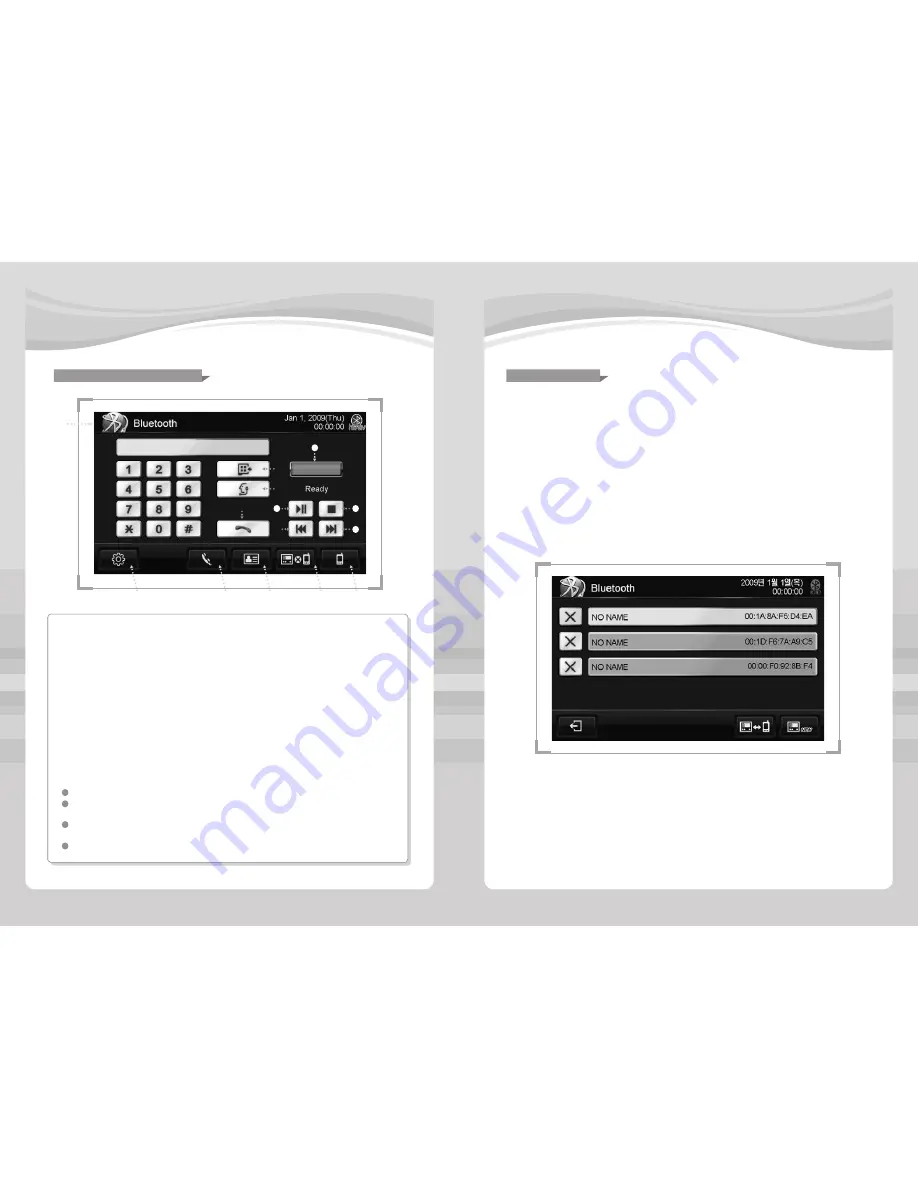
• Bluetooth Touch Screen Controls •


Current Source Indicator : Displays source currently playing.


Re-dial Button : Press to redial with previous phone number. Some mobile device cannot    


                works properly for this function or required to press this button twice.


Voice-dial Button : Press to dial with voice recorded number. 


                     Some mobile device cannot support this function.


Talk Button : Place an outgoing call.


Setting Menu Icon : Press to access Bluetooth setup menu. Refer “III. 


                       How to set up- Bluetooth Setting”.


Call History Button : Press to access incoming and outgoing call numbers list.


Phone Book List : Touch this icon to access phone book list transferred from mobile device.


Disconnect Button : Press to disconnect mobile device and head unit.


Pairing Device Button : Touch this icon to pair mobile device or see paired device with this  


     head unit.


Previous Track : Touch this icon to go back to previous track, playing audio function in mobile  


              device.

      Next Track : Touch this icon to go to next track, playing audio function in mobile device.
      Stop : Touching this icon to stop playback completely and will restart from the beginning of  

                 MP3, playing audio function in mobile device.
      Play/Pause : Touching this icon will temporarily stop playback of MP3. Touching it again will  


        resume playback, playing audio function in mobile device.

      Call Time Indicator : Display call time.

11


12


13


14

Pairing 

Before you can use a mobile device with this head unit, it must be authenticated. 

This is also referred to as “pairing” a device.

Note :

 Please make sure that Bluetooth is activated on your mobile device before you begin the pairing 

process. Refer to the owner’s manual of your mobile device for more details.

Step 1

Press “

 Pairing Device Button” on Bluetooth main screen and touch “New device” icon to begin the 

pairing process. The head unit will display “Wait Pairing…” and will search for any nearby Bluetooth 

device. If you have more than one Bluetooth device, please make sure only the device you want to 

connect to is powered on. Refer to the owner’s manual of your mobile device for more details on 

searching for Bluetooth devices.

Step 2

When prompted by your mobile device. Enter the PIN code or pass code. The PIN code will be set on 

“Bluetooth Set”. 

Содержание Evolve N-1

Страница 1: ...Beat Evolve N 1 User Manual www beat audio co uk ...

Страница 2: ...tings Page 2 3 3 SYSTEM Settings Page 3 3 4 VIDEO Settings 5 AUDIO Settings Page 1 3 6 AUDIO Settings Page 2 3 7 AUDIO Settings Page 3 3 8 DVD Settings Page 1 3 9 DVD Settings Page 2 3 10 DVD Settings Page 3 3 11 Radio Settings 12 iPod Settings Optional 13 AUX Settings 14 CAMERA Settings 15 Bluetooth Settings IV Installation Troubleshooting Specifications 1 BeforeYou Start 2 Wiring Diagram 3 Troub...

Страница 3: ... injury or death to the vehicle s occupants or persons outside the vehicle and or property damage 2 Safety Information Please read all instructions carefully before attempting to install or operate Due to its technical nature it is highly recommended that your G 9 is installed by a professional installer or an authorized dealer This product is only for use in vehicles with 12VCD negative ground on...

Страница 4: ... screen together NAVI Press NAVI to select Navigation mode EJECT Press EJECT to insert or eject DVD or CD Remote sensor The part of remote controller sensor Monitor Notes The angle can be selected via the screen setting menu The color of the LCD monitor varies between viewing angles Select the angle with most optimum view for your location The last position of the monitor can be saved in memory II...

Страница 5: ...facing up insert a standard disc into the slot The panel will close and the disc will automatically begin playback Only one disc can be inserted at a time 2 Press EJECT key to eject a disc Insert Map SD card 1 Press EJECT key to open panel down or set panel angle down in setting menu 2 With label facing up put Map SD card into SD card slot on the bottom of panel 3 Push SD card to eject USB connect...

Страница 6: ...stralia New Zealand Mexico South America 5 Eastern Europe Russia India Africa 6 China Current Source Indicator Displays source currently playing FM Band Show which band the radio is tuned to FM 1 FM 2 FM 3 Local DXTuning Mode Shows when local or distance tuning is on Preset Number Indicator Show what preset has been selected Tune Button Touching this icon will tune the radio adjust frequency by on...

Страница 7: ...urce Indicator Displays source currently playing TrackTime Indicator Shows how much time has elapsed in the current track Disc Folder List Display all disc folders and touch a folder to select TrackTitle List Display all tracks in selected folder and touch a track to select Play Pause Touching this icon will temporarily stop playback of the DISC Touching it again will resume playback Stop Touching...

Страница 8: ...playing audio function in mobile device Stop Touching this icon to stop playback completely and will restart from the beginning of MP3 playing audio function in mobile device Play Pause Touching this icon will temporarily stop playback of MP3 Touching it again will resume playback playing audio function in mobile device CallTime Indicator Display call time 11 12 13 14 Pairing Before you can use a ...

Страница 9: ... with OPP Object Push Profile in user s mobile phone and not supports for PBAP Phone Book access profile Phonebook list is downloaded from user s mobile phone and store in the memory of head unit To use phonebook function user has to download phonebook list from mobile phone to this head unit and re download whenever phonebook list is changed and updated The contents in incoming call list outgoing...

Страница 10: ...ing this icon will temporarily stop playback of the file Touching it again will resume playback Stop Touching this icon to stop playback completely and will restart from the beginning of the file PreviousTrack Touch this icon to go back to previous track Keep press to operate F R NextTrack Touch this icon to go to next track Keep press to operate F F Repeat Touch this icon to repeat the currentTra...

Страница 11: ...ll cycle the repeat mode Shuffle Touch this icon to shuffle all tracks iPodVideo Browsing Touch this icon to bring up the video contents list in iPod Current Source Indicator Displays source currently showing Press this icon to exit Settings menu Page Button Press this icon to move next page Tilt Position Set for best viewing angle for your vehicle Tilt Movement Select AUTO to make the last positi...

Страница 12: ... with previous source sound OFF Manually rearview camera on BeepTone Mode Select the touch beep sound on or mute Time setting Touch this area to adjust time Touch Adjustment For proper calibration you must touch each pointer for 2 seconds Factory Set Touch this icon to load all factory parameters to their original settings 2 SYSTEM Settings Page 2 3 3 SYSTEM Settings Page 3 3 ...

Страница 13: ...st the sharpness Bass Gain Adjust the relative volume in Bass range 10 10 Bass Frequency Set the bass center frequency for optimal bass effect Mid Gain Adjust the relative volume in Mid range 10 10 Mid Frequency Set the mid center frequency for optimal mid effect Treble Gain Adjust the relative volume inTreble range 10 10 Treble Frequency Set the treble center frequency for optimal treble effect 4...

Страница 14: ...t AMP EXT AMP using external AMP Rear Right Sound Mode Adjust the relative volume in rear right speaker AUTO SPEAKER using this head unit AMP EXT AMP using external AMP Equalizer FLAT POP JAZZ CLASSIC LIVE ROCK Balance Adjust the relative volume balance in left right speaker Fader Adjust the relative volume balance in front rear speaker High pass Filter Sets the frequency which affects the 4 speak...

Страница 15: ...ize of front speaker Rear Speaker Select size of rear speaker Center Speaker Select ON if a center speaker is included in your system Woofer Speaker Select ON if a subwoofer speaker is included in your system SpeakerTest Touch this icon to test the speaker system Notes 6CH mode must be selected to adjust speaker size and Center Woofer speaker 8 DVD Settings Page 1 3 9 DVD Settings Page 2 3 Step 1 ...

Страница 16: ...onal 11 Radio Settings 13 AUX Settings Step 1 Select the RADIO mode on menu screen Step 2 Touch Current Source Indicator icon to access menu screen or press MODE key on front panel Step 3 Touch the Setting icon to change RADIO setup Step 1 Select the AUX mode on menu screen Step 2 Touch Current Source Indicator icon to access menu screen or press MODE key on front panel Step 3 Touch the Setting ic...

Страница 17: ...ccess setup screen Connection Role Select connection profile referring mobile device s manual HF HS AV HF HS AV Auto Connect The head unit will automatically connect to a previously paired phone Auto Reception The head unit will automatically receive incoming call Bluetooth Gain Adjust the relative volume in the Bluetooth mode Mic Gain Adjust the relative volume in the Mic sound PIN Code Set the P...

Страница 18: ... law and is prohibited 2 Wiring Diagram TV Antenna Radio Antenna GPS Antenna iPod DVD_USB BLACK USB Camera video IN YELLOW RCA Reverse Gear IN ORANGE Lineout Center GRAY RCA Lineout Woofer BLUE RCA Lineout left front WHITE RCA Lineout right front RED RCA Lineout left rear WHITE RCA Lineout right rear RED RCA Aux audio left IN WHITE RCA Aux audio right IN RED RCA Aux audio IN YELLOW RCA Aux audio l...

Страница 19: ...p Select reverse gear DVD does not start playback Physical defect in media Wrong region Check media for scratches Check region code on disc Bad Disc appears on display Focus error or disc is in upside down Press eject key or restart Item Description FM Tuning range 87 5MHz 107 9MHz Usable sensitivity 10dB Stereo separation 25dB Frequency response 60Hz 12kHz AM Frequency response 531kHz 1 620kHz Us...

Страница 20: ...www beat audio co uk ...

Отзывы: