background image

16. 

Align front corner Window Wall Panel as per

Steps 11 & 12

. using 3 - 2 1/2” screws to secure

wall studs together.

17. 

Locate 

Narrow Wall Panel

and position once again so 2x3 bottom wall framing sits flush on floor

and wall siding overhangs. 

Note:

Narrow Wall Panel is only 73” high.

18. 

Secure as per 

Step 12.

19. 

Locate 3” wide 

Door Jamb

and place on

wall stud to the right of door opening.

Door Jamb

7ROO)UHHZZZEHDULFXGDFRPLQIR#EHDULFXGDFRP

Page 9

Содержание SAG HARBOR

Страница 1: ...keep the structure securely grounded have a regular maintenance plan to ensure screws doors windows and parts are tight Customer agrees to hold HDULFXGD Partnership and any Authorized Dealers free of any liability for improper installation maintenance and repair Toll Free 1 www EHDULFXGD com LQIR EHDULFXGD com Page 1 8x4 6DJ DUERU Garden Shed Assembly Manual Revision 12 March 16 2012 In the event ...

Страница 2: ... 4 x 2 x 75 Corner Filler Trim 2 x 2 x 78 Vertical Door Trim 2 x 2 x 80 Front Side Corner Trim 4 x 2 x 88 Rear Middle Trim Opt Door Trim 2 x 4 x 78 Front Corner Trim 2 x 4 x 88 Rear Corner Trim 1 x 1 x 32 Horizontal Door Trim 1 x 2 1 2 x 8 1 2 Horizontal Narrow Wall Trim 2 x 4 x 51 5 8 Roof Ridge Board 2 Detail Facia Plate Larger for Rear Facia 1 Window Insert 1 Window Trim Pkg 1 24 1 16 angle cut...

Страница 3: ...ses Work Gloves Safety Equipment Required Not Provided Ladder Screw Gun Drill Tape Measure Hammer Wood Clamp Level Pliers Tools Required Not Provided 1 8 Drill Bit Barrel Bolt Utility Knife Simpson Strong Tie x 8 7ROO UHH ZZZ EHDULFXGD FRP LQIR EHDULFXGD FRP Page 3 1 1 4 Finishing Square Drive Bit 2 1 2 1 1 4 3 4 Black 2 Black ...

Страница 4: ...ts as illustrated above Position Joists equally in Floor Joist Frame Use Small Floor Joist Frame as a template to determine joist posi tion Position Joist flush with framing 2 When correctly positioned attach each Joist with 4 2 1 2 screws 2 per end You can find the Square Drive Bit for the screws in with the Hardware Kit Bag Flush with framing Front of SpaceSaver You can find the Square Drive Bit...

Страница 5: ...o assist you Be careful when laying floor down not to bend or twist floor Note The floor will be flipped over and floor runners will sit on your foundation It is important to note that having a level foundation is critical Choosing a foundation will vary between regions Typical foundations can be concrete pads or patio stones positioned underneath the floor runners 6 When in place level floor comp...

Страница 6: ...ll Plate 9 Locate 4 Solid Wall Panels and 4 Wall Plates Attach Plates to bottom of studs of each wall panel with 3 2 1 2 screws Position plates flush with framing 7ROO UHH ZZZ EHDULFXGD FRP LQIR EHDULFXGD FRP Page 6 8 Position Plywood so it sits almost flush with outside of floor joist framing see Note When correctly positioned attach to all floor joists with 1 1 4 screws Use screws every 16 Note ...

Страница 7: ...ly smaller than floor framing Keep plywood seams tight Note Siding will overhang the floor by approx 1 2 When positioned correctly locate 2nd Solid Wall Panel and place in Corner Wall Plate Flush with floor framing Wall Siding Overhangs Floor by 1 2 12 Butt both vertical wall studs of side and rear walls together and attach with 3 2 5 screws Screw at the bottom middle and top of stud to secure pro...

Страница 8: ...When positioned correctly attach both wall panel studs together as per Step 12 with 3 2 1 2 screws 14 With Rear Wall Panel in place position other side wall panel on floor as per Step 10 11 Rear Wall Panel 15 Secure side wall panel to rear wall panel as per Step 12 Next locate Window Wall Panel and place in front corner Do Not Attach Walls To Floor until Step 30 7ROO UHH ZZZ EHDULFXGD FRP LQIR EHD...

Страница 9: ... Narrow Wall Panel and position once again so 2x3 bottom wall framing sits flush on floor and wall siding overhangs Note Narrow Wall Panel is only 73 high 18 Secure as per Step 12 19 Locate 3 wide Door Jamb and place on wall stud to the right of door opening Door Jamb 7ROO UHH ZZZ EHDULFXGD FRP LQIR EHDULFXGD FRP Page 9 ...

Страница 10: ...or Header to Door Jamb and Narrow Wall Panel top framing Header should sit flush with Door Jamb and Outside of Narrow Wall Panel Siding Attach with 3 2 1 2 screws Dado cut on edge 22 Locate an Angled Wall Extendor and place on side wall panel frame Note lap siding of Wall Extendor will cover lap siding of side wall Lap Siding of panels will fit together 7ROO UHH ZZZ EHDULFXGD FRP LQIR EHDULFXGD FR...

Страница 11: ... Wall framing by approximately 1 2 24 With Angled Wall Extendor and Side Wall aligned correctly secure together from the inside with 4 2 1 2 screws 25 Complete opposite Angled Wall Extendor positioning and attachment as per Steps 23 24 Extendor Framing overhangs Wall Framing by 1 2 Siding lines up Slight Gap 7ROO UHH ZZZ EHDULFXGD FRP LQIR EHDULFXGD FRP Page 11 ...

Страница 12: ...Extendor Wall Lap Siding of rear wall 27 With 2x3 wall framing aligned attach Wall Extendor to both the Angled Wall Extendor framing and the rear wall framing with 5 2 1 2 screws 28 Position and secure 2nd Wall Extendor Panel as per Steps 26 27 Attach together with 2 2 1 2 screws 7ROO UHH ZZZ EHDULFXGD FRP LQIR EHDULFXGD FRP Page 12 ...

Страница 13: ...sure wall panels are aligned correctly on the floor Refer to Step 11 Wall siding should overhang floor while 2x3 wall plates should sit flush with floor C Rafter and Roof Section Exploded view of all parts necessary to complete the Rafter and Roof Section Identify all parts prior to starting 5 1 2 Wide Filler Shingles not shown in Illustration Left Roof Panel Right Roof Panel Rear Soffit 2 3 wide ...

Страница 14: ...ter end Important Drill pilot holes in Soffit ends to prevent splitting Measure and attach interior Rafters as illustrated above Measure and attach remaining Soffit Rafter connections using 2 1 1 4 screws per rafter soffit 4 wide 3 wide 3 wide Rear Soffit Board 2 4 wide Front Soffit Board 2 48 21 3 4 21 3 4 96 A B C Front Soffit Mid Rafter Mid Rafter Front 3 wide Soffit 2 Screw center rafters toge...

Страница 15: ...n on top of walls Outside Rafters will sit on Extension Wall framing and be positioned equally from side to side 34 When Rafter Section is positioned correctly both Front and Rear Soffits will sit approximately 1 8 away from wall siding This can vary slightly 3 wide Soffit 4 wide Soffit Rear of SpaceSaver Front of SpaceSaver 7ROO UHH ZZZ EHDULFXGD FRP LQIR EHDULFXGD FRP Page 15 4 Wide Soffit to th...

Страница 16: ...ior rafters using 6 2 1 2 Screws Screw into rafters from inside of Header at front of shed and from inside of Extension Wall Framing at rear of shed 37 Correctly orientate Left Side Roof Panel with shingles overhanging the plywood on the outside left and shingles flush with plywood on the right Place on rafters with front of plywood flush with front of rafter Note trimmed shingles on roof panel to...

Страница 17: ...r panel 2 in total Make sure to screw into both rafters 38 For correct Roof Panel position align panel so plywood sits evenly on Center Rafters Complete both Roof Panels Exposure Line 39 With Roof Panel aligned screw panels down to center rafter with 2 2 1 2 screws in the bottom row of shingles 1 screw per panel Roof Seam 7ROO UHH ZZZ EHDULFXGD FRP LQIR EHDULFXGD FRP Page 17 Roof Panel centered on...

Страница 18: ...ring with 4 1 1 4 screws per Strong Tie Complete both sides Strong Ties Mid Rafter Plywood 3 2 1 2 screws Toe Nailed in each Mid Rafter 7ROO UHH ZZZ EHDULFXGD FRP LQIR EHDULFXGD FRP Page 18 43 To further secure roof panels from the inside drill pilot holes on an angle in each panel s Mid Rafter 3 per Rafter Using 3 2 1 2 screws secure rafters to plywood Note from outside have a helper push roof pa...

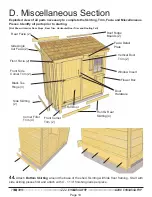
Страница 19: ...de Skirting 2 Window Insert Flower Box Side Angle Cut Facia 2 Front Side Corner Trim 2 Front Corner Trim 2 Corner Filler Trim 4 Front Rear Skirting 4 Full Door Black Tee Hinge 3 Door Hardware Vertical Door Trim 2 Facia Detail Plate Front Facia 2 44 Attach Bottom Skirting around the base of the shed Skirting will hide floor framing Start with side skirting pieces first and attach with 4 1 1 4 finis...

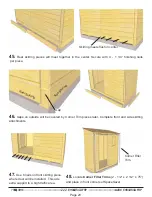
Страница 20: ... front and side skirting attachments 47 Use 6 nails on front skirting piece where door will be installed This ads extra support to a high traffic area 48 Locate Corner Filler Trims 2 1 2 x 2 1 2 x 75 and place in front corners of SpaceSaver Rear Skirting Gap Side Skirting Skirting meets flush in center Corner Filler Trim 7ROO UHH ZZZ EHDULFXGD FRP LQIR EHDULFXGD FRP Page 20 ...

Страница 21: ...ttach Corner Filler Trims in the rear as per Step 49 Angled Extendor Wall Corner Filler Trim 51 Locate Vertical Door Trims 2 1 2 x 2 1 2 x 78 3 4 Position Door Trim flush with outside narrow wall stud Trim should be aligned tight underneath Soffit Attach with 8 1 1 4 finishing nails Flush with Narrow Wall stud Left side Vertical Door Trim Toll Free 1 877 232 7428 www bearicuda com info bearicuda c...

Страница 22: ...2 54 Place both trims in front corner and align as illustrated above Do a dry run prior to attaching to achieve best fit Start with 4 1 2 wide Front Corner Trim and align tight underneath soffit to determine vertical height Attach with 8 1 1 4 finishing nails per piece Position and attach Front Side Corner Trim 2 1 2 wide using 8 1 1 4 nails 4 1 2 Skirting 55 To completely trim out rear corners lo...

Страница 23: ...inishing nails Place trim flush up against Soffit Attach Black Tee Hinges with 3 4 2 Black Screws Note illustration of Hinge may not be accurate The of screw holes in the hinge may vary from three to four depending on model 3 4 screws 2 Screws 58 Attach Door Hinges to Door Panel trim Position Hinges equally on door trim as shown above and attach with Black 3 4 and 2 screws Important Drill Pilot Ho...

Страница 24: ...m 2 Black Screws 59 With Hinges attached position door in opening Use Shim Shingles to establish gap 61 Make sure Door Panel is aligned evenly at top and edge When aligned correctly attach top and middle hinges to narrow trim with hinge hardware provided 62 Locate and identify all Facia pieces Front Facia is 4 wide while Rear Facia is 4 1 2 wide Side Angle Cut Facia is angle cut on both ends In fr...

Страница 25: ...ce on top of roof shingles evenly spaced between outside rafters and secure with 4 1 1 4 nails 66 Nail Roofing Felt down with 1 1 4 nails to ends of rafters Roofing Felt will slightly overhang rafters 67 Locate Rear Facia 4 1 2 wide and align with top edge of roof shingles Attach facia to rafter ends with 6 1 1 4 finishing nails per piece Complete both Rear Facia pieces Rear Facia aligned with top...

Страница 26: ...rst Roof Ridge Board at the rear of roof to cap off shingles and facia Ridge Board should meet on seam of roof panel Ridge Board should also completely cover Roofing Felt When aligned correctly attach with 4 1 1 4 nails Ridge Board caps Rear Facia 69 Locate Window Insert and Window Trim Package Before installing run a bead of caulking around window opening perimeter Position window in cavity and s...

Страница 27: ... hole only 73 Attach Facia Detail Plates to cover seams where Front and Rear Facia pieces come together Secure 4 1 1 4 finishing nails Note Rear Facia Detail Plate is slightly larger Toll Free 1 877 232 7428 www bearicuda com info bearicuda com Page 27 74 Assemble Flower Box Kit with Assembly Instructions found in Flower Box Kit Position completed Flower Box below bottom of window trim and secure ...

Страница 28: ...anel bottom framing so it sits flush with plywood Wall siding will overhang the floor by 1 2 Note make sure to use the Larger Floor Panel on the same side as doorway Narrow Wall Panel Rear view of SpaceSaver Rear Side Doorway B Follow sequential Steps 11 15 in the wall section for regular configuration to position and secure wall panels C With walls positioned and attached together locate Door Jam...

Страница 29: ...eft side flush with outside narrow wall stud Trim should also be aligned flush with bottom skirting Attach with 8 1 1 4 finishing nails See H for alternative method See Step 51 to finish Door Trim Optional Door Trim G Attach 1 Vertical and Horizontal Door Stop See Step 70 for detail Optional Door Trim cut 80 long Unused Vertical Door Stop 2 1 2 wide cut to 32 and 8 long for Horizontal Door Trim Do...

Страница 30: ...ould like to hear back from you on how well we are doing in the following areas 1 Customer Service 2 On Time Shipping 3 Motor Freight Delivery 4 Quality of Materials 5 Assembly Manual 6 Overall Satisfaction Toll Free 1 877 232 7428 www bearicuda com info bearicuda com The materials contained in this Assembly Manual may be downloaded or copied provided that ALL copies retain the copyright and any o...

Отзывы: