1.
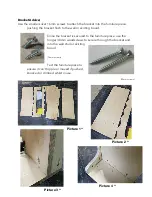
Open and lay out contents of package (Picture 1).
2.
Start by choosing one of the side pieces and lay it on a clean flat surface with
the pencil side up. (The pieces with a rounded corner) (Picture 2).
3. Starting with piece 1, screw in the two pocket hole screws into the side piece,
making sure the back of the piece lines up with the pencil markings, and the bottom
of the side and piece 1 are flush (Picture 3).
4. Repeat for pieces 2, 3 4 and 5 (Picture 4).
Please note, as our pieces are handmade, they can vary by a couple of mm, we
recommend ensuring the front of the shelves are flush with the front edge of the side
pieces, hiding variations in width at the back which won’t be visible.
All pencil markings can be sanded off (use the coarser brown paper first, finish with
the finer yellow paper). LBT = Left Back Top // RBT = Right Back Top.
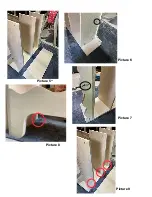
5. Once all pieces have been screwed into the side piece, place the 2nd side piece
pencil side up, symmetrically to the first side (match the round corner) (Picture 5).
6. Carefully flip the partially assembled toy shelf onto the 2nd side piece (Picture 5).
(
Safety note
-we recommend grabbing a friend to help you, although it can be done
individually).
7. Start screwing the pieces into the 2nd side piece, ensuring all numbers are
matched, and lines are adhered to. Please screw the middle pocket hole screws last
(circled in picture) (Picture 6 & 7).
8. Attach the angle brackets to the toy shelf in a convenient place, using the small
silver screws provided, and then secure the toy shelf to a wall or skirting board using
the larger gold screws (Pictures 8 & 9).
- We recommend attaching the bracket to the underside of a shelf, allowing you to
screw into a wall (See advisory photos on next page).
Please refer to our ‘Usage & Safety’ document for additional guidance. We hope you
enjoy your new bookshelf!
Contact us @bearwoodfurniture_ // [email protected]
Содержание Montessori Toy Shelf
Страница 4: ...Picture 5 Picture 6 Picture 7 Picture 8 Picture 9 ...
Страница 5: ......


