background image


  - 3 - 


Table of contents


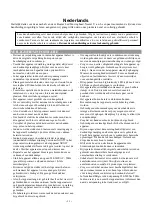
Safety Information 


1. Preface 

1.1 Packing list 


1.2 Unpacking instructions 


1.3 AC Power 


1.4 Safety instructions 


2. Introduction 


2.1 Features 


2.2 DMX channel 

3. Setup

3.1 Fuse replacement 

3.2 Fixture linking 

 Data cabling 


DMX data cable 


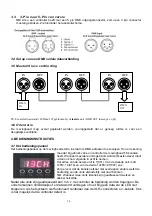
3.3 3-Pin to 5-Pin conversion chart 


3.4 Setting up a DMX serial data link 


3.5 Master/Slave fixture linking 


3.6 Orientation 


4. Operating instructions 


4.1 Navigating the control panel   

4.2 Menu map 


4.3 User  configurations 


Auto Run Mode 


DMX mode 

4.4 DMX channel values 

5. Technical specifications/Warranty conditions 


Содержание 150.518

Страница 1: ...MINI WASH 7X 10W DMX Ref nr 150 518 INSTRUCTION MANUAL GEBRUIKSAANWIJZING GEBRAUCHSANLEITUNG ...

Страница 2: ...o an earthed mains outlet 220 240Vac 50Hz protected by a 10 16A fuse During a thunderstorm or if the unit will not be used for a longer period of time unplug it from the mains The rule is Unplug it from the mains when not in use If the unit has not been used for a longer period of time condensation may occur Let the unit reach room temperature before you switch it on Never use the unit in humid ro...

Страница 3: ... is 220 240Vac 50Hz Check if power outlet match If you travel make sure that the mains voltage of the country is suitable for this unit This mark attracts the attention of the user to high voltages that are present inside the housing and that are of sufficient magnitude to cause a shock hazard This mark attracts the attention of the user to important instructions that are contained in the manual a...

Страница 4: ...p5 3 1 Fuse replacement 3 2 Fixture linking Data cabling DMX data cable 3 3 3 Pin to 5 Pin conversion chart 3 4 Setting up a DMX serial data link 3 5 Master Slave fixture linking 3 6 Orientation 4 Operating instructions 4 1 Navigating the control panel 4 2 Menu map 4 3 User configurations Auto Run Mode DMX mode 4 4 DMX channel values 5 Technical specifications Warranty conditions ...

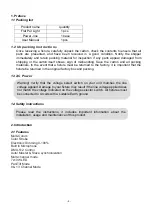
Страница 5: ...s Once receiving a fixture carefully unpack the carton check the contents to ensure that all parts are presented and have been received in a good condition Notify the shipper immediately and retain packing material for inspection if any parts appear damaged from shipping or the carton itself shows sign of mishandling Save the carton and all packing materials In the event that a fixture must be ret...

Страница 6: ...available in a 110v to 250v version Because line voltage may vary from venue to venue you should be sure your unit voltage matches the wall outlet voltage before attempting to operate you fixture 3 1 Fuse replacement With a flat head screwdriver wedge the fuse hold out of its housing Remove the damaged fuse from its holder and replace with exact same type fuse Insert the fuse holder back in its pl...

Страница 7: ...r of the next fixture consisting of a male 3 pin connector Then proceed to connect from the output as stated above to the input of the following fixture and so on 3 6 Orientation This fixture may be mounted in any position provided there is adequate room for ventilation 4 Operating instructions 4 1 Navigating the control panel Access control panel functions using the four panel buttons located dir...

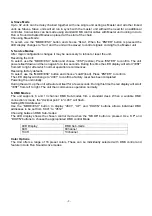
Страница 8: ...or rd s reversed UP and DOWN buttons cycle between the two settings Press the ENTER button to confirm the chosen selection 2 Auto Run Mode One of two Auto Run Sub modes can be selected with a choice of preset speeds This mode enables the unit to act as a Master to other Slave units Choosing Auto Run Sub modes To select use the MODE ESC button to show NAFA or NASL UP and DOWN buttons change between...

Страница 9: ... right after which normal operation recommences Restoring factory defaults To select use the MODE ESC button and choose LoAD load Press ENTER to confirm The LED display will change to d001 to confirm a factory reset has been completed Powering the unit initially During the warm up the unit will auto test itself for a few seconds During this time the led display will scroll rEST from left to right ...

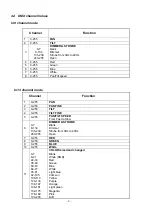
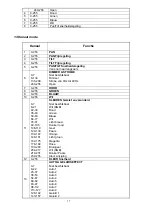
Страница 10: ...tion 1 0 255 PAN 2 0 255 PAN FINE 3 0 255 TILT 4 0 255 TILT FINE 5 0 255 PAN TILT SPEED From Fast to Slow 6 0 7 8 134 135 239 240 255 DIMMER STROBE Blank Dimmer Strobe from 0Hz to 40Hz Open 7 0 255 RED 8 0 255 GREEN 9 0 255 BLUE 10 0 255 White 11 0 7 8 21 22 34 35 49 50 63 64 77 78 91 92 105 106 119 120 133 134 147 148 161 162 175 176 189 190 203 COLOR mixed and changed Blank White RGB Red Green B...

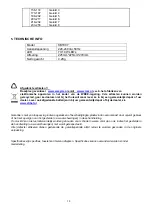
Страница 11: ...authorities or your dealer about the way to proceed The specifications are typical The actual values can slightly change from one unit to the other Specifications can be changed without prior notice WARRANTY CONDITIONS The date the product leaves the importer is considered to be the date the warranty begins The law obliges the retailer to offer a quarantee to the enduser Ask your retailer for the ...

Страница 12: ... en buiten gebruiken De behuizing wordt zeer warm raak deze dan ook niet aan bij gebruik én direct na gebruik Om ongevallen in bedrijven te voorkomen moét rekening worden gehouden met de daarvoor geldende richtlijnen en moeten de aanwijzingen waarschuwingen worden gevolgd Zorg voor een extra veiligheidsketting als het apparaat op hoogte wordt gehangen Gebruik een trusssysteem met clamps Ga nooit o...

Страница 13: ...oedgekeurd er mogen géén veranderingen modificaties worden doorgevoerd deze kunnen de CE status te niet doen met alle gevolgen van dien Tevens vervalt de garantie OPMERKING Om zeker te zijn van een correcte werking dient u dit apparaat in een ruimte te gebruiken waar de temperatuur tussen de 5 C 41 F en 35 C 95 F ligt 1 INLEIDING 1 1 Verpakking Mini Movinghead Netsnoer en Handleiding 1 2 Inhoud ve...

Страница 14: ...chroevendraaier de zekeringhouder open en verwijder de zekering Plaats een nieuwe zekering in de houder en draai deze weer vast 3 2 Meerdere movingheads Om een lichtshow te geven met meerdere movingheads of een aansluiting te maken indien meerdere movingheads tegelijkertijd moeten werken Master Slave heeft u een seriele dataverbinding nodig met gebruikmaking van een DMX 512 controller Sluit eerst ...

Страница 15: ...t bij gebruik van een controller de movinghead 13 kanalen heeft Wanneer meerdere units gebruikt worden Master slave dient u dan ook het volgende in acht te nemen Het adres van de eerste unit is 1 001 Van de tweede unit is dit 1 13 14 014 en van de derde 14 13 27 027 enz Zorg ervoor dat de kanalen elkaar niet overlappen anders werkt de bediening van de units afzonderlijk niet naar behoren NB Wannee...

Страница 16: ...e keuze te bevestigen Instelling Tilt normaal of Tilt omgekeerd Druk de MODE ESC toets en kies t L normaal of rt l omgekeerd Druk de UP en DOWN toetsen en kies uit de twee mogelijkheden Druk de ENTER toets om de keuze te bevestigen Instelling Normaal LED Display of omgekeerd Druk de MODE ESC toets en kies d s normaal of rd s omgekeerd Druk de UP en DOWN toetsen en kies uit de twee mogelijkheden Dr...

Страница 17: ...durende de warm up van de unit vindt een paar seconde automatisch een zelf test plaats Gedurende deze tijd zal de LED display de tekst rEST scrollen van links naar rechts waarna de unit klaar is voor gebruik 6 DMX Modes De unit ondersteunt 8 en 13 kanalen DMX Sub modes Wanneer een DMX verbinding is gemaakt zal de decimale punt in d 001 knipperen DMX Adressen instellen Gebruik de MODE ESC toets voo...

Страница 18: ...5 ROOD 8 0 255 GROEN 9 0 255 BLAUW 10 0 255 Wit 11 0 7 8 21 22 34 35 49 50 63 64 77 78 91 92 105 106 119 120 133 134 147 148 161 162 175 176 189 190 203 204 217 218 231 232 255 KLEUREN Gemixt en veranderd Niet beschikbaar Wit RGB Rood Groen Blauw Wit Licht blauw Donker rood Geel Paars Oranje Licht groen Magenta Rose Bruingeel Wit RGB Donker Paars Kleur wijziging 12 0 255 KLEUR Snelheid 13 0 7 8 22...

Страница 19: ...epot of uw dealer Lever ook afgedankte batterijen in bij uw gemeentelijk depot of bij de dealer zie www stibat nl Garantie is niet van toepassing indien ongelukken of beschadigingen plaatsvinden veroorzaakt door onjuist gebruik of het niet opvolgen van het gestelde o a waarschuwingen in deze handleiding Tronios BV kan niet verantwoordelijk worden gehouden voor schade in welke vorm dan ook indien h...

Страница 20: ...ich danach nicht das Gehäuse anfassen Um Unfällen in der Öffentlichkeit vorzubeugen müssen die geltenden Richtlinien beachtet und die Anweisungen Warnungen befolgt werden Wenn das Gerät an der Decke befestigt werden soll muss es mit einer zusätzlichen Sicherheitskette abgesichert werden Benutzen Sie ein Traversensystem mit Haken Während der Montage darf sich niemand im Bereich darunter aufhalten D...

Страница 21: ... die Auswirkungen berücksichtigen die die Effekte dieses Moving Head auf ihre Gesundheit haben können Das Gerät ist CE geprüft Daher dürfen KEINE Veränderungen vorgenommen werden Außerdem verfällt bei Veränderungen am Gerät jeglicher Garantieanspruch HINWEIS Um einen einwandfreien Betrieb zu gewährleisten muss die Raumtemperatur zwischen 5 und 35 C liegen 1 EINLEITUNG 1 1 Verpackung Mini Movinghea...

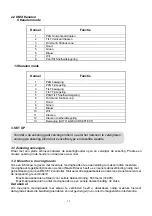
Страница 22: ...al Modus Kanal Funktion 1 PAN Horizontal drehen 2 TILT Vertikal drehen 3 Dimmer Stroboskop 4 Rot 5 Grün 6 Blau 7 Weiß 8 PAN TILT Drehzahlsteuerung 13 Kanal Modus Kanal Funktion 1 PAN Drehung 2 PAN Fine Abstimmung 3 TILT Drehung 4 TILT Fine Abstimmung 5 PAN TILT Drehzahlsteuerung 6 Dimmer Sroboskop 7 Rot 8 Grün 9 Blau 10 Weiß 11 Farben Mixed 12 Farben Drehzahlsteuerung 13 Bewegung AUTOmatik MUSIKge...

Страница 23: ...gnalkabel bevor Sie das Netzkabel mit einer Steckdose verbinden Die maximale empfohlene Entfernung führ serielle Datenverbindung beträgt ca 500 Meter Maximal empfohlene Anzahl von Moving Heads einer seriellen Datenverbindung 32 Stck Hinweis Um mehrere Moving Heads mit einander zu verbinden brauchen Sie Datenkabel Verwenden Sie hier bitte Data Grade Qualität Kabel die nicht anfälllig sind für Elect...

Страница 24: ...Daten empfangen werden blinkt die LED nicht Wenn die Anlage nicht funktioniert prüfen Sie die XLR Verbinder und Kabel Es ist ebenfalls möglich dass der Kontroller defekt ist Am Ausgang des letzten Geräts muss ein 120Ω 1W Abschlusswiderstand angebracht werden um eine korrekte Datenübertragung zu erhalten 4 2 Menu Mappe 6 Menüs von denen viele Untermenüs werden von der Einheit unterstützt Drücken Si...

Страница 25: ...t Fast fast oder SloU slow LED Display Text LED Display Text ändert sich in Sub mode NAFA Fast Fast Auto Run NASL SloU Slow Auto Run 3 Musikgesteuert Das Gerät reagiert auf Musik mit Hilfe eines Mikrofons Jedes Geräusch wird in einen Farbwechsel und eine andere Haltung des Kopfes umgewandelt Wählen Sie Musikgesteuert Drücken Sie die MODE ESC Taste und wählen Sie NStS Wenn die ENTER Taste gedrückt ...

Страница 26: ...erwenden Sie die MODE ESC Taste für die Adresse d001 mit den UP und DOWN Tasten können Sie die einzelne DMX Adressen d001 bis d512 einstellen DMX Sub Modi wählen Drücken Sie die Mode Taste Verwenden Sie die Tasten UP und DOWN zur Auswahl 8 Kanäle und 13 Kanäle Farb optionen Das Gerät bietet eine Auswahl von 16 voreingestellte Farben Sie können ausgewählt und verwendet werden im DMX Modus Auto Run ...

Страница 27: ... 255 ROT 8 0 255 GRÜN 9 0 255 BLAU 10 0 255 Weiß 11 0 7 8 21 22 34 35 49 50 63 64 77 78 91 92 105 106 119 120 133 134 147 148 161 162 175 176 189 190 203 204 217 218 231 232 255 FARBEN Mix Nicht verfügbar Weiss RGB Rot Grün Blau Weiß Hell Blau Dunkel rot Gelb Lila Orange Hell grün Purpurrot Rosa Braungelb Weiß RGB Dunkel Lila Farbwechsel 12 0 255 FARBE Tempo 13 0 7 8 22 23 37 38 53 54 67 68 82 AUT...

Страница 28: ...istrierungsnummer 21003000 BatterieG Lithiumbatterien und Akkupacks sollten nur im entladenen Zustand in die Altbatteriesammelgefäße bei Handel und bei öffentlich rechtlichen Entsorgungsträgern gegeben werden Bei nicht vollständig entladenen Batterien Vorsorge gegen Kurzschlüß treffen durch Isolieren der Pole mit Klebestreifen Der Entnutzer ist zur Rückgabe von Altbatterien gesetzlich verpflichtet...

Страница 29: ...9299 Fax 0031546589298 The Netherlands Product number 150 518 Product Description Beamz Mini Wash Movinghead 7x10W DMX Regulatory Requirement EN 60598 1 EN 60598 2 17 EN 61000 3 2 3 3 EN 55015 EN 61547 The product meets the requirements stated in the above mentioned Declaration s ALMELO 16 05 2011 Signature ...

Страница 30: ...www tronios com Copyright 2011 by TRONIOS the Netherlands ...

Отзывы: