background image

28 -

 Guía Rápida 

Quick Start Guide

¡Enhorabuena!

 Ha empezado a imprimir su primera pieza 3D con BCN3D Sigmax.

Congratulations! You have started printing your first 3D part with the BCN3D Sigmax.

Haz tu primera impresión dual 

Your first dual print

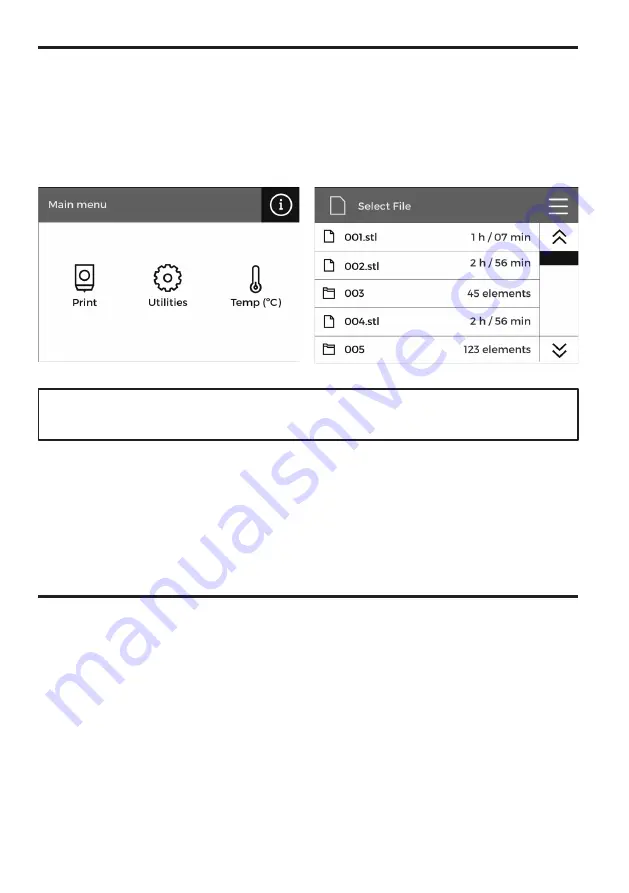
10.

 Seleccionar 

Print

 en el menú principal del 

display de la Sigmax.

Select Print in the main menu
of Sigmax’s display.

11. 

Seleccionar el archivo a imprimir.

Select the file to print.

Primera impresión Espejo/Duplicación 


First Mirror/Duplication print

1.

 Cargar los modelos a imprimir y moverlos, 

escalarlos o rotarlos según convenga.

Load files to print and move, scale or ratate the 
models as needed.

2.

 Seleccionar el perfil de impresión para el 

extrusor de la izquierda. Asegurarse de que el 
hotend y el material cargados en la derecha 
son los mismos que en la izquierda. 

 Select the printing profile for the Left Extruder. 
Make sure the hotend and material loaded at 
Right Extruder are the same than in the Left 
Extruder.

Содержание Sigmax

Страница 1: ...Guía Rápida Quick Start Guide ...

Страница 2: ......

Страница 3: ......

Страница 4: ...Youtube Check the Getting Started Playlist in our Youtube channel Queremos dar las gracias a todos los usuarios por su confianza en BCN3D por ayudarnos a llevar a cabo nuestros sueños y hacer un producto mejor cada día Antes de utilizar la impresora es necesario leer el manual completo disponible en la web y en la tarjeta SD Esta máquina no es un juguete La manipulación y uso de este producto requ...

Страница 5: ...Guía rápida Quick Start Guide ...

Страница 6: ...ank 7 Superficie de impresión de cristal Printing surface glass 8 Lector SD SD Reader 9 Pantalla táctil Touchscreen 10 Entrada de filamento Filament entry 11 Bobina de plástico Spool 12 Interruptor Switch 13 Plataforma Platform 14 Enchufe de alimentación Power plug 15 Puerto USB USB port 16 Soporte alimentación externa External feeding support 17 Guía alimentación externa External feeding guide 2 ...

Страница 7: ...Guía Rápida Quick Start Guide 7 Glosario Glossary 5 12 13 8 14 16 17 15 1 ...

Страница 8: ...ders SD card Cross head screwdriver Glue Stick Quick start guide 6 Clips USB and Power cable 3 Allen key Sample print Stickers 2 teflon tubes Printing surface glass 2 PLA spools Pliers Warranty 10 Shims Nylon filament 4 Flat cable clips 2 0 4mm Hotends Spatula Tarjeta SD Barra de pegamento 2 Bobinas de PLA Garantía Espátula 10 Galgas Cable USB y alimentación Pieza de muestra Pegatinas with 0 6mm h...

Страница 9: ...Guía Rápida Quick Start Guide 9 Desembalaje Unpacking 1 2 4 5 3 Sacar la máquina con ayuda de los flejes Take out the printer using the strap ...

Страница 10: ... la plataforma haciendo coincidir las ranuras Place the printing surface glass on the platform The slots must match 1 Manipular la superficie de impresión de cristal con cuidado En caso de rotura puede causar heridas The printing surface glass must be handled with care In case of breakage may cause injuries ...

Страница 11: ...Quick Start Guide 11 Puesta a punto Set up Colocar los soportes en las bobinas Place the spools holders on the spools 2 Encajar las bobinas y los soportes en los huecos indicados Fit them into the indicated holes 3 ...

Страница 12: ...nsert the Teflon tube until it stops 5 Insertar el otro extremo en el orificio del hotend Insert the opposite end of the teflon tube into the hotend s hole 6 Mover manualmente el eje Y hacia adelante para trabajar más cómodamente Move Y axis manually towards the front in order to work more comfortably 4 ...

Страница 13: ...Guía Rápida Quick Start Guide 13 Puesta a punto Set up Fijar los tubos de teflón con las anillas Attach the teflon tubes with the clips 7 ...

Страница 14: ... Guía Rápida Quick Start Guide Puesta a punto Set up Unir el tubo de teflón al cable del hotend con los clips de cable plano Put together the Teflon tube with the hotend cable using the flat cable clips 8 ...

Страница 15: ...a a punto Set up Conectar el cable de alimentación por la parte trasera de la Sigmax Connect the power supply cable The plug is located at the rear of the machine 9 Introducir la tarjeta SD en el lector Insert the SD card into the reader 10 ...

Страница 16: ... adjuntada y en la página web de BCN3D Soporte Sigmax Descargas Sigmax Printed Parts External Spool Support Alimentación externa de bobinas External Spool Feeding The Sigmax features an external feeding system to use bigger spools up to 300mm in diameter at the back of the printer The STL file for the external spool support can be found both in the SD card attached and in the BCN3D website Support...

Страница 17: ... alimentación eléctrica La espátula es una herramienta afilada que puede producir lesiones Utilizarla solamente para eliminar restos de impresión derivadas del proceso de calibración asistida Take care about the indications of security spread out on the printer and those which appear in the screen Do not put any object neither any part of the body between the mobile parts of the printer when it is...

Страница 18: ...ilament Pulsar Next 4 Select material Elegir PLA 6 Repetir el proceso para el otro extrusor Repeat all the process with the other extruder 5 Seguir las instrucciones Follow screen s instructions Press Next Press Accept Choose PLA 8 Calibrado de la superficie de impresión de cristal Printing surface glass calibration 9 Girar los tornillos de calibración según indica la pantalla Turn calibration scr...

Страница 19: ...o por favor consulte la sección Instalación de galgas página 22 para una explicación detallada y sobre cómo proceder con esta operación If so please check next section Installing shims page 22 for a detailed explanation of the reason benefits and procedure to perform this operation 16 Elegir la pareja más alineada Choose best aligned couple of lines Puesta en marcha Getting started 1 10 1 10 1 5 1...

Страница 20: ... necesario para corregir la desviación The Sigmax automatically corrects the offsets when printing in Duplication Mirror modes However this correction distorts the first layer of the model by repeating it as many times as needed Modos Espejo y Duplicación Mirror and Duplication modes Para hacerlo exitosamente es muy importante garantizar que ambas boquillas están a la misma altura Sin embargo por ...

Страница 21: ...s los usuarios que planeen usar frecuentemente los modos de impresión Espejo y Duplicación Modos Espejo y Duplicación Mirror and Duplication modes To avoid such distortion there are different options 1 Enable raft in Cura The offset will be corrected in the first layers of the raft so the model won t be affected by any Z offset 2 Install shims to mechanically correct the Z offset Printing a raft t...

Страница 22: ...hims as were indicated in the screen Apagar la máquina Turn off the machine Bien durante el proceso de Full Calibration o antes de imprimir un archivo en modo Espejo o Duplicación la Sigmax puede recomendar la instalación de galgas para corregir la diferencia de alturas entre boquillas Una vez se confirme que se desea instalar galgas recordar el número de galgas a instalar y el cabezal a operar y ...

Страница 23: ...Guía Rápida Quick Start Guide 23 Instalación de Cura BCN3D BCN3D Cura installation ...

Страница 24: ...n that has been developed by BCN3D Cura is an open source software that adapts exceptionally well to the new IDEX independent dual extrusor functionality Just as other Gcode generator softwares Cura sections the 3D model in layers and establish a difference between the perimeter and the infill of the object In order to provide a better printing experience the version developed by BCN3D contains a ...

Страница 25: ... dual Your first dual print 1 Abrir BCN3D Cura previamente descargado e instalado Open BCN3D Cura that previously downloaded and installed 2 Seleccionar BCN3D Sigmax dentro del menú Select your machine Select BCN3D Sigmax in the main menu Select your machine ...

Страница 26: ...impresión dual Your first dual print 5 Asignar el extrusor con el que imprimir cada modelo Assign the extruder to print with for each model 3 Clicar sobre el botón Open File Click Open File 4 Seleccionar los archivos a imprimir Select files to print ...

Страница 27: ...era impresión dual Your first dual print 7 Seleccionar perfil de impresión El proceso de preparación del archivo de impresión empezará automáticamente Select profile The printing file generation will start automatically 6 Seleccionar los modelos pulsando SHIFT Clic izquierdo Los modelos seleccionados estarán resaltados con un contorno azul Clic derecho en cualquiera de los modelos y clic en la opc...

Страница 28: ... archivo a imprimir Select the file to print Primera impresión Espejo Duplicación First Mirror Duplication print 1 Cargar los modelos a imprimir y moverlos escalarlos o rotarlos según convenga Load files to print and move scale or ratate the models as needed 2 Seleccionar el perfil de impresión para el extrusor de la izquierda Asegurarse de que el hotend y el material cargados en la derecha son lo...

Страница 29: ...hivo e imprimir Save file and print 4 El volumen de impresión disponible se reduce y los modelos cargados se desplazan a la izquierda donde aún pueden modificarse Se previsualizan los modelos duplicados o en modo espejo en la derecha Note how the available printing volume reduces and the models loaded automatically move to the left These models can still be modified A preview of the duplicated or ...

Страница 30: ......

Страница 31: ......

Страница 32: ...32 Guía Rápida Quick Start Guide MX 2018 1 ...

Отзывы: