background image

– 16 –

T R A D I T I O N A L   S E R I E S   S T R A I G H T   M O D E L   •   G R E E N H O U S E   I N S T R U C T I O N S

Aluminum Frame Assembly 

& Installation 

(contd.)

E

G

H

F

5.

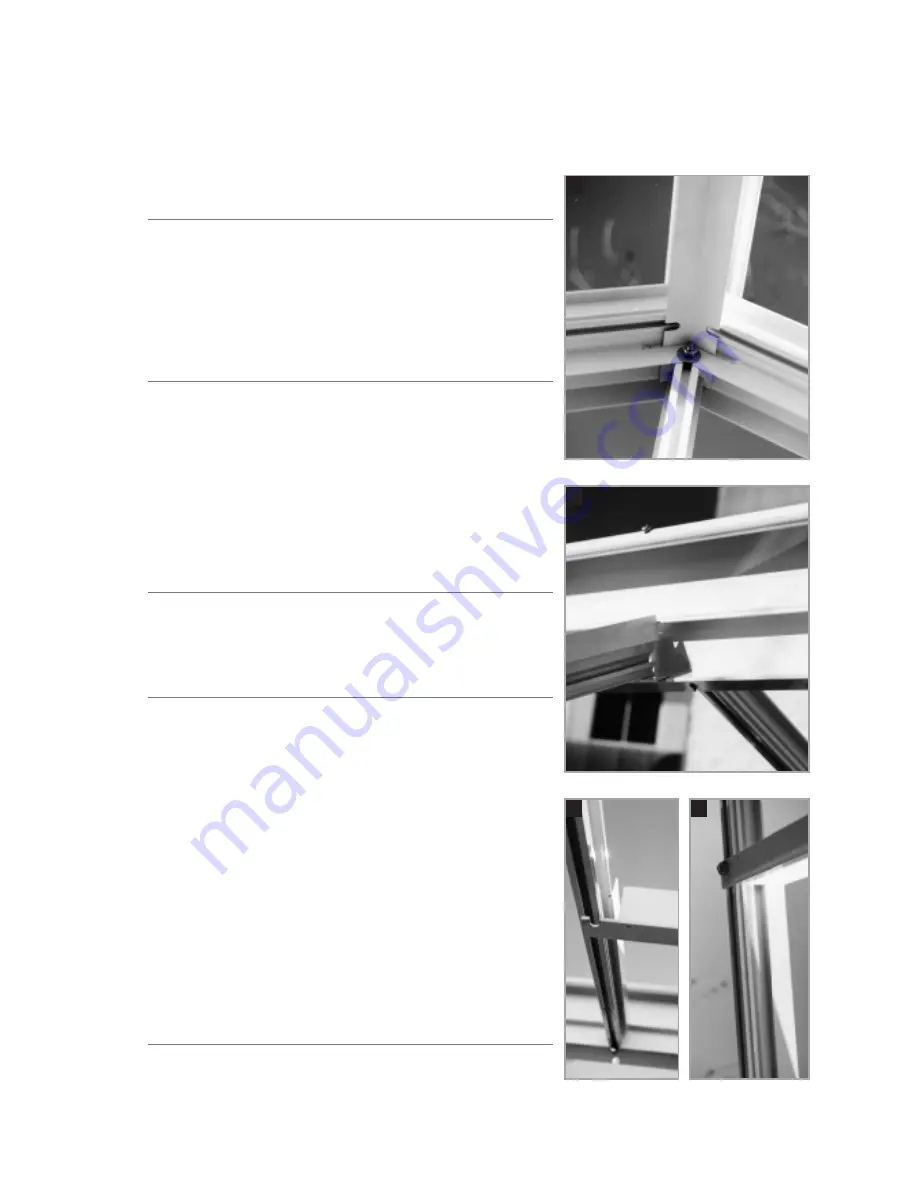
RIDGE

For a small greenhouse, you handle the ridge by yourself.
Over 12' long it be easier with 2 people. Set the ridge on
top of the end rafters in the middle of the greenhouse.
Push the end rafter out and drop the ridge down 2" and
slide it in-between as far as it goes. The bolt track in the
glass bar lines up with the punch mark in the ridge.
Undo the bolt and slide it up and fasten it 

(See Pic E).

5A. TRUSS ASSEMBLY INSTALLATION

(See Appendix F).

6.

GLASS BAR WITH VENT SLIDERS

Each glass bar has a small vent frame slider on it. They
are marked 1/2/3/4 etc. On the ridge there will be the
same markings. Slide a bolt in the top and 2 in the
bottom of the glass bar and tighten. Put into place with
the angle cut on top. Note that the numbers are the same
so it can be lined up with the slots in the Ridge and
gutter. Then fasten. 

(See Pic F).

7.

VENT FRAME BOTTOM SECTION

The vent frame bottom is now in between the glass bars
that you have just installed 

(See Pic G). 

The 2" side of

the angle faces towards the Ridge 

(See Pic H). 

Move the

bolt up the glass bar and fasten it.

8.

REMAINING GLASS BARS

All remaining glass bars can now be installed. Make sure
that the top is against the ridge. Before you tighten the
glass bar on the gutter, eyeball the gutter to see if it is
straight. There is usually about a 1/8" space between the
glass bar and the gutter.

9.

Fasten the greenhouse base/sill to the foundation using
#8 x 1” screws 

(if it is on concrete, drill holes using a concrete

bit and push the plugs into the holes)

. If possible, seal below

he base before fastening the greenhouse to the
foundation. 

(See Page 21).

10.

Your greenhouse is now ready for putting on the 1/8"
foam strips. Do not put the foam strips on the base or
beside the door. Only use the foam on the glass bars &
gutter. 

(See Page 22).

Note:

Make sure the greenhouse is fastened to the

foundation with 1" screws.

OPTIONALS

Side vents, intake shutters and exhaust fan installation.
See Appendix A – F.

3

3

Содержание Traditional Free Standing Glass Greenhouses

Страница 1: ...Traditional Series Free Standing GlassGreenhouses GREENHOUSE INSTRUCTIONS B C G T H E G A R D E N E R S C H O I C E S I N C E 1 9 5 1 M A Y 2 0 0 3...

Страница 2: ...6 9 Fastening The Base Sill To The Foundation 10 Taping Glass bars with Foam 22 Side Vents Intake Shutter Polycarbonate Roof and Exhaust Fan Installation if necessary See Appendices B through F Glass...

Страница 3: ...use Try to locate your greenhouse for easy access especially to the necessary power and water that is required for greenhouse gardening Please watch the enclosed video and follow the steps in this man...

Страница 4: ...wing Details 1 5 12 Assembly Outline Steps 1 5 17 18 Steps 6 9 19 21 Door Installation 28 Vent Assembly Exploded View 29 Vent Detail 31 Truss Assembly Appendix A Vent Opener Appendix B Intake Shutter...

Страница 5: ...on 9 64 aluminum bit 15 64 aluminum bit fastening perlins to trusses larger greenhouses 7 16 wrench Razor blade cutter Caulking gun Ladder Hammer Optionals Automatic Opener Circulating Fan Max Min the...

Страница 6: ...10 cm deep and 8 20 cm wide gravel bed Wood timbers can be stacked to increase the height of the greenhouse One advantage of the wood foundation is that it is not classified as a permanent structure T...

Страница 7: ...T R A D I T I O N A L S E R I E S S T R A I G H T M O D E L G R E E N H O U S E I N S T R U C T I O N S 6...

Страница 8: ...R U C T I O N S Front Gable End with door Line Drawing Assembly Procedure 1 2 3 4 5 7 6 7 Base Corner Post Corner Post End Rafter Glass Bar Glass Bar Door Frame Door Frame Header Plates 4 hole End Ra...

Страница 9: ...sill and the doorframe sides using 1 4 x 1 2 stainless steel bolts see Pic A Before tightening the bolts be sure that it is square If you ordered a greenhouse with a door drop measure from the bottom...

Страница 10: ...ould match the roof slope See Pic E The 1 x 2 angle above the door 50 long can now be bolted on The 1 4 round holes should be lined up with the holes in the plates See Pic F Each end of the 1 x 2 angl...

Страница 11: ...of the glass bar before you put on the end rafter See Pic H 6 At this point you can install all the end glass bars A smaller greenhouse will only have 1 bar above the door See Pic I The centre bar us...

Страница 12: ...T R A D I T I O N A L S E R I E S S T R A I G H T M O D E L G R E E N H O U S E I N S T R U C T I O N S 11...

Страница 13: ...I O N A L S E R I E S S T R A I G H T M O D E L G R E E N H O U S E I N S T R U C T I O N S Back Gable End Line Drawing Assembly Procedure 1 2 3 4 5 12 Base Corner Posts Glass Bars Back Brace End Raf...

Страница 14: ...have the 1 side with the slot punches out facing up See Pic A 2 Bolt the corner post onto the base angle See Pic B 3 Bolt on all the end bars to the base Make sure that the longest bar is in the cente...

Страница 15: ...e end of the gutter and base See Pic E 2 Bolt the glass bars to the base A B Sidewall Assembly C D E Lay out the sidewall with the gutter at the top base at the bottom See Pic A You will notice that e...

Страница 16: ...it down and up approx 3 and tighten the bolts Now stand up the end wall Slide the gutter sidewall in between the end rafter and the corner post There should be a 1 8 space See Pic B By sliding the gu...

Страница 17: ...in the Ridge and gutter Then fasten See Pic F 7 VENT FRAME BOTTOM SECTION The vent frame bottom is now in between the glass bars that you have just installed See Pic G The 2 side of the angle faces t...

Страница 18: ...O N A L S E R I E S S T R A I G H T M O D E L G R E E N H O U S E I N S T R U C T I O N S Step 1 Stand up Side Wall or Endwall Step 2 3 Bolt Side Wall to Back Gable End Assembly Outline Step 3 Bolt o...

Страница 19: ...T R A D I T I O N A L S E R I E S S T R A I G H T M O D E L G R E E N H O U S E I N S T R U C T I O N S Step 5 Ridge Step 4 Side Wall Front View Inside Right View 18...

Страница 20: ...T R A D I T I O N A L S E R I E S S T R A I G H T M O D E L G R E E N H O U S E I N S T R U C T I O N S Step 6 Roof Glass bar with Vent Frame Sliders 19 1 1 2 2...

Страница 21: ...20 T R A D I T I O N A L S E R I E S S T R A I G H T M O D E L G R E E N H O U S E I N S T R U C T I O N S Step 7 Vent Frame Bottom...

Страница 22: ...1 T R A D I T I O N A L S E R I E S S T R A I G H T M O D E L G R E E N H O U S E I N S T R U C T I O N S Step 8 Install all remaining roof bars Step 9 Fasten the greenhouse base sill to the foundatio...

Страница 23: ...lowly roll down the tape toward the outer edge and press it down at the same time See Pictures Be careful because sometimes the edge of the paper is quite sharp Do not remove the paper until later NOT...

Страница 24: ...post All glass is a 3mm 24 oz thickness unless it is a special order When handling glass put one hand on the bottom and one hand on the side Do not hold the glass flat on your hands When laying out t...

Страница 25: ...rews too tightly Also do not put a screw in the top hole of the cap When the first piece of glass and cap is installed go to the next bay Finish off the bottom row on one side only B Install the next...

Страница 26: ...he second row of Roof Glass overlapping the first 1 2 Settle the glass against the cap See Pic B The second row of caps are 1 longer than the glass When you put them on the first hole in the cap lines...

Страница 27: ...ceeding row has the same size glass as per sketch but they overlap the previous row by 1 2 and are held in place by an Alum Cap see Side Glazing Do not caulk the bottom where the glass rests on the ba...

Страница 28: ...um to the wood concrete base It can also be used to fill the air gaps between the glass and aluminum frame However for most people silicone is easier to use when sealing aluminum to glass The areas th...

Страница 29: ...lates and move the frame to make it square When it is in place tighten all the bolts Next install the door handle see the instructions inside the box To install the door catch angle slide in two bolts...

Страница 30: ...S S T R A I G H T M O D E L G R E E N H O U S E I N S T R U C T I O N S Door Installation Plan View Vertical Jamb Base Base Base Door Vertical Jamb Plate Base INSIDE GREENHOUSE OUTSIDE GREENHOUSE Z B...

Страница 31: ...hinge the other side and center bar Make sure that the Glass bars fit tightly into the gutter and hinge after the vent is assembled 5 Turn it over and square it up 6 Put the 1 8 foam on the Glass bars...

Страница 32: ...31 T R A D I T I O N A L S E R I E S S T R A I G H T M O D E L G R E E N H O U S E I N S T R U C T I O N S Vent Assembly Exploded View...

Страница 33: ...32 T R A D I T I O N A L S E R I E S S T R A I G H T M O D E L G R E E N H O U S E I N S T R U C T I O N S Glass Greenhouse Roof Vent Details...

Страница 34: ...33 T R A D I T I O N A L S E R I E S S T R A I G H T M O D E L G R E E N H O U S E I N S T R U C T I O N S Sketches Free Standing Greenhouse Models No 600 to 2000...

Страница 35: ...the greenhouse and put the feet on your foundation between the side base sill Lift the top of the truss towards the ridge and bolt it on Use the notch on either side of the center There are three notc...

Страница 36: ...tion of Cleat Connection 1 4 x 1 2 S S Bolts 1 4 x 2 S S Bolts 2 1 4 x 2 S S Bolts Drill 5 32 Hole Fasten with 8 Teck Screw Truss Foot Piece Truss Ridge Piece Ridge Detail Optional 8 Screw Drill 3 32...

Страница 37: ...stainless steel screws to fasten the Bayliss and the vent sill 1 and the vent 2 All holes are already drilled After the Bayliss is fastened in place install the threaded adjuster into the swivel bloc...

Страница 38: ...beside fan bottom Temporarily tighten Insert fan in square cutout of acrylic piece Slide bolts into slots on angle and tighten Seal around shutter on outside 1 4 x 1 2 S S Bolt Inside Fan Cage Fan Mo...

Страница 39: ...41 2 2 x 1 x 1 8 Aluminum Angle Locking Handle GLASS POLYCARBONATE GLASS POLYCARBONATE Locking Handle 1 4 x 1 2 S S Bolt Inside 1 Slide slider on inside foam track of glass poly bar where side vent is...

Страница 40: ...39 T R A D I T I O N A L S E R I E S S T R A I G H T M O D E L G R E E N H O U S E I N S T R U C T I O N S Appendix E Side Vent CONTINUED...

Страница 41: ...40 T R A D I T I O N A L S E R I E S S T R A I G H T M O D E L G R E E N H O U S E I N S T R U C T I O N S Appendix F Glass Louvre GLASS OR POLYCARBONATE GLASS LOUVRE ASSEMBLY...

Страница 42: ...PANEL INSTALLATION NOTE When you install the roof panels start on the far side of the roof vent opening Work towards the vent opening When installing the last pieces in the roof you can reach it throu...

Страница 43: ...42 T R A D I T I O N A L S E R I E S S T R A I G H T M O D E L G R E E N H O U S E I N S T R U C T I O N S Appendix G Polycarbonate Panels Cap Installation CONTINUED 4 5 6 7 1 2 3...

Страница 44: ...I O N A L S E R I E S S T R A I G H T M O D E L G R E E N H O U S E I N S T R U C T I O N S Atthispoint standbackandenjoyyourworkmanship YourTraditionalGreenhouse shouldnowbeclosedinandreadyforuse Con...

Отзывы: