background image

Содержание 720-0267

Страница 1: ...ASSEMBLY OPERATING INSTRUCTIONS MODEL 720 0267 FOR OUTDOOR USE ONLY PLEASE CONTACT 1 866 984 7455 FOR ASSISTANCE DO NOT RETURN TO PLACE OF PURCHASE ...

Страница 2: ... SECTION THREE Gas hook up 14 Leak testing 15 Operation Instructions 16 Grill lighting instruction 17 SECTION FIVE Care and maintenance 18 Lighting Illustration 19 To match light the grill 20 Troubleshooting 21 SECTION SIX Exploded view 22 Parts list 23 Ordering parts 24 Grill hints 24 SECTION SEVEN Grill Cooking Chart 25 SECTION EIGHT Grill recipe suggestions 27 SECTION NINE Warranty 30 ...

Страница 3: ...lid 4 If odor continues immediately call your gas supplier or your fire department FOR YOUR SAFETY 1 Do not store or use gasoline or other flammable vapors and liquids in the vicinity of this or any other appliance 2 An LP cylinder not connected for use shall not be stored in the vicinity of this or any other appliance ...

Страница 4: ...hat may occur during future use Read this booklet carefully and be sure your gas grill is properly assembled installed and maintained Failure to follow these instructions could result in serious bodily injury and or property damage This gas grill in intended for outdoor use only and is not intended to be installed in or on recreational vehicles or boats NOTE TO INSTALLER Leave these instructions w...

Страница 5: ...nown by the State of California to cause cancer or reproductive harm California law requires businesses to warn customers of potential exposure to such substances To minimize exposure to these substances always operate this unit according to the use and care manual ensuring you provide good ventilation when cooking with gas SAFETY PRACTICES TO AVOID PERSONAL INJURY When properly cared for your sta...

Страница 6: ... the grill do not touch the grill rack burner grate or immediate surroundings as these areas become extremely hot and could cause burns Use only dry potholders Grease is flammable Let hot grease cool before attempting to handle it Avoid letting excess grease deposits collect in the grease tray at the bottom of the grill s firebox Clean often DO NOT USE ALUMINUM FOIL TO LINE THE GRILL RACKS OR GRIL...

Страница 7: ...itions If located in a consistently windy area oceanfront mountaintop etc a windbreak will be required see below Always adhere to the specified clearance NEVER USE A DENTED OR RUSTY PROPANE TANK DO NOT USE BRIQUETTES OF ANY KIND IN THE GRILL PLACEMENT OF THE GRILL CLEARANCE To Non Combustible Construction A minimum of 3 clearance from the back of the grill to non combustible construction is requir...

Страница 8: ...ded The following hardware is provided Item Descri pti on SCALE 1 1 Speci fi cati on QJant i ty crossed round head screw 1 2 3 4 5 6 7 8 crossed round head screw crossed round head screw crossed round head screw v_sher v_sher hex nut fl at v_sher 1 4x 40re_ 1 4x 15nm 1 4x 1Onto 5 32x 1Onto 1 4 5 32 1 4 1 4 8pcs 4pcs 17pcs 2pcs 25pcs 2pcs 2pcs 6pcs ...

Страница 9: ... carton Remove hardware attached to panel legs to secure 2 plastic wheels with hex nuts washers Then screw in regular casters with brake on opposite panel legs as shown in figure below STEP 2 Attach bottom panel to side panel legs with 8 pieces crossed round head screws 1 4 x 40 mm and washers to secure bottom panel and side panel legs ii iii ...

Страница 10: ...legs with 4 pieces crossed round head screws 1 4 x 10mm and washers as shown ft lure below STEP 4 Attached and secure the cart frame crossed bar to the top back of both side panels by using 4 pieces 1 4 x 10 mm crossed round head screws washers ...

Страница 11: ...ure to cart frame Caution Head unit is heavy to avoid injury we strongly recommend 2 or more persons for this step STEP 6 Secure the head unit to cart with 4 pieces crossed round head screws 1 4 x 15mm and fiat washers as shown on diagram below Note Remove cooking grids and flame tamers before this step ...

Страница 12: ... the right panel leg with 1 piece crossed round head screw 1 4 x10 and washer as below shown STEP 8 Attach left side shelf with 4 pieces crossed round head screws 1 4 x 10mm and washers as shown on below figure Repeat the above step to install the shelf on right 10 ...

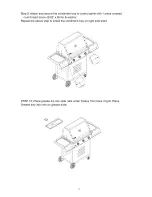
Страница 13: ... panel with 1 piece crossed round head screw 5 32 x 8mm washer Repeat the above step to install the condiment tray on right side shelf STEP 10 Place grease dip into slide rails under firebox from back of grill Place Grease tray into rails on grease slide 1 ...

Страница 14: ...STEP 11 Place L P tank in tank seat hole and secure with retention wing bolt 12 ...

Страница 15: ...th the positive terminal facing outward Replace the ignition battery cap after the battery has been installed PROPANE TANK ASSEMBLE Attach regulator to prop tank turning the regulator noble clockwise and by hand until tight as shown in figure below LP gas cylinder must be fitted with a listed overfill prevention device OPD 13 ...

Страница 16: ...ply cylinder valve outlet specified as applicable for connection type QCC1 in the standard for compressed gas cylinder valve outlet and inlet connection ANSI CGA V 1 Manifold pressure operating 10 water column W C non operating 11 2 water column W C L P GAS HOOK UP Ensure that the black plastic grommets on the LP cylinder valve are in place and that the hose does not come into contact with the gre...

Страница 17: ...s indicate leaks Disconnected L P cylinders must have threaded valve plugs tightly installed and must not be stored in a building garage or any other enclosed area The gas must be turned off at the supply cylinder when the unit is not in use If the appliance is stored indoors the cylinder must be disconnected and removed from the appliance Cylinders must be stored outdoors in a well ventilated are...

Страница 18: ...rill marks DO NOT LEAVE THE GRILL UNATTENDED WHILE COOKING USING THE GRILL Grilling requires high heat for searing and proper browning Most foods are cooked at the HI heat setting for the entire cooking time However when grilling large pieces of meat or poultry it may be necessary to turn the heat to a lower setting after the initial browning This cooks the food through without burning the outside...

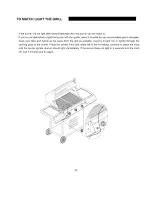
Страница 19: ...ent however variations in the local gas supply may take minor adjustments necessary Burner flames should be blue and stable with no yellow tips excessive noise or lifting If any of these conditions exist call our customer service line If the flame is yellow it indicates insufficient air tf the flame is noisy and tends to lift away from the burner it indicates too much air TO MATCH LIGHT THE GRILL ...

Страница 20: ...ill is allowed to cool before cleaning cleaning will be more difficult ENSURE THAT THE GAS SUPPLY AND THE KNOBS ARE IN THE OFF POSITION MAKE SURE THE RANGETOP BURNER IS COOL BEFORE REMOVAL GRILL BURNERS Extreme care should be taken when moving a burner as it must be correctly centered on the orifice before any attempt is made to relight the grill Frequency of cleaning will depend on how often you ...

Страница 21: ... Side Burner Lighting Illustration Step 1 Make sure the Lid is open Step 2 Push and turn one of main knobs to HI position Step 3 You may need 3 or 4 trials to light the burner After the burner is lit adjust the knob as desired 19 ...

Страница 22: ...ccumulated gas to dissipate Keep your face and hands as far away from the grill as possible Insert a lit light rod or lighter through the cooking grids to the burner Press the control knob and rotate left to the HI setting continue to press the knob until the burner ignites Burner should light immediately If the burner does not light in 4 seconds turn the knob off wait 5 minutes and try again 2O ...

Страница 23: ... the grill does not function properly use the following checklist before contacting your dealer for service You may save yourself the cost of a service call PROBLEMS WHAT TO DO Grill will not light when the control knob is rotated Check to see if the LP tank is empty Clean wire s and or electrode with rubbing alcohol and a clean swab Wipe with a dry cloth Make sure the wire is connected to the ele...

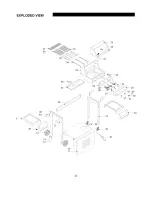
Страница 24: ...EXPLODED VIEW 21 37 _ii ii i ii _k ii ii ii ii ii ii ii ii ii 34 _ 35 22 ...

Страница 25: ...Box 1 8 Cart Frame Cross Bar 1 27 Ignition line 3 9 Left Cart Panel Legs 1 28 Control Panel 1 10 Left side shelf bracket 2 29 Control Knob Seat Bezel 3 11 Right side shelf bracket 2 30 Control Knob 3 12 Side Shelf 2 31 Electric Ignition Cover 1 13 Wheels 2 32 Condiment Tray Left 1 14 Screw thread cover 2 33 RT Cart Panel Legs 1 15 Screw thread staff 2 34 Retention Wing Bolt 1 16 Bottom Panel 1 35 ...

Страница 26: ... or grill dealer before making the conversion Different orifices must be installed when converting from one type of gas to another You will also need a data plate indicating what type of gas is used by the grill GRILLING HINTS The preparation of meat whether rare medium or well done is affected to a large degree by the thickness of the cut The cooking time is affected by the type of meat the size ...

Страница 27: ...ll rotating occasionally Dot with butter or margarine Wrap in heavy duty foil Grill turning occasionally Green beans Sprouts Broccoli Brussels French fries MEATS BEEF Medium 15 to 30 minutes Place in aluminum foil pan Grill stirring occasionally Hamburgers Tenderloin Porterhouse Rib eye Rare Medium Well done 1 2 to 3 4 inch 1 inch Medium High High 10 to 18 minutes 8 to 15 minutes 8 to 14 minutes G...

Страница 28: ... turning occasionally Pork During lastfewminutes brush with barbecue sauce turning several times Hamsteaks 1 2inchslices High 4 to8 minutes Remove excess fatfromedges precooked Slashremaining fatat 2inch intervals Grill turning once Medium 5to 10minutes Slitskin Grill turning once Lowor 1to 1 1 2hours Medium 30to45minutes 8to 15minutes Medium to High 3 4to1inch Placeskin side up Grill turninc andb...

Страница 29: ... black pepper 1 tsp sugar tsp paprika 1 clove garlic Peel grate onion and add rest of the ingredients except the pork chops Mix well Pour over chops and marinate one hour in a cool place Turn the BBQ grill on full Heat 10 minutes BBQ the chops brushing with the marinade occasionally Serve with mixed salad dressed with vinaigrette flavored with fresh dill 3 tbs chopped parsley 1 tbs vegetable oil 1...

Страница 30: ...g heat tortillas on grill Slice meat across grain in thin slices Placeon hot platter Squeeze lemonjuice over Wrap meat and any of the following toppingsin tortillas chopped tomatoes guacamole sour cream tacosauce BEEFANDLAMBKABOBS Serve4 lb bonelesssirloinor beef cutinto1 cubes lb bonelessloinof lambcut into1 cubes 2 3c water divided c chopped onion 2tbs soysauce c vegetable oil divided 1tbs darkb...

Страница 31: ... and tighten At the beginning of the rack and to its center penetrate the second rib with the pointed end of the spit and push it between the meat Skip a couple and continue the process until the entire rack is accordion pleated Fasten the second meat hook into the rack Turn your rotis burner on high Rotis for 50 minutes or until done PORK ROAST Apple cider vinegar basting sauce 1 c apple cider vi...

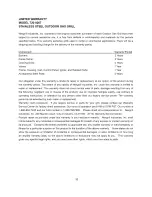
Страница 32: ...operating instructions or alteration by any person other than our factory service center The warranty period is not extended by such repair or replacement Warranty claim procedure tf you require service or parts for your grill please contact our Warranty Service Center for factory direct assistance Our hours of operation are 8 AM to 5 PM PST Our number is 1 866 984 7455 and our FAX number is 1 909...

Отзывы: