bbf A175003B Скачать руководство пользователя страница 6

USE AND CARE

A175003B

1.To clean, use a soft cloth slightly dampened with water.
2.Do not use abrasive cleaners or spray liquids.
3.Periodically check that all fasteners are tightened.
4.The height adjustable desk has electric motors and is designed for use in 
dry work areas only.
5.Service inquiries? Operators are standing by at our
TOLL−FREE help line 1−800−950−4782 USA/CANADA, 
001−800−950−4782 MEXICO  
 
1.Para limpiar, use un paño suave ligeramente humedecido con agua. 
2.No use limpiadores abrasivos o rociadores. 
3.Compruebe periódicamente que todos los sujetadores estén apretados. 
4.El escritorio de altura regulable tiene motores eléctricos y está diseñado 
para su uso en sólo en las zonas de trabajo secas.
5.Preguntas sobre servicio? Los operadores están haciendo una pausa en 
nuestra Línea de ayuda gratuita 1−800−950−4782 EE.UU. / Canadá, 
001−800−950−4782 MEXICO
 
1.Pour nettoyer, utilisez un chiffon doux légèrement humidifié avec de l’eau.
2.Ne pas utiliser de nettoyants abrasifs ou de liquides en aérosol. 
3.Vérifier périodiquement que toutes les fixations sont serrées. 
4.Le bureau réglable en hauteur a des moteurs électriques et est conçu 
pour une utilisation dans les zones de travail sèches.
5.Demandes de service? Les opérateurs se tiennent à notre 
Ligne d’aide SANS FRAIS 1−800−950−4782 USA / CANADA, 
001−800−950−4782 MEXIQUE
 

TECHNICAL SPECIFICATIONS


HEIGHT RANGE WITHOUT TOP

 600mm (23.6") - 1250mm (49.2")

BASE WIDTH

1092mm (43") - 1803mm (71")

TRAVEL SPEED

38mm (1.5") PER SECOND (NO 

LOAD)

WEIGHT CAPACITY

200lbs.

DUTY CYCLE

10% MAX. 2 MINS ON, 18MINS 

OFF


SOFT START/STOP


ADJUSTABLE LEVELING STUDS


4 MEMORY PRESETS


Содержание A175003B

Страница 1: ...ASSEMBLY INSTRUCTIONS Part Number A175003B Height Adjustable Table Base NEED HELP Call 1 800 950 4782 www bbffits com Keep manual for future reference...

Страница 2: ...raves The area surrounding desk must be clear of all obstacles that may interfere with the desk s path Do not place objects taller than 20 inches 508mm underneath desk Obstacles may cause desk to beco...

Страница 3: ...NG ADVERTENCIA AVERTISSEMENT Do not lean against sit on stand on crawl or lie underneath desk frame Death or serious injury may result if desk becomes unstable or a person becomes trapped under desk N...

Страница 4: ...graves Pinch points may be created by placing desk too close to other furniture or objects Maintain a minimum of 1 inch 25mm clearance between desk and all other furniture objects at all times Failure...

Страница 5: ...la longitud del cable adecuado para todos los dispositivos principales escritorio sobre todo el recorrido hacia arriba abajo del escritorio Los dispositivos con demasiado corta de cuerdas pueden volc...

Страница 6: ...rabajo secas 5 Preguntas sobre servicio Los operadores est n haciendo una pausa en nuestra L nea de ayuda gratuita 1 800 950 4782 EE UU Canad 001 800 950 4782 MEXICO 1 Pour nettoyer utilisez un chiffo...

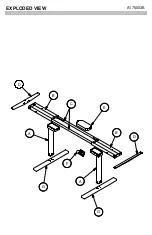
Страница 7: ...EXPLODED VIEW A175003B D B C B D G A F G A E...

Страница 8: ...24D GREY HATB30DGM 03K A 2 H175004 LEG GREY B 2 H175006 CROSSBAR ENDS GREY C 2 H175023 CENTER RAILS GREY D 2 H175007 SIDE BRACKETS GREY E 1 H175242 CONTROL BOX F 1 H175009 SWITCH G 2 H175013 FEET 30D...

Страница 9: ...uantity 24 M6 x 14 H175014 Quantity 8 M6 x 10 H175015 Quantity 8 M5 x 20 H175016 Quantity 4 M5 x 16 H175017 Quantity 24 M6 x 14 H175024 Quantity 8 M6 x 10 H175025 Quantity 8 M5 x 20 H175026 HATB24DGM...

Страница 10: ...HARDWARE A175003B Quantity 1 H175010 Quantity 2 H175011 Quantity 4 H175012 Quantity 10 H175018 Quantity 1 H26328 10A 125V Power Cord Cable Cable Clip 4mm Allen Wrench PRE INSTALLED Leveler...

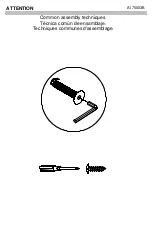
Страница 11: ...ATTENTION Common assembly techniques T cnica com n de ensamblaje Techniques communes d assemblage A175003B...

Страница 12: ...or M nimo 25 4 mm 1 d Epaisseur Minimum HATB30DGM 03K HATB30DBL 03K 25 4mm 1 Thick Minimum 25 4 mm 1 de Espesor M nimo 25 4 mm 1 d Epaisseur Minimum Desktop Size Escritorio Tama o Taille Desktop 1117...

Страница 13: ...2 STEP A175003B B B B B C C Slide Open Deslice Abierta Glisser Ouvert...

Страница 14: ...3 STEP A175003B B A x2 M6x14 8 4mm ALLEN WRENCH Do not fully tighten No apriete completamente Ne serrez pas compl tement...

Страница 15: ...step Todos los tornillos deben apretarse completamente despu s de este paso Toutes les vis doivent tre serr es apr s cette tape Tighten these screws after side screws are installed Apriete los tornil...

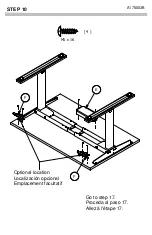
Страница 16: ...5 STEP A175003B C C B B...

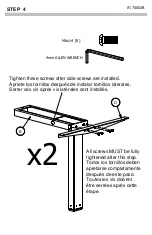
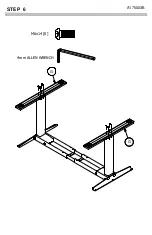
Страница 17: ...6 STEP A175003B G G M6x14 8 4mm ALLEN WRENCH...

Страница 18: ...Si los agujeros de montuira existen proceda al paso 8 Si les trous de montage existent deja a l etape 8 If mounting holes do NOT exist proceed to step 11 Si no existen agujeros de montaje contin e con...

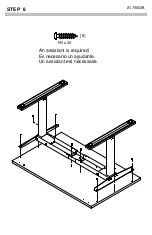
Страница 19: ...8 STEP A175003B An assistant is required Es necesario un ayudante Un assistant est n cessaire 8 M5 x 20...

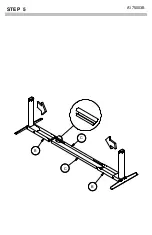
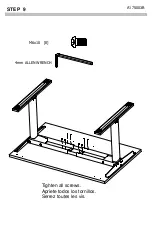
Страница 20: ...9 STEP A175003B M6x10 8 4mm ALLEN WRENCH Tighten all screws Apriete todos los tornillos Serrez toutes les vis...

Страница 21: ...10 STEP A175003B Optional location Localizaci n opcional Emplacement facultatif Go to step 17 Proceda al paso 17 Allez l tape 17 F F 4 M5 x 16 E...

Страница 22: ...t the feet do not stick past the edge of the top shelf Centre la unidad de modo que los pies no se pegan m s all del borde del estante superior Centrer l appareil de sorte que les pieds ne collent pas...

Страница 23: ...12 STEP A175003B M6x10 8 Tighten all screws Apriete todos los tornillos Serrez toutes les vis 4mm ALLEN WRENCH...

Страница 24: ...13 STEP A175003B 3 32 2 5mm DRILL 3 8 10mm DEEP 8 HOLES 8 HOYOS 8 TROUS...

Страница 25: ...14 STEP A175003B 8 M5 x 20...

Страница 26: ...where along the front edge but it is recommended that it be placed toward an end to prevent interference with a chair when seated Coloque el interruptor de modo que la parte frontal del interruptor es...

Страница 27: ...16 STEP A175003B 4 M5 x 16...

Страница 28: ...bles como se muestra Branchez les c bles comme indiqu 2 1 10 Use Cable Clips to secure the cables and cord Utilice Cable Clips para sujetar los cables y el cable Utilisez Clips c bles pour fixer les c...

Страница 29: ...18 STEP A175003B An assistant is required Es necesario un ayudante Un assistant est n cessaire...

Страница 30: ...ser bureau Reset Procedure 1 Unplug the power cord for at least 20 seconds 2 Plug the Power cord back in 3 Push and hold the down button until base travels fully down stops then rises slightly 4 The d...

Страница 31: ...los botones arriba abajo hasta encontrar la altura deseada a continuaci n pulse y suelte el bot n M seguido de un bot n de 1 4 n mero Mantenga pulsado un bot n de n mero para volver a una altura prees...

Страница 32: ...21 STEP A175003B Maximum Weight 200 Lbs Peso M ximo 200 Libras Poids Maximum 90 7 kilogramme...

Страница 33: ...detected Desktop overloaded Reduce desktop load Check for interference with walls or other objects Desk Base does not attain preset height ON No Obstructions above or below desk surface Remove obstru...

Страница 34: ...ncia con las paredes u otros objetos Escritorio Base no alcanza la altura preestablecida Activado No Las obstrucciones por encima o por debajo de la superficie del escritorio Elimine las obstrucciones...

Страница 35: ...du bureau V rifiez les interf rences avec des murs ou d autres objets Bureau de base n atteint pas la hauteur pr d finie ON rien Obstacles au dessus ou en dessous de la surface de bureau Enlevez les o...

Отзывы: