GT 9
Tachogenerator
Montage- und Betriebsanleitung
Mounting and operating instructions
M
B
02
3 - 1
10
55
62
7
au
m
er
_G
T9
_I
I_
D
E-
E
N
(1
9A
1)
Страница 1: ...GT 9 Tachogenerator Montage und Betriebsanleitung Mounting and operating instructions MB023 11055627 Baumer_GT9_II_DE EN 19A1 ...
Страница 2: ...3 5 1 Einseitig offene Hohlwelle 13 5 1 1 Standard IP00 und mit Abdeckhaube und Verschraubung IP44 13 5 1 2 Standard IP00 mit Abdeckhaube und Verschraubung IP44 und mit Passfedernut 13 5 1 3 Mit Abdeckhaube und Kabeltülle IP44 14 5 2 Konuswelle 14 5 2 1 Standard IP00 und mit Abdeckhaube und Verschraubung IP44 14 6 Elektrischer Anschluss 15 7 Betrieb und Wartung 16 7 1 Austausch der Kohlebürsten 16...
Страница 3: ... 13 5 1 Blind hollow shaft 13 5 1 1 Standard IP00 and with cover and cable gland IP44 13 5 1 2 Standard IP00 with cover and cable gland IP44 and with key slot 13 5 1 3 With cover and cable sleeve IP44 14 5 2 Cone shaft 14 5 2 1 Standard IP00 and with cover and cable gland IP44 14 6 Electrical connection 15 7 Operation and maintenance 16 7 1 Replace of the carbon brushes 16 8 Dismounting 17 8 1 Ste...
Страница 4: ...mitätserklärung gemäß den europäischen Richtlinien 1 7 Wir gewähren 2 Jahre Gewährleistung im Rahmen der Bedingungen des Zentralverbandes der Elektroindustrie ZVEI 1 8 Das Gerät darf nur wie in dieser Anleitung beschrieben geöffnet werden Reparaturen oder Wartungsarbeiten die ein vollständiges Öffnen des Gerätes erfordern sind ausschließlich vom Hersteller durchzuführen Am Gerät dürfen keine Verän...
Страница 5: ...the European Directives 1 7 We grant a 2 year warranty in accordance with the regulations of the ZVEI Central Association of the German Electrical Industry 1 8 The device may be only opened as described in this instruction Repair or maintenance work that requires opening the device completely must be carried out by the manufacturer Alterations of the device are not permitted 1 9 In the event of qu...
Страница 6: ...ammerschläge können zur Zerstörung des Gerätes führen Niemals Gewalt anwenden Bei sachgemäßer Montage lässt sich alles leichtgängig zusammenfügen Für die Demontage geeignetes Abziehwerkzeug benutzen 2 4 Zerstörungsgefahr durch Verschmutzung Schmutz kann im Gerät zu dessen Beschädigung führen Während aller Arbeiten am Gerät auf absolute Sauberkeit achten Niemals Öl oder Fett in das Innere des Gerät...
Страница 7: ...k Violent shocks e g due to hammer impacts can lead to the destruction of the device Never use force Mounting is simple when correct procedure is followed Use suitable puller for dismounting 2 4 Risk of destruction due to contamination Dirt penetrating inside the device can damage the device Absolute cleanliness must be maintained when carrying out any work on the device Never allow lubricants to ...
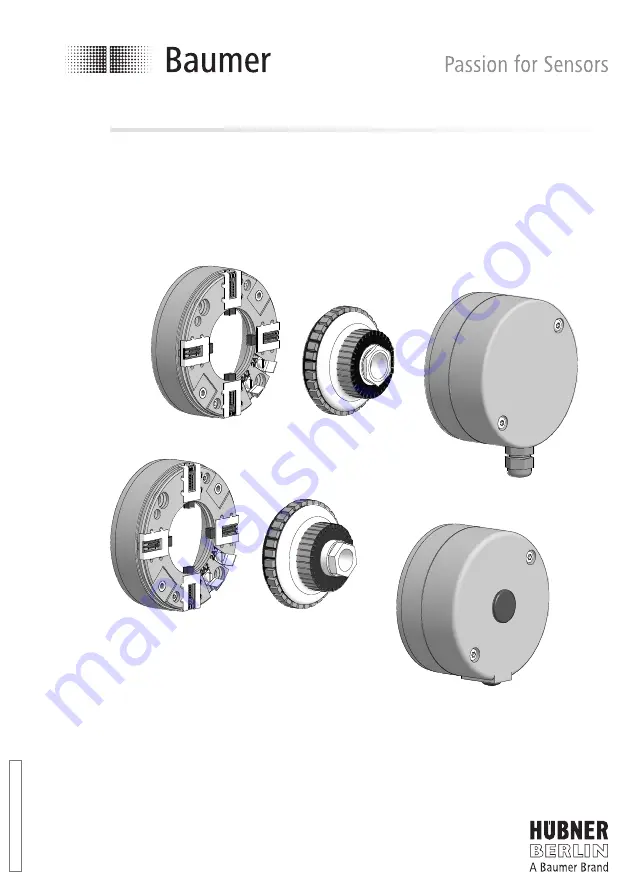
Страница 8: ... HV1218 1 Je nach Version 1 Stator 2 Carbon brushes 4x also available as accessory see section 7 3 Connecting terminal see section 6 4 1 Armature with blind hollow shaft 4a 1 Clamping element 4b 1 Plug 5 1 Armature with cone shaft 6 1 Cover 7 1 Washer A4 DIN 137 8 1 Torx screw M4x20 mm 9 1 Cable gland M12x1 5 mm 10 1 Cable sleeve HV1218 1 Depending on version 1 4 6 9 10 6 7 8 5 4a 4b 2 3 1 1 1 1 1...
Страница 9: ...t Konuswelle nicht im Lieferumfang enthalten 3 3 Required for dismounting only for version with cone shaft not included in scope of delivery 16 Gewindestift M6x10 mm ISO 7436 17 Abdrückschraube M8x45 mm ISO 4762 16 Grub screw M6x10 mm ISO 7436 17 Jack screw M8x45 mm ISO 4762 16 17 15 3 4 Erforderliches Werkzeug nicht im Lieferumfang enthalten 3 4 Required tools not included in scope of delivery 5 ...
Страница 10: ... und Parallelversatz erfolgen The device must be mounted on the drive with the least possible angular error and parallel misalignment Die Antriebswelle sollte einen möglichst kleinen Rundlauffehler aufweisen Rundlauffehler verursa chen Vibrationen die die Lebensdauer des Gerätes verkürzen können The drive shaft should have as less runout as possible Runouts can cause vibrations which can shorten t...
Страница 11: ...er verursa chen Vibrationen die die Lebensdauer des Gerätes verkürzen können The drive shaft should have as less runout as possible Runouts can cause vibrations which can shorten the service life of the device Antriebswelle einfetten Lubricate drive shaft Siehe Seite 5 See page 5 4 2 Schritt 1 Konuswelle 4 2 Step 1 Cone shaft Ansicht X View X Ansicht Y View Y M6 ø17 ø89 H7 9 20 4 5 ø 7 4 2x M5 1 1...
Страница 12: ... 2 Einseitig offene Hohlwelle 4 3 Step 2 Blind hollow shaft 4 4 Schritt 2 Konuswelle 4 4 Step 2 Cone shaft Zul Anzugsmoment Max tightening torque Mt 3 4 Nm Zul Anzugsmoment Max tightening torque Mt 3 4 Nm Siehe Seite 5 oder 6 See page 5 or 6 13 12 5 4 4a 4b 22 mm 19 mm 5 mm ...
Страница 13: ... 11055627 Baumer_GT9_II_DE EN 19A1 10 Montage Mounting 4 4 5 Schritt 3 4 5 Step 3 Zul Anzugsmoment Max tightening torque Mt 3 Nm 4 6 Schritt 4 4 6 Step 4 11 1 14 Siehe Seite 5 oder 6 See page 5 or 6 1 2x8 mm ...
Страница 14: ...rd 4 8 Schritt 5 Mit Abdeckhaube und Ver schraubung 4 7 Step 5 With cover and cable gland Ansicht Z siehe Abschnitt 6 View Z see section 6 Ansicht Z siehe Abschnitt 6 View Z see section 6 6 7 8 9 15 15 Siehe Seite 5 oder 6 See page 5 or 6 3 3 Zul Anzugsmoment Max tightening torque Mt 2 3 Nm TX 20 14 mm ...
Страница 15: ... erhöhtem Kohlebürstenver schleiß führen Do not use cable with silicone Atmospheres containing silicone can increase the wearout of the carbon brushes Zur Gewährleistung der angegebenen Schutzart sind nur geeignete Kabel durchmesser zu verwenden To ensure the specified protection of the device the correct cable diameter must be used i Wir empfehlen das Gerät so zu montieren dass der Kabelanschluss...
Страница 16: ...ing direction ødH7 L1 L2 12 13 6 4 16 18 1 5 5 Abmessungen 5 1 Einseitig offene Hohlwelle 5 1 1 Standard IP00 und mit Abdeckhaube und Verschraubung IP44 81026 81053 81101 81102 81031 81032 5 Dimensions 5 1 Blind hollow shaft 5 1 1 Standard IP00 and with cover and cable gland IP44 81026 81053 81101 81102 81031 81032 Drehrichtung positiv Positive rotating direction ødH7 12 14 16 Alle Abmessungen in ...
Страница 17: ...ng positiv Positive rotating direction 5 2 Konuswelle 5 2 1 Standard IP00 und mit Abdeckhaube und Verschraubung IP44 81251 81252 5 2 Cone shaft 5 2 1 Standard IP00 and with cover and cable gland IP44 81251 81252 Drehrichtung positiv Positive rotating direction Alle Abmessungen in Millimeter wenn nicht anders angegeben All dimensions in millimeters unless otherwise stated ...
Страница 18: ...nection 6 Elektrischer Anschluss Polarität bei positiver Drehrichtung siehe Abschnitt 5 1 und 5 2 6 Electrical connection Polarity at positive rotating direction see section 5 1 and 5 2 2A1 2A2 Ansicht Z Anschlussklemmen siehe Abschnitt 4 7 View Z Connecting terminal see section 4 7 ...
Страница 19: ...st 7 Operation and maintenance 7 1 Replace of the carbon brushes When the minimum carbon brush length of 5 5 mm L is reached the carbon brushes should be replaced and the com mutator area should be cleaned with dry compressed air in order to ensure perfect operation Betrieb und Wartung Operation and maintenance 7 2 Kohlebürsten als Zubehör erhältlich 1 Satz 4 Stück Qualität H87 Bestellnummer 11076...
Страница 20: ... Demontage Dismounting 8 Demontage 8 1 Schritt 1 Standard 8 Dismounting 8 1 Step 1 Standard 8 2 Schritt 1 Mit Abdeckhaube und Ver schraubung 8 2 Step 1 With cover and cable gland 6 7 8 9 15 15 Siehe Seite 5 oder 6 See page 5 or 6 3 3 TX 20 14 mm ...
Страница 21: ...GT9_II_DE EN 19A1 18 Demontage Dismounting 8 8 4 Schritt 2 8 4 Step 2 8 3 Schritt 1 Mit Abdeckhaube und Ka beltülle 8 3 Step 1 With cover and cable sleeve 6 7 8 10 15 3 Siehe Seite 5 oder 6 See page 5 or 6 14 TX 20 1 2x8 mm ...
Страница 22: ...ting 8 7 Schritt 3 Konuswelle 8 7 Step 3 Cone shaft Siehe Seite 5 oder 6 See page 5 or 6 12 13 8 6 Schritt 4 Einseitig offene Hohlwelle 8 6 Step 4 Blind hollow shaft 4 4a 4b 8 5 Schritt 3 Einseitig offene Hohlwelle 8 5 Step 3 Blind hollow shaft 4 22 mm 19 mm 5 mm ...
Страница 23: ...A1 20 Demontage Dismounting 8 8 8 Schritt 4 Konuswelle 8 8 Step 4 Cone shaft 8 9 Schritt 5 Konuswelle 8 9 Step 5 Cone shaft 8 10 Schritt 6 Konuswelle 8 10 Step 6 Cone shaft Siehe Seite 5 oder 6 See page 5 or 6 16 17 16 19 mm 6 mm 0 8x4 mm ...
Страница 24: ... 9 µs Leerlaufspannung 10 20 mV pro U min je nach Bestellung Störfestigkeit EN 61000 6 2 Störaussendung EN 61000 6 3 Zulassung CE 9 2 Technische Daten mechanisch Baugröße Flansch ø89 mm Wellenart ø12 16 mm einseitig offene Hohlwelle ø17 mm Konuswelle 1 10 Schutzart DIN EN 60529 IP00 IP44 mit Abdeckhaube Drehmoment 0 35 Ncm Trägheitsmoment Rotor 0 95 kgcm2 Werkstoffe Gehäuse Edelstahl Kunststoff We...
Страница 25: ...000 0 nmax U0 mV U min RL kΩ RL kΩ RL kΩ nmax U min RA 20 C Ω LA mH GT9 06L 410 10 5 12 27 9000 105 40 GT9 06L 420 20 20 48 108 9000 370 169 Überlagerte Welligkeit für τRC 0 3 ms 0 5 Spitze Spitze 0 25 effektiv 9 3 Daten nach Typ Polarität bei positiver Drehrichtung siehe Abschnitt 5 2A1 2A2 VDE 9 4 Ersatzschaltbild RA LA U0 n U n RL 2A1 R 2A2 Tachogenerator C U n U0 n U0 n für R RL RA τRC R C τA ...
Страница 26: ... Open circuit voltage 10 20 mV per rpm as ordered Interference immunity EN 61000 6 2 Emitted interference EN 61000 6 3 Approval CE 9 2 Technical data mechanical design Size flange ø89 mm Shaft type ø12 16 mm blind hollow shaft ø17 mm cone shaft 1 10 Protection DIN EN 60529 IP00 IP44 with cover Torque 0 35 Ncm Rotor moment of inertia 0 95 kgcm2 Materials Housing stainless steel plastic Shaft stainl...
Страница 27: ...V rpm RL kΩ RL kΩ RL kΩ nmax rpm RA 20 C Ω LA mH GT9 06L 410 10 5 12 27 9000 105 40 GT9 06L 420 20 20 48 108 9000 370 169 Superimposed ripple for τRC 0 3 ms 0 5 peak peak 0 25 rms 9 3 Type data Polarity for positive direction of rotation see section 5 2A1 2A2 VDE 9 4 Replacement switching diagram U n U0 n U0 n for R RL RA τRC R C τA LA RL RL RA RL RA LA U0 n U n RL 2A1 R 2A2 Tachogenerator C n U n...
Страница 28: ...ion Originalsprache der Anleitung ist Deutsch Technische Änderungen vorbehalten Original language of this instruction is German Technical modifications reserved 10 Accessories Mounting cone Order number 11056815 Carbon brushes 1 set 4 pieces quality H87 Order number 11076211 Tool kit Order number 11068265 10 Zubehör Montagekegel Bestellnummer 11056815 Kohlebürsten 1 Satz 4 Stück Qualität H87 Beste...